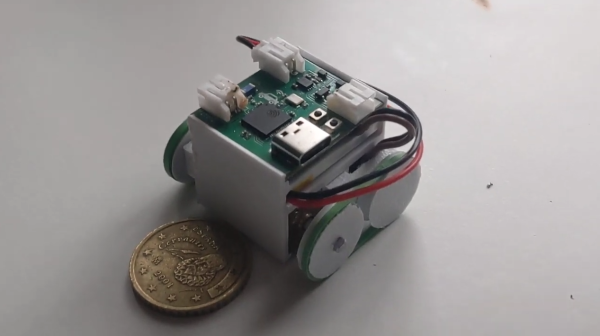
Nevermore Is What You Get When Engineers Design Air Filters For 3D Printers

What happens when an air filter for 3D printers gets designed by engineers with a passion for function, a refusal to compromise, and a desire to do without bad smells or fumes? You get the Nevermore, a design for a recirculating active-carbon filtration system to deal with VOCs (volatile organic compounds) from 3D printing.

3D-printable parts and an easy-to-fill chamber for bulk-activated carbon make this recirculating air filter for VOCs a smart, space-saving design.

The Nevermore Micro (and larger Nevermore Max) were originally intended to complement the Voron 3D printer design, but are made such that they can be used with just about anything else. These filters use 3D-printable parts, and are designed to be easily filled (and refilled) using bulk-activated carbon instead of some kind of proprietary pre-packed filter like most commercial offerings. The Voron project is all about a printer without compromises, and the Nevermore comes from that same design ethos.

A Nevermore filter sits inside the build chamber, and works by recirculating air inside while passing it through the activated carbon. The idea is that by concentrating on dealing with the problem at the source inside a relatively small build chamber, one doesn’t need a lot of airflow. A small recirculating air filter can do the job efficiently, though for best results, the build chamber should be as sealed as possible.

One interesting caution is that it seems not all activated carbon is the same, and it is absolutely crucial to use only acid-free, steam-activated (not acid-washed) carbon in a recirculating filter like the Nevermore. There are horrifying photos of oxidized metal surfaces resulting from using acid-residue carbon, some of which took only minutes to occur. Thankfully, there are pointers to trusted sources for the known-good stuff.

It’s known that 3D printing results in chemical and particle emissions. These differ significantly depending on both material and type of printer, but it’s enough of an issue to warrant attention. One deals with particulates with something like a HEPA filter, but VOCs require a carbon filter. This is where the Nevermore comes in. Active carbon filters will wear out simply from exposure to the air, so if one is serious about cleaning VOCs when printing, it is definitely worth looking into bulk carbon with a design like the Nevermore.

Hackaday Prize 2022: Treadmill Becomes Human-Powered Generator

Running on a treadmill is a great way to workout, but what if the effort you put in could be put to use? This treadmill generator from [Amitabh Shrivastava] does just that.

The build starts with a regular old treadmill, which has a motor inside typically used to power the tread. Instead, the motor’s control electronics were removed, and it was repurposed to work as a generator. The output from the treadmill’s DC motor was fed directly to a DC-DC converter. This was then fed to an inverter that generates 120 V AC, which can power appliances that use up to 20-25W based on [tinkrmind’s] running performance.

It’s a fun way to generate power during a workout. If you don’t want your treadmill’s monitor to die in the middle of a Friends rerun, you’ll have to dig deep on those long runs. We’ve seen similar builds before too, with exercise bikes being a popular method of generating electricity. In fact, that’s [Amitabh]’s next project! Video after the break.

Continue reading “Hackaday Prize 2022: Treadmill Becomes Human-Powered Generator”

This Pico-W IoT Starter Project Gets You Into Home Assistant Quick As A Flash

Many of us hacker types with some hardware knowledge and a smattering of embedded experience would like to get into home automation, but there can be quite a learning curve. If you’re looking for a hackable starting point; something to deploy, learn about and then later expand upon, then look no further than the PicoW Home Assistant Starter project from [Danilo Campos].

The project is based upon the arduino-pico core, which supports a whole pile of RP2040-based boards, so you don’t need to restrict yourself to the “official” Pico-W, so long as you have working networking, Wi-Fi or otherwise. Integration is provided by the arduino-home-assistant library, which acts as the bridge between your sensors and other widgets, MQTT, and thence the network beyond. Events and sensor data on the end-point are packaged up with MQTT and published out to the broker via the network provided, all for minimal initial effort. Once you’ve got the basic connectivity to your Home Assistant instance working, there are many code examples in the arduino-home-assistant GitHub page to give you a helping start to connect whatever tickles your fancy.

It turns out we’ve covered HA quite a bit on these fair pages, like for example, these sweet automated window blinds. Another hack uses load cells under the bed legs to detect if someone is in bed or not, and if this isn’t your thing, maybe your idea of a home assistant is a bit more like this one?

Streamlining The Toolchain

Sometimes I try to do something magical, and it works. Most of the time this happens because other people have done a good part of the work for me, and shared it. I just cobble a bunch of existing tools into a flow that fits my needs. But the sum of all the parts is often less than the whole, when too many of the steps involve human intervention. Tools made for people simply keep the people in the loop.

For instance, I wanted to take a drawing that my son made into a stamp, by way of a CNC machine and whatever scrap wood we have kicking around in the basement. It’s easy enough, really. Take the photo, maybe use a little tweaking in GIMP to get the levels right, export it into Inkscape for the line detection and maybe even make the GCode right there, or take it off to any convenient SVG-to-GCode tool.

While this works straight out of the box for me, it turns out that’s because I have experience with all of the sub-tools. First, it helps a lot if you get the exposure right in the first place, and that’s not trivial when your camera’s light meter is aiming for grey, but the drawing is on white paper. Knowing this, you could set it up to always overexpose, I guess.

Still, there’s some experience needed in post-processing. If you haven’t played around with both image processing and image editing software, you don’t know how they’re going to interact. And finally, there are more parameters to tweak to get the CNC milling done than a beginner should have to decide.

In short, I had a toolchain up and running in a jiffy, and that’s a success. But in terms of passing it on to my son, it was a failure because he would have to learn way too many sub-tools to make it work for him. Bummer. I’m left wondering if I can streamline all of the parts to work together well enough, or whether I’m simply needed in the loop.

Plotter Churns Out Labels With Roll Of Tape

Like it or not, organizing your workspace from time to time is a necessary chore. Labels can go a long way towards taming the most unruly of benches, but writing them out by hand isn’t exactly ideal. Looking for something a bit neater, [sandy] built a simple pen plotter to write labels on a roll of tape.

Pen plotter writing on roll of masking tape

The plotter uses the usual 3D printer components like steppers, drivers, belts, and rails. The tape holder is printed with flexible arms for a tight grip, and a servo is used to raise and lower the pen while writing.

The custom control board includes an Arduino Nano clone and a pair of stepper drivers, and an optional Bluetooth module and can be configured for a variety of machine control applications. A pair of Android apps are used to generate and send the G-code from a phone to the GRBL firmware loaded on the Arduino.

This seems to fall in the category of “entry-level” custom automation tools which help to save some time and effort on repetitive tasks without blowing the budget. We would include the various component tape cutters we’ve seen in this category, as well as smart build platform for manual PCB assembly

The controller being held in its creator's hand after the modification's been done. The controller is painted in blue-white-black camo-like style. Analog sticks are sticking out where the buttons used to be

Oops! All Analog Sticks

Knowing his friend is a first-person shooter enthusiast, [Solderking] came up with a unique modified XBox controller as a gift. Tongue in cheek, you could argue that this controller is fully analog, as all of the buttons have been removed and replaced with analog sticks — each stick emulating four different buttons with its four different directions.

For this mod, he picked a controller known to have button connections available on testpoints. The controller’s buttons are digital inputs, but a bit of additional resistance wasn’t a problem for the IC in charge. Having tested that to be extra sure, he started the rebuilding work. As any self-respecting one-off mod, the bulk of this project involved JB Weld, point-to-point soldering of wires and taking a Dremel to the shell. That said, this project pays attention to detail, with portions of potentiometer track material carefully scraped off so that contact couldn’t be made in center position, and 3D printed spacers keeping the looks within the “gift-worthy” boundary.

After finishing the controller, [Solderking] tested it to confirm that it was absolutely atrocious to use, and breathed a sigh of relief, with yet another mod well done. We’ve already covered a few of his other fun efforts, like this Pokemon Ruby Nintendo cartridge restoration project where some delicate soldering was called for, or this broken mouse turned 12-key macropad.

Continue reading “Oops! All Analog Sticks”

3D Printing A Prosthetic-Compatible Golf Club

Relearning an old sport, or starting a new one, can be challenging for amputees. Besides the obvious physical aspects, custom prosthetics or adaptors might need to be made and fitted, which can be very expensive. With the power of 3D printing and some machining, [Ian Davis] was able to build a custom prosthetic golf club to get a quadruple amputee back on the greens.

The recipient of this prosthetic lost both hands above the wrists, so [Ian] had to come up with a mechanism that could hold the club and mimic wrist motion throughout the swing. He was able to achieve this motion with a simple four-plate hinge for each arm. For optimal ergonomics, [Ian] also added two-axis adjustability, with only a single bolt needing to be loosened per axis. A standard golf club can be used and is clamped in the printed holders.

Machined prosthetic sockets were used to allow quick connection to the user’s existing prosthetic forearms. Theoretically, this should also allow him to switch clubs without excessive hassle. [Ian], an amputee himself, has used his engineering skills to build a series of prosthetic hands and even a custom controller mod to get back to gaming with fewer flesh fingers.

Continue reading “3D Printing A Prosthetic-Compatible Golf Club”