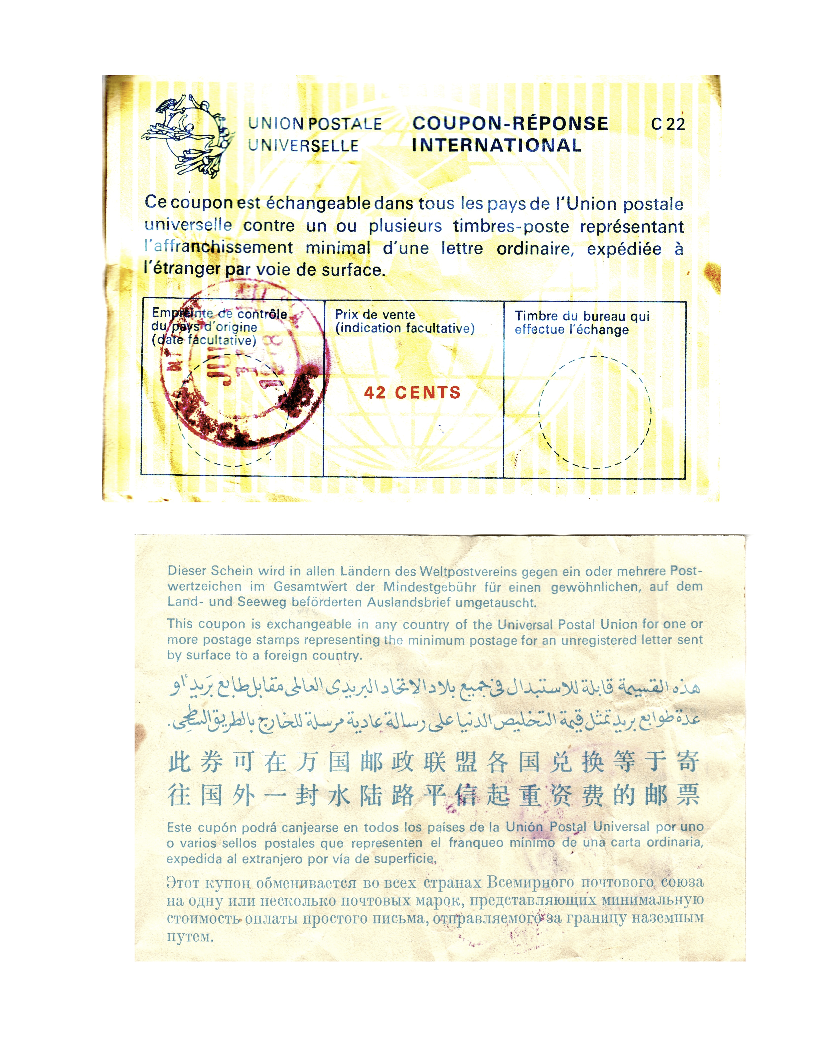
DIY Soldering Tweezers, Extra Thrifty

It started when [Mitxela] was faced with about a hundred incorrectly-placed 0603 parts. Given that he already owned two TS101 soldering irons, a 3D printer, and knows how to use FreeCAD (he had just finished designing a custom TS101 holder) it didn’t take long to create cost-effective DIY soldering tweezers.

Two screws allow adjusting the irons to ensure the tips line up perfectly.

The result works great! The TS101 irons are a friction-fit and the hinge (designed using the that-looks-about-right method) worked out just fine on the first try. Considering two TS101 irons are still cheaper than any soldering tweezer he could find, and one can simply undock the TS101s as needed, we call this a solid win.

One feature we really like is being able to precisely adjust the depth of each iron relative to each other, so that the tips can be made to line up perfectly. A small screw and nut at the bottom end of each holder takes care of that. It’s a small but very thoughtful design feature.

Want to give it a try? The FreeCAD design file (and .stl model) is available from [Mitxela]’s project page. Just head to the bottom to find the links.

We’ve seen DIY soldering tweezers using USB soldering irons from eBay but the TS101 has a form factor that seems like a particularly good fit.

Biting Off More Than I Can Chew

Earlier this year, I bought one of those K40-style laser machines that was listed at a ridiculously low price, and it arrived broken. Well, let me qualify that: the laser tube and the power supply work perfectly, but that’s about the best you can say about it.

On first power-up, it made a horrible noise, the Y-axis was jammed, the X-axis was so off-square that it was visibly apparent, and it turned out that as I fixed one of these problems after the other, that it was just the tip of the iceberg. The Y-axis was jammed because the belts were so tight that they made the motor bind. Replacing them, because they were simply too short, got the stage moving, but it didn’t engage the endstops. Fixing those revealed that the motor was stepped wrong, and flipping the pins in the connector finally got it homing in the right direction. Full disassembly and reassembly steps required at each stage here.

The X-axis just needed adjustment, but the opto on its endstop had been completely crushed by a previous failed homing, and I had to desolder and resolder in a new one. (Keep your junkbox well stocked!) With the machine working, it became obvious that the driver board was barely usable. It accelerates horribly jerkily, which makes the motors skip and stall. It had to be run artificially slowly because it couldn’t make the corners. So I put in a new motor controller board that handles Gcode and does legitimate acceleration ramps.

Movement mostly fixed, it was time to align the laser. Of course, the optical path is all messed up, they forgot the o-ring that holds the focusing lens in place, and the thing keeps powering down randomly. This turns out to be because of the aiming red laser pointer, which has a positive case, which is shorting through the single wrap of electrical tape that “insulates” it from the machine’s frame. When this shorts, the motor driver board browns out. Lovely!

Once I was finally able to start aligning the beam, I discovered that the frame is warped out of plane. The simple solution is to take it all apart again and shim it until it’s flat, but I just haven’t had the time yet. I’m not beaten, but it’s been eating up hours after hours on the weekends, and that time is scarce.

I love DIY, and I love taking a machine apart in order to understand it. Once. But I’m now on my tenth or twelfth unmounting of the motion stage, and frankly, it’s no fun any more. It would have been quicker, if maybe not cheaper, to have built this machine entirely from scratch. At least for the moment, I’ve bitten off more than I have time to chew.

Tiny Pogo Robot Gets Wings, Does Flips

Most robots depend on controlled environments, because the real world is hard to get around in. The smaller the robot, the bigger this problem because little wheels (or legs) can take only little steps. One way around that is MIT’s latest one-legged hopping robot, which sports a set of four insect-like wings on its top end and can quickly pogo-hop its way across different terrain with ease.

The four wings provide lift, and steer the robot so that its single leg lands precisely.

The wings aren’t for flying in the usual sense. They provide lift, but also help the tiny device steer itself so that its hops land precisely. Earlier incarnations of one-legged hopping robots (like this one) accomplished this with propellers and electric motors, but traditional motors are a non-starter on a device that weighs less than a paperclip.

Right now, this little winged hopper is not completely self-contained (power and control systems are off-board) but running it as a tethered unit allows researchers to test and evaluate different, minimalistic ways for a machine to move around efficiently. And efficiency is the whole goal of going in this direction.

Certainly tiny flying drones already exist and get about in the real world just fine. But if one wants to shed mass, ditch conventional motors, and reduce cost and power consumption, this tiny winged hopping machine is one way to do it. And it can even carry payloads! The payloads are tiny, of course, but being able to haul around ten times one’s own weight and still function reliably is an impressive feat.

You can watch it in action in the video embedded just below the page break. Once you’ve watched that, we’d like to remind you that novel locomotion isn’t just the domain of hopping robots. Tiny robots with explosive joints is just as wild as it sounds.

Continue reading “Tiny Pogo Robot Gets Wings, Does Flips”

Repairing Classic Sound Cards

Sound hardware has been built into PC motherboards for so long now it’s difficult to remember the days when a sound card was an expensive add-on peripheral. By the mid to late 1990s they were affordable and ubiquitous enough to be everywhere, but three decades later some of them are starting to fail. [Necroware] takes us through the repair of a couple of Creative Labs Sound Blaster 16s, which were the card to have back then.

The video below is a relaxed look at typical problems afflicting second-hand cards with uncertain pasts. There’s a broken PCB trace on the first one, which receives a neat repair. The second one has a lot more wrong with it though, and reveals some surprises. We would have found the dead 74 series chips, but we’re not so sure we’d have immediately suspected a resistor network as the culprit.

Watching these cards become sought-after in the 2020s is a little painful for those of us who were there at the time, because it’s certain we won’t be the only ones who cleared out a pile of old ISA cards back in the 2000s. If you find one today and don’t have an ISA slot, worry not, because you can still interface it via your LPC bus.

Continue reading “Repairing Classic Sound Cards”

Tracing The #!: How The Linux Kernel Handles The Shebang

One of the delights in Bash, zsh, or whichever shell tickles your fancy in your OSS distribution of choice, is the ease of which you can use scripts. These can be shell scripts, or use the Perl, Python or another interpreter, as defined by the shebang (#!) at the beginning of the script. This signature is followed by the path to the interpreter, which can be /bin/sh for maximum compatibility across OSes, but how does this actually work? As [Bruno Croci] found while digging into this question, it is not the shell that interprets the shebang, but the kernel.

It’s easy enough to find out the basic execution sequence using strace after you run an executable shell script with said shebang in place. The first point is in execve, a syscall that gets one straight into the Linux kernel (fs/exec.c). Here the ‘binary program’ is analyzed for its executable format, which for the shell script gets us to binfmt_script.c. Incidentally the binfmt_misc.c source file provides an interesting detour as it concerns magic byte sequences to do something similar as a shebang.

As a bonus [Bruno] also digs into the difference between executing a script with shebang or running it in a shell (e.g. sh script.sh), before wrapping up with a look at where the execute permission on a shebang-ed shell script is checked.

Creating A Somatosensory Pathway From Human Stem Cells

Human biology is very much like that of other mammals, and yet so very different in areas where it matters. One of these being human neurology, with aspects like the human brain and the somatosensory pathways (i.e. touch etc.) being not only hard to study in non-human animal analogs, but also (genetically) different enough that a human test subject is required. Over the past years the use of human organoids have come into use, which are (parts of) organs grown from human pluripotent stem cells and thus allow for ethical human experimentation.

For studying aspects like the somatosensory pathways, multiple of such organoids must be combined, with recently [Ji-il Kim] et al. as published in Nature demonstrating the creation of a so-called assembloid. This four-part assembloid contains somatosensory, spinal, thalamic and cortical organoids, covering the entirety of such a pathway from e.g. one’s skin to the brain’s cortex where the sensory information is received.

Such assembloids are – much like organoids – extremely useful for not only studying biological and biochemical processes, but also to research diseases and disorders, including tactile deficits as previously studied in mouse models by e.g. [Lauren L. Orefice] et al. caused by certain genetic mutations in Mecp2 and other genes, as well as genes like SCN9A that can cause clinical absence of pain perception.

Using these assembloids the development of these pathways can be studied in great detail and therapies developed and tested.

A humanoid robot packs a lunch bag in the kitchen

Gemini 2.0 + Robotics = Slam Dunk?

Over on the Google blog [Joel Meares] explains how Google built the new family of Gemini Robotics models.

The bi-arm ALOHA robot equipped with Gemini 2.0 software can take general instructions and then respond dynamically to its environment as it carries out its tasks. This family of robots aims to be highly dexterous, interactive, and general-purpose by applying the sort of non-task-specific training methods that have worked so well with LLMs, and applying them to robot tasks.

There are two things we here at Hackaday are wondering. Is there anything a robot will never do? And just how cherry-picked are these examples in the slick video? Let us know what you think in the comments!

Continue reading “Gemini 2.0 + Robotics = Slam Dunk?”