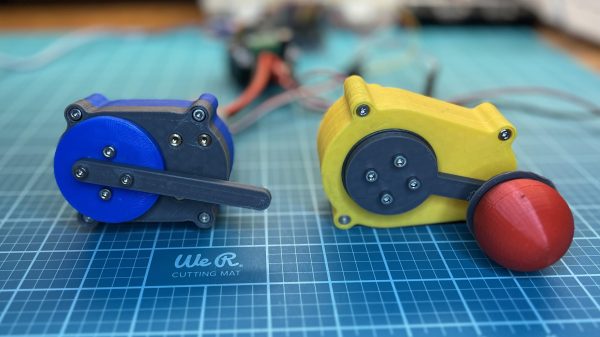
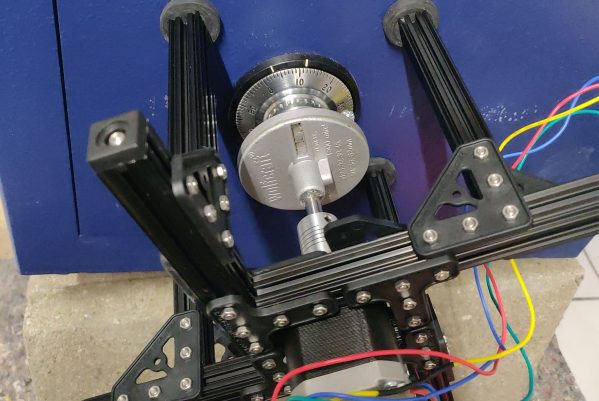
Hands-On Review: TCam-Mini WiFi Thermal Imager

A thermal camera is a tool I have been wanting to add to my workbench for quite a while, so when I learned about the tCam-Mini, a wireless thermal camera by Dan Julio, I placed an order. A thermal imager is a camera whose images represent temperatures, making it easy to see things like hot and cold spots, or read the temperature of any point within the camera’s view. The main (and most expensive) component of the tCam-Mini is the Lepton 3.5 sensor, which sits in a socket in the middle of the board. The sensor is sold separately, but the campaign made it available as an add-on.

Want to see how evenly a 3D printer’s heat bed is warming up, or check whether a hot plate is actually reflowing PCBs at the optimal temperature? How about just seeing how weird your pets would look if you had heat vision instead of normal eyes? A thermal imager like the tCam-mini is the tool for that, but it’s important to understand exactly how the tCam-mini works. While it may look like a webcam, it does not work like one.

Continue reading “Hands-On Review: TCam-Mini WiFi Thermal Imager”

Classroom Surplus Becomes Linux Powerhouse

The SMART Response XE is a handheld computer that was originally sold for use in the classroom as a terminal for pupils taking tests. It’s now cheap enough on the surplus market to have become a target for experimenters, and we’ve seen them with a variety of cool hacks. We particularly like what [chmod775] has done with it, putting a VT100 terminal emulator on the device and hiding a NanoPi Neo Air single board computer in the battery bay. Powered from a USB battery bank, it gives a fully-featured Linux terminal in the palm of the hand. We see it running an Ubuntu LTSĀ  version, and it’s clear that it’s a functional and usable device.

This raises a more abstract question though: We’d guess comparatively few of us write software through an old-style dumb terminal, instead we’re more likely to get our terminal experience at a much more accomplished command line with all the conveniences of a modern desktop surrounding it. How many of us could comfortably return to the limited confines of a VT100 emulator on an odd-sized LCD display? We’d be interested to hear [chmod755]’s experiences using it, because if it retains usability it’s a device we wouldn’t mind having ourselves.

Hungry for more SMART Response XE hacks? Take a look at the BASIC computer, or the spectrum analyser.

Vintage Monochromator Makes Monochromatic Light, Mechanically

A monochromator is an optical instrument that permits only a narrow selection of wavelengths to be transmitted from a source, and the particular model [Doug] obtained renders visual light monochromatic by way of a mechanically-adjusted system of mirrors and diffraction gratings that allows only the selected wavelength to pass. The big dial is how the operator selects the desired wavelength, and is labeled in ‘mu’ (or milli-micro), but [Doug] helpfully points out the more modern term for that is nanometers.

LCD monitor viewed through a monochromator set to pass red wavelength only, showing that images remain intact.

How does it work? Light enters the device via an opening at the base, and only the selected wavelength exits from the top. The dial’s range is from 450 nm to 640 nm (representing violet-blue to red), which [Doug] demonstrates by shining a white LED flashlight into the unit and showing how only green, red, or blue will exit from the top depending on the setting of the dial.

An interesting side note is that with this particular device, images can be rendered monochromatic but otherwise remain intact. [Doug] demonstrates this by viewing a small section of his LCD monitor through the device, as shown in the photo he managed to capture.

It’s an interesting piece of vintage equipment that shows what is possible with passive optical components and a clever mechanical design. These devices are therefore entirely manually-operated tools (at least until someone sticks a stepper motor to the adjustment dial to create an automated scanner, that is.)

A Single SSD’s Journey From System 7 To High Sierra

With some time to kill and an array of old Apple computers on hand, [Pierre Dandumont] wondered if he could continuously upgrade a single OS drive from the oldest system he had, System 7.1 on a Performa 630, to the latest version of MacOS on a MacBook Air. He recalled watching an old video which demonstrated a continuous upgrade from DOS to Windows 10 (we think this video from 2016 may be the one), which gave him the inspiration for this journey. [Pierre] documents his efforts on his blog (in French; English translated link is here).

Along the way, he installed 24 different operating systems

  • System 7.1.2, 7.5
  • Mac OS 7.6
  • Mac OS 8.0, 8.1, 8.5, 8.6
  • Mac OS 9.0, 9.1, 9.2
  • Mac OS X 10.0 – 10.11
  • macOS 10.12, 10.13

on seven Mac computers

  • Performa 630 (ca. 1994, Motorola 68040)
  • Power Mac G3 Beige (ca. 1997, Motorola PowerPC 730)
  • Power Mac G3 Blue (ca. 1999, Motorola PowerPC 730)
  • Power Mac G4 Digital Audio (ca. 2001, Motorola PowerPC 7400)
  • Mac mini G4 (ca. 2005, Motorola PowerPC 7447)
  • Mac mini 2009 (Intel Core 2 Duo Penryn)
  • MacBook Air 2012 (Intel Core i5/i7)

across three of the four processor families spanned by the Macintosh line of computers since their introduction in 1984. You can see in the lead photo the success, where the Mac OS 8 search tool Sherlock is shown in the dock of a MacBook Air running High Sierra.

Continue reading “A Single SSD’s Journey From System 7 To High Sierra”

If Society Is In Danger Of Collapse, Here’s How We Should Do Our Bit

If you’ve been following the news, you can’t have missed the series of floods, droughts, and wildfires that have occurred seemingly in all corners of the world. Coming on the heels of a Northern Hemisphere winter that had its own extreme weather events, it would be perhaps foolhardy not to by now take climate change seriously. You may also have seen the news about a return to a 1970s paper in which MIT crystal-ball-gazers predicted the collapse of our civilisation in the mid-21st century, and a review based upon the empirical data gathered since then which concluded that we could be right on track with that prediction set to happen in about 2040.

It’s sobering stuff, and something which could so easily form the basis of many a Hollywood apocalyptic disaster movie. But sitting here in 2021 amid extreme weather events and a global pandemic it’s certainly something to think about. It’s not as though we’re riding biogas-powered weapon cars through the post-apocalyptic desert just yet though, we still have a chance to do something to avert catastrophe and no doubt over the next decade a raft of changes will reduce our CO2 impact and make our infrastructure more resilient to stave off any coming crises.

Our mind was turned to the halcyon time before the pandemic, to the Danish BornHack hacker camp back in August 2019. One of the talks at the event came from [Igor Nicolic], whose day job as an academic with Delft University of Technology takes him into the study of ecology and sustainability. In it he looks at the current state of global sustainability, and identifies the roles which the hardware hacker community could play in an uncertain future. It’s a fascinating lecture from an expert in the field and it’s well worth a watch and taking note of his points, so we’ve placed it below the break. Continue reading “If Society Is In Danger Of Collapse, Here’s How We Should Do Our Bit”

Building An Electronic Tester For Measuring Arrow Stiffness

When shooting archery, if you want to be accurate, you need arrows of uniform specification and quality. One important part of this is making sure each arrow has a spine of similar stiffness. Traditionally, this is checked in a very analog way by using weights and measuring deflection of the arrow spine, but it can be done electronically too with this tester from [dvd8n].

The principle of operation is simple. The arrow is held up by two supports, 28 inches apart. The user then presses down in the center of the arrow, deflecting it by a 1/2 inch where itreaches a stop , and load cells at either end of the tester measure the force required to deflect the arrow by the set amount.

It allows arrows to be electronically measured in a fashion that is compatible with existing standards for measurement. The Arduino hardware which measures the load cells can also easily run conversion maths to display the arrow’s measured stiffness in whatever common spine measurement standard is desired. The system can also weigh the arrows, a useful thing to know for the home fletcher.

It’s a tidy build and one that should prove useful when [dvd8n] is building out their next quiver. We’ve seen other capable DIY archery hacks before, too. If you’ve got your own, drop us a line!


WiFiWart Boots Linux, Moves To Next Design Phase

Over the last few months we’ve been keeping an eye on WiFiWart, an ambitious project to develop a Linux single-board computer (SBC) small enough to fit inside a USB wall charger. Developer [Walker] says the goal is to create an easily concealable “drop box” for penetration testing, giving security researchers a valuable foothold inside a target network from which to preform reconnaissance or launch attacks. Of course, we don’t need to tell Hackaday readers that there’s plenty of other things you can do with such a tiny open hardware Linux SBC.

Today we’re happy to report that [Walker] has gotten the first version of the board booted into Linux, though as you might expect given a project of this complexity, there were a few bumps along the way. From the single missing resistor that caused U-Boot to throw up an error to the finer points of compiling the kernel for an embedded board, the latest blog post he’s written up about his progress provides fascinating insight into the little gotchas of bringing up a SBC from scratch.

Once the board was booted into Linux, [Walker] started testing out different aspects of the system. A memory benchmark confirmed the finicky DDR3 RAM was working as expected, and he was able to load the kernel modules for the dual RTL8188 interfaces and connect to a network. While the two WiFi modules are currently hanging off the board’s full-sized USB ports, they will eventually be integrated into the PCB.

Critically, this prototype board is also allowing [Walker] to get an idea of what the energy consumption of the final hardware might be. Even at full tilt, this larger board doesn’t go over 500 mA at 5 VDC; so if he designs the power supply with a maximum output of 1 A, he should have a nice safety margin. As mentioned in the previous post, the plan is currently to put the PSU on its own board, which will allow more effective use of the charger’s internal volume.

With the software and hardware now largely locked in, [Walker] says his attention will be turned towards getting everything small enough to fit into the final form factor. This will certainly be the most challenging aspect of the project, but with a growing community of hackers and engineers lending their expertise to the cause, we’re confident the WiFiWart will soon be a reality.