ESP32 Brings Air Purifier Online With Home Assistant

A lot of hackers are rightfully concerned about the privacy issues that surround many of today’s “smart” gadgets, but it’s hard to argue that the ability to remotely control devices around your home isn’t convenient. Enter self-hosted, open source projects like Home Assistant. This provides the framework for building out a home automation system without having your soul information sold, but as you might expect, you’re going to have to put some effort in to get the most of it.

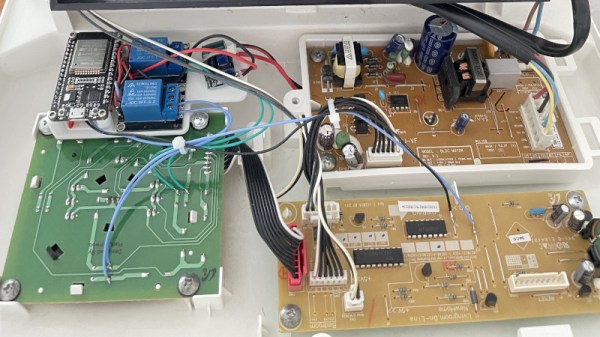
For example, take a look at this Phillips AC4014 air purifier that [Anton] connected to Home Assistant by way of an ESP32. Rather than getting too bogged down in reverse engineering the purifier’s surprisingly complex internal electronics, he took the easy way out and wired a couple of relays across the power and fan speed buttons; this allows the device to be easily controlled by the microcontroller, without impacting the functionality of the original controls.

But since those front panel controls still work, that meant [Anton] needed a way for the ESP32 to detect the device’s status and report that to Home Assistant so everything stayed in sync. So he looked around on the PCB for a trace that got powered up when the air purifier was up and running, which he connected to a pin of the microcontroller through a transistor. This let’s the firmware determine if the machine is running or not just by checking if the appropriate pin has gone high.

Speaking of the firmware, [Anton] decided to use ESPHome rather than trying to write his own code from scratch. This project allows you to rapidly add new devices to Home Assistant by providing the firmware with a relatively simple YAML configuration file, which he’s provided as an example. In fact, he’s provided quite a lot of examples with this project, down to an annotated image of the PCB that shows where to tap your wires into. He’s done quite a service for anyone who’s got this same model of air purifier.

This unit doesn’t appear to have any capability of actually checking the quality of the air in the room, but we’ve recently seen a low-cost IKEA product that can do exactly that. Even better, it can be easily modified to report its findings over the network using the ESP8266.

a money shot of the hidden arcade

Arcade Machine Pack And Play

There’s something about the large imposing wooden box of an arcade machine that lends a confident presence to a room. The problem with a tall and heavy box is that it takes up quite a bit of space and readily draws the eye. So [Alexandre Chappel] set out to avoid that and build an arcade machine that could hide in plain sight.

Extra points awarded for neat wiring on the inside.

The idea is a wooden box hung on the wall that folds up when not in use. [Alex] starts with Baltic birch plywood cut into the panels. Next, he applies edge banding (a thin veneer with some glue on the backside) so that all the exposed edges look like natural wood. Next, a screen hole is routed into the face frame, allowing an LCD monitor to sit snuggly in. A combination of pocket holes and biscuits allows [Alex] to assemble everything with no visible screws or fasteners.

With the help of a 3D printer, he quickly fabricated a locking mechanism to keep the front panel attached when it folds up. The hinge is also 3D printed. The typical Raspberry Pi 4 powers this particular machine. Two french cleats hold the box onto the wall, and once the system is on the wall, we have to say it looks incredible.

If you’re looking for a smaller but more traditional arcade cabinet, why not take a look at this arcade cabinet for toddlers? Or, if you loved the solid wood look of the hidden arcade, this full-sized solid oak cabinet would be something you would enjoy. Video after the break.

Continue reading “Arcade Machine Pack And Play”

Teardown: Analog Radionic Analyzer

Have you ever looked up a recipe online, and before you got to the ingredients, you had to scroll through somebody’s meandering life story? You just want to know how many cans of tomato paste to buy, but instead you’re reading about cozy winter nights at grandma’s house? Well, that’s where you are right now, friend. Except instead of wanting to know what goes in a lasagna, you just want to see the inside of some weirdo alternative medicine gadget. I get it, and wouldn’t blame you for skipping ahead, but I would be remiss to start this month’s teardown without a bit of explanation as to how it came into my possession.

So if you’ll indulge me for a moment, I’ll tell you a story about an exceptionally generous patron, and the incredible wealth of sham medical hokum that they have bestowed upon the Hackaday community…

Continue reading “Teardown: Analog Radionic Analyzer”

GamecubePC Puts a PC into a Gamecube chassis

GamecubePC Packs Plenty Of Punch Into GameCube Plastics

If reading Hackaday teaches us anything, it’s that there is a subset of hackers who take things like emulator builds a step farther than most. [RetroModder] is very clearly one such hacker. Enter the GamecubePC, which you can read about on Hackaday.io. The GamecubePC is a multi-year project that aims to stuff an entire Windows 10 PC into a GameCube shell while still being able to play Wii and GameCube titles at native resolution and performance.

Internals of the GamecubePC with all the custom chassis and PCB's on display
Internals of the GamecubePC with all the custom chassis and PCB’s on display

Although it only takes a spare computer and the Dolphin emulator to make a GameCube and Wii emulator, great attention has been paid to keeping the GameCube at the forefront. Contributing to the illusion is the preservation of the original GameCube power switch and reset buttons by way of custom PCB’s that interface the parts to the mSTX motherboard.

The bottom of the GameCube shell is replaced with a 3D printed base that mounts the motherboard while smartly giving access to the motherboard’s front panel. The minuscule motherboard sports an Intel Core™ i5-7600 with 8GB memory, and SSD storage. Topping off the experience are four functional controller ports that can be switched to be used with the emulator or with PC games too. Surely the GamecubePC will be the subject of many double takes!

Custom game builds are no stranger to Hackaday, and you might appreciate this portable Wii that can play Wii and GameCube games or this GameCube controller hacked into a Joycon for the Nintendo Switch.

Edit from the far future: it’s now a project on Tindie.  Check it out.

VCF East 2021: Preserving Heathkit’s 8-Bit Computers

To say the Heathkit name is well known among Hackaday readers would be something of an understatement. Their legendary kits launched an untold number of electronics hobbies, and ultimately, plenty of careers. From relatively simple radio receivers to oscilloscopes and televisions, the company offered kits for every skill level from the post-war era all the way up to the 1990s.

So it’s hardly a surprise that in 1977, seeing the success of early home computers like the Altair 8800 and IMSAI 8080, Heathkit decided to join the fray with a computer kit of their own. But by that point the home computing market had started to shift from a hobbyist’s pursuit to something the whole family could enjoy. Compared to the Apple II and TRS-80, both of which also launched in 1977, Heathkit’s machine seemed like the product of a bygone era.

While it might not have gained the notoriety of the microcomputers it was designed to compete with, the Heathkit H8 is certainly not forgotten. Tucked away in a corner at the 2021 Vintage Computer Festival East was an impressive exhibit dedicated to the Society of Eight-Bit Heath Computerists (SEBHC) called Heathkit: Keeping the Legacy Alive. Presented by Glenn Roberts, this collection of original and modern hardware demonstrated the incredible lengths to which this group of passionate Heathkit owners have gone to not just preserve the memory of these often overlooked computers, but to continue to improve upon the kit’s unique design.

Continue reading “VCF East 2021: Preserving Heathkit’s 8-Bit Computers”

Mechanical Linkage CAD For Everyone

As much as some of us don’t like it, building things for real requires some mechanical component. Maybe it is something as simple as an enclosure or even feet for a PCB, but unless you only write software or play with simulators, you’ll eventually have to build something. It is a slippery slope between drilling holes for a front panel and attempting to build things that move. Sometimes that’s as simple as a hinge and a spring, or maybe it is a full-blown robot articulated arm.  That’s why [RectorSquid] built Linkage, a “program that lets you design and edit a two-dimensional mechanism and then simulate the movement of that mechanism” (that quote is from the documentation.

The program has had a few versions and is currently up past 3.15. To get an idea of the program’s capabilities, the first video below shows an older version simulating a ball lift. The second video shows the actual mechanism built from the design. The associated YouTube channel has more recent videos, too, showing a variety of simulations.

Continue reading “Mechanical Linkage CAD For Everyone”

Retro TV Shows Off Family Memories With Raspberry Pi

Fascinated by the look and feel of vintage electronics, [Democracity] decided to turn an old Sony Micro TV into a digital picture frame that would cycle through old family photos in style. You’d think the modern IPS widescreen display would stick out like a sore thumb, but thanks to the clever application of a 1/16″ black acrylic bezel and the original glass still installed in the front panel, the new hardware blends in exceptionally well.

Driving the new display is a Raspberry Pi 4, which might sound overkill, but considering the front-end is being provided by DAKboard through Chromium, we can understand the desire for some extra horsepower and RAM. If it were us we’d probably have gone with a less powerful board and a few Python scripts, and of course there are a few turn-key open source solutions out there, though we’ll admit that this is probably faster and easier to setup.

[Democracity] provides some general information on how he took apart the TV and grafted in the new gear, but of course the exact steps will vary a bit depending on which old TV you end up sending to the big parts bin in the sky. We did like that he made sure to keep all the mechanisms for the buttons and knobs intact, so even if they don’t do anything, you can still fiddle around with them.

Otherwise, his steps for setting up a headless Chromium instance are probably more widely applicable. As are the tips about setting up this particular LCD module and getting the display rotated into the proper orientation. If you just follow along for that part of the guide, you can spin up your own stand-alone Raspberry Pi DAKboard endpoint to take the service for a test drive.

It probably won’t come as much of a surprise to hear that this isn’t the first time [Democracity] has upgraded a piece of vintage hardware. Back in 2017, we covered this gorgeous art deco speaker that he outfitted with RGB LEDs and an Amazon Echo Dot. As with the previous post, it’s likely some commenters will be upset that a vintage piece of gear has been gutted for this project. But we’d counter that by saying his family is going to get a lot more enjoyment out of this beautiful piece of hardware now than they would have if it was still collecting dust in a closet.