
If you are a Star Trek fan, you’ll probably remember the phrase “You have to learn why things work on a starship.” The truth is, in most episodes, knowing how to override another ship’s console or make gunpowder didn’t come in very handy, but boy when it did, it really saved the day. Linux is a lot like that. There are a few things you probably don’t need to know very often, but when you do need to know, it makes a huge difference. In this particular post, I want to look at an odd use of the fork system call. For many purposes, you’ll never need to know this particular irregular use. But when you need it, you are really going to need it.
This is actually based on an old client of mine who used Unix to run a massive and very critical report every day. The report had a lot of math since they were trying to optimize something and then generate a lot of reports. In those days, the output of the report was on old green-bar paper on a line printer. The problem was that the report took something like 14 hours to run including the printouts. If someone discovered something wrong, there was no time to run the report again because the next day’s report would have to start before the second run would finish.
The client had a bunch of Windows programmers and — at that time — there wasn’t anything really analogous to a real fork call in Windows. I looked at the code and realized that probably most of the code was spending time waiting to print the output. The computer had multiple CPUs and there were multiple printers, but that one program was hanging on the one printer. There was a lot of data, so writing it to a database and then running different reports against it wasn’t a great option. The answer was to use the power of fork. With a change in the code that took less than 30 minutes, the report ran in five hours. They were very pleased.
So how did I do it? The answer lies in how fork works. Just about every time you see a fork, you see some sort of exec call to start a new program. So if you think about fork at all, you probably think it is part of how you start a new program and, most of the time, that’s true. Continue reading “Linux Fu: An Odd Use For Fork()”


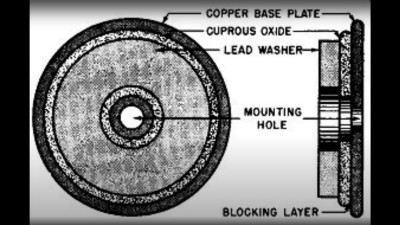 based not upon silicon or germanium, but copper. Copper (I) Oxide is a naturally occurring P-type semiconductor, which can be easily constructed by heating a copper sheet in a flame, and scraping off the outer layer of Copper (II) Oxide leaving the active layer below. Simply making contact to a piece of steel is sufficient to complete the device.
 as the Selenium rectifier, based on the properties of a Cadmium Selenide – Selenium interface, which forms an NP junction, albeit one that can’t handle as much power as good old copper. One final device, which was a bit of an improvement upon the original CuO rectifiers, was based upon a stack of Copper Sulphide/Magnesium metal plates, but they came along too late. Once we discovered the wonders of germanium and silicon, it was consigned to the history books before it really saw wide adoption.


