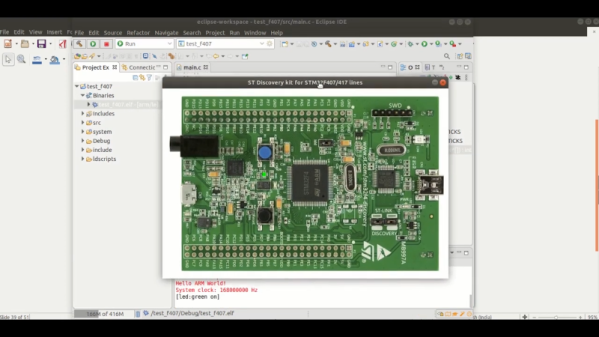
A Tin Can Modem, Just For Fun

Anyone old enough to fondly recall the “bleep-burp-rattle” sequence of sounds of a modem negotiating a connection over a phone line probably also remembers the simple “tin-can telephone” experiment, where a taut string transmits sound vibrations from the bottom of one tin can to another.  This tin can modem experiment puts both of those experiences together in a single project.

As [Mike Kohn] notes, this project was harder than it would seem that it should be. He actually had a much harder time getting the tin can phone part of the project optimized than getting the electronics sorted out, resulting in multiple tries with everything from the canonical tin cans to paper coffee cups before eventually settling on a pair of cardboard nut cans, the kinds with the metal bottoms. Linked together with a length of kite string — dental floss didn’t work — [Mike] added a transmitter on one end and a receiver on the other.

The transmitter used an ATtiny 2313 and everyone’s favorite audio amplifier, the LM386, while the receiver sported an electret mike preamp board, an LM566 tone decoder, and an MSP430 microcontroller. The modulation scheme was as simple as possible — a 400 Hz tone whose length varies whether it’s a one or a zero, or a stop or start bit. Connected to a pair of terminal programs, [Mike] was able to send his name over the wire string at what he calculates to be six or seven baud.

This project has all the hallmarks of lockdown boredom, but we don’t care because it’s good fun and a great learning opportunity, particularly for the young ones. There’s plenty of room for optimization, too — maybe it could even get fast enough for the Hackaday Retro 300-baud challenge.

Continue reading “A Tin Can Modem, Just For Fun”

An HDMI Monitor From Your Phone

Digital video has proceeded to the point at which we have near-broadcast-quality HD production capabilities in the palm of our hand, and often for a surprisingly affordable price. One area in which the benefits haven’t quite made it to our wallets though is in the field of small HD monitors of the type you might place on top of a camera for filming. It’s a problem noted by [Neon Airship], who has come up with a solution allowing the use of an Android mobile phone as an HDMI monitor. Since many of us will now have a perfectly capable older phone gathering dust, it’s an attractive proposition with the potential to cost very little.

The secret isn’t the most elite of hacks in that it uses all off-the-shelf hardware, but sometimes that isn’t the only reason to be interested in a project such as this one. [Neon] is using an HDMI-to-USB capture card of the type that has recently become available from the usual sources for an astoundingly small sum. When paired with a suitable USB OTG cable, the adapter can be seen by the phone as just another webcam.

We see him try a few webcam viewer apps including one that rather worryingly demands a direct APK download, and the result is a very good quality HDMI monitor atop his camera that really didn’t break the bank. Sometimes the simplest of solutions deliver the most useful of results.

This is something of special interest to those of us who experiment with our own camera form factors.

Continue reading “An HDMI Monitor From Your Phone”

Reverse Engineering Teaches An Old Scope New Tricks

[PMercier] clearly loves his old Tektronix TDS3014 scope, which did however lack essentially modern connectivity such as an Ethernet port for control and a USB port for a convenient way to capture screenshots. So he decided to do some in-depth reverse engineering and design his own expansion card for it. The scope already has an expansion port and an expansion card, but given this model was first released in 1998, purchasing an OEM part was not going to be an option.

They don’t make ’em like they used to. Test equipment is today is built to last a decade — but usually lives on much longer. This is certainly true for the previous generations of kit. It’s no surprise that for most of us, hand-me-downs from universities, shrewd eBay purchasing, and even fruitful dumpster dives are a very viable way to attain useful and relevant test equipment. Now, while these acquisitions are more than adequate for the needs of a hobbyist lab, they are admittedly outdated and more to the point, inaccessible from a connectivity and communication standpoint. A modern lab has a very high degree of automated data acquisition and control over ethernet. Capturing screen dumps on a USB is a standard feature. These modern luxuries don’t exist on aging equipment conceived in the age of floppy disks and GPIB.

Continue reading “Reverse Engineering Teaches An Old Scope New Tricks”

Tool Changing 3D Printers Shouldn’t Break The Bank

Close-up on the magnetic coupling

One of the Holy Grails of desktop 3D printing is the ability to print in multiple materials, for prints that mix colours or textures. There are printers with multi-way hot ends, add-ons that change your filament, or printers with tool changers, that swap hot ends as needed. [Amy] has taken the final route with her Hypercube, and her Doot Changer allows her to print in two materials with ease. Best of all, she tells us it only cost her $20 to make.

For those not familiar with Hypercube-style printers, they have a roughly cubic frame made using aluminium extrusion. On the rear upper rail are a couple of receptacles with metal locating pins onto which a hot-end unit can be slotted. The printer carriage has a magnetic coupling that can pick up or disengage a hot end from its receptacle at will, as can be seen in action in a short video clip.

All the parts can be found on Thingiverse, and there is a photo album with plenty of eye-candy should you wish to see more. Meanwhile as far as tool changers go, we’ve been there before in great depth.

The Sincerest Form Of Flattery

In the art world, it’s often wistfully said that imitation is the sincerest form of flattery. In the open-source hardware world, this flattery takes the shape of finding your open-source project mass produced in China and sold at outrageously low markups. Looking around on my lab, I’ve been the direct beneficiary of this success.

I see an AVR Transistor Tester that I picked up for a few bucks a long time ago. Lacking anything better, it’s my go-to device for measuring inductance and capacitor ESR. For $7, it is worth much more than I paid for it, due to some clever design work by a community of German hackers and the economics of mass production. They’re so cheap that we’ve seen people re-use them just for the displays and with a little modification, turned them into Tetris consoles. That’s too cool. Continue reading “The Sincerest Form Of Flattery”

Forget LED Matrices, How About Neon!

The low-cost LED has changed the way we approach lighting in all its forms, allowing complex addressable displays and all sorts of lighting goodness. But what did we do before we had cheap LED arrays? Use neon bulbs, perhaps? That’s exactly what [Manawyrm] has done with her chainable 8×8 neon matrix boards, taking 64 neon indicator bulbs and driving each from mains potential with an individual triac. A line of 74HC595s handle the data transfer, floating at mains voltage while their ESP32 driver is kept safe by a set of isolators.

A Twitter post shows it in action, but perhaps the most hackworthy praise should be reserved for the test rig. Unable to source a variable 230 V mains supply for testing the array, she applied a 50 Hz sine wave to an audio power amplifier, and replaced the speaker with the low voltage side of a mains transformer. It’s the sort of hack we can’t help liking.

Neons have generally featured here as novelties rather than as significant displays in their own right. They’re interesting components that everyone should have a play with, not least because the possess negative resistance, and can be made to oscillate.

A Z80 Board With Very Few Parts

The Z80 is one of those old CPUs that is both obtainable and easy to work with — at least in some versions. [Doctor Volt] put together what may be the simplest possible setups to get a working Z80 system. He has the processor, of course. But everything else — clock, memory, and power — are from an Arduino Mega 2560. You could argue that’s two chips, but the board actually has several chips on it. On the other hand, you could probably pull off the same stunt with a bare ATMega 2560.

We’ve seen this done before, but usually with a few more support chips. If you are a purist, [Doctor Volt] also has some Z80 and CP/M experiments where the Arduino only acts as a disk drive for the computer and there are only two support chips. There are three videos for both projects that you can see below.

Continue reading “A Z80 Board With Very Few Parts”