Hands-On: CCCamp2019 Badge Is A Sensor Playground Not To Be Mistaken For A Watch

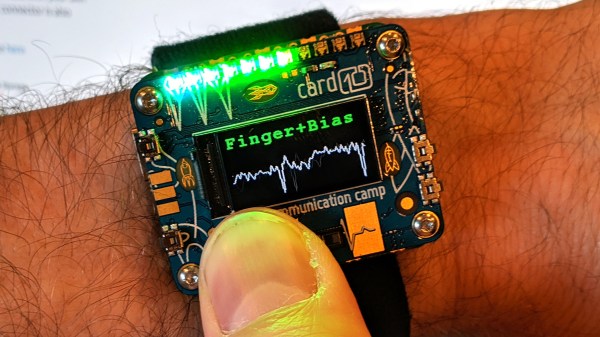
Last weekend 5,000 people congregated in a field north of Berlin to camp in a meticulously-organized, hot and dusty wonderland. The optional, yet official, badge for the 2019 Chaos Communication Camp was a bit tardy to proliferate through the masses as the badge team continued assembly while the camp raged around them. But as each badge came to life, the blinkies that blossomed each dusk became even more joyful as thousands strapped on their card10s.

Yet you shouldn’t be fooled, that’s no watch… in fact the timekeeping is a tacked-on afterthought. Sure you wear it on your wrist, but two electrocardiogram (ECG) sensors for monitoring heart health are your first hint at the snoring dragon packed inside this mild-mannered form-factor. The chips in question are the MAX30001 and the MAX86150 (whose primary role is as a pulse sensor but also does ECG). We have high-res ADCs just waiting to be misused and the developers ran with that, reserving some of the extra pins on the USB-C connector for external devices.

There was a 10€ kit on offer that let you solder up some electrode pads (those white circles with gel and a snap for a solid interface with your body’s electrical signals) to a sacrificial USB-C cable. Remember, all an ECG is doing is measuring electrical impulses, and you can choose how to react to them. During the workshop, one of the badge devs placed the pads on his temples and used the card10 badge to sense left/right eye movement. Wicked! But there are a lot more sensors waiting for you on these two little PCBs.

Continue reading “Hands-On: CCCamp2019 Badge Is A Sensor Playground Not To Be Mistaken For A Watch”

You’re Sitting On An Engineering Masterpiece: Chairs As A Design Challenge

If you move as a hardware hacker through the sometimes surprisingly similar world of artists, craftspeople, designers, blacksmiths, and even architects, there’s one piece of work that you will see time and time again as an object that exerts a curious fascination. It seems that designing and building a chair is a rite of passage, and not just a simple chair, but in many cases an interesting chair.

An American-made Windsor chair from the turn of the 19th century. Los Angeles County Museum of Art [Public domain]
Some of the most iconic seating designs that you will be instantly familiar with through countless mass-produced imitations began their lives as one-off design exercises. Yet we rarely see them in our community of hackers and makers, a search turns up only a couple of examples. This is surprising, not least because there is more than meets the eye to this particular piece of furniture. Your simple seat can be a surprisingly complex challenge.

Moving Charis From Artisan to Mass Market

The new materials and mass production techniques of the 19th and 20th centuries have brought high-end design into the hands of the masses, but while wealthy homes in earlier centuries had high-quality bespoke furniture in the style of the day, the traditional furniture of the masses was hand-made in the same way for centuries often to a particular style dependent on the region in which it was produced.

Continue reading “You’re Sitting On An Engineering Masterpiece: Chairs As A Design Challenge”

A Buzzing, Flashing Phone Ringer For The Elderly

For a lonely person, elderly or otherwise, the sound of a ringing phone can be music to the ears, unless of course it’s another spam call. But what good is a phone when you can’t hear it well enough to answer?

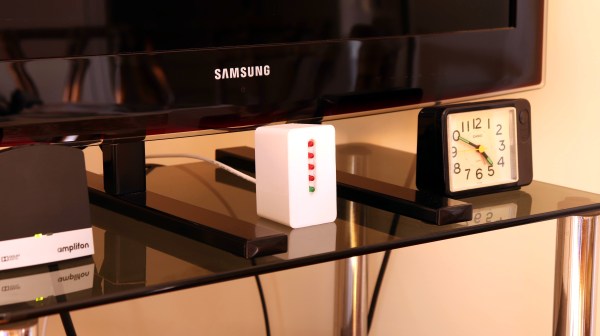
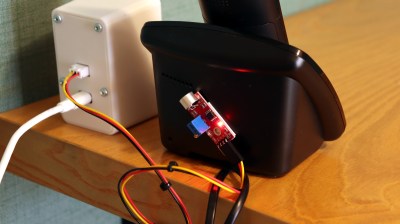
[Giovanni Aggiustatutto] was tasked with building an additional ringer for a set of cordless landline phones belonging to an elderly friend. Rather than try to intercept the signal, [Giovanni] chose to simply mic up the phone base that’s connected to the phone port on the router and send a signal over Wi-Fi to a second box which has a loud piezo buzzer and a handful of LEDs.

At the heart of this build is a pair of ESP8266 Wemos D1 minis and an Arduino sound sensor module inside a pair of really nice-looking 3D printed boxen that may or may not have been inspired by an IKEA air quality sensor. On the receiving side, a green LED indicates the system is working, and the red LEDs flash as soon as a call comes in.

All the code, schematics, and STL files are available for this build, and between the Instructable and the build video after the break, you should have no trouble replicating it for the hard-of-hearing in your life.

Continue reading “A Buzzing, Flashing Phone Ringer For The Elderly”

e-paper display showing hand-drawn fonts attached to a custom controller PCB

Recycling Junk E-tags Into A LoRaWAN AQI Sensor

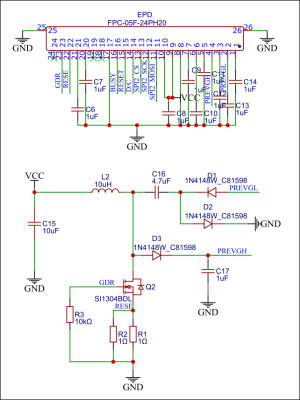
E-paper interfacing circuit is just a simple switched-mode power supply
Interfacing to E-paper displays is nothing to be scared of

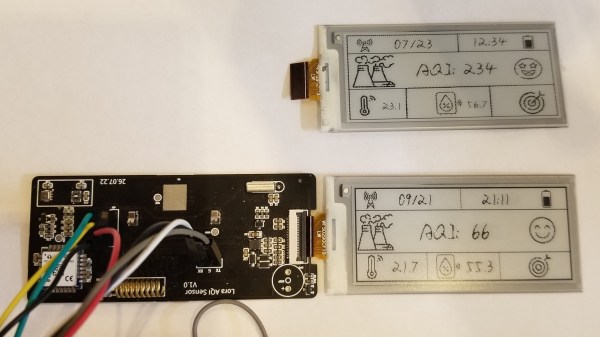
[Aduecho] had seen those cheap eBay deals of e-paper-based pricing tags, and was wondering if they could be hacked to perform some other tasks. After splitting the case open, the controller chip was discovered to be a SEM9110, with some NFC hardware support but little else. [aduecho] was hoping to build some IoT-connected air quality indicator (AQI) units but the lack of a datasheet for SEM9110 plus no sensors in place meant the only real course of action was to junk the PCB and just keep the E-paper display and the batteries. These units appeared to be ‘new old’ stock, so there was a good chance that both would be fresh and ripe for picking.

The PCB [aduecho] came up with is mechanically the same as the original unit, but now sports a Seeed studio Wio-E5 LoRa module, which uses the STM32WLE5 from ST for the heavy lifting. This has what looks like a Semtech SX126x integrated on-die (we can’t think of a sane way an actual SX126x die could be flip-chip mounted, but you never know). Using this module is a snap, needing only very minimal antenna-matching components and a spot of decoupling to function. On the sensing side of things, a Bosch BME680 gas sensor handling the AQI measurements, and a Bosch BMI270 6-axis IMU, provides a gyro and accelerometer, for all those planned user interaction features. As can be seen from the schematic, interfacing the EPD is pretty straightforward, just a handful of parts are needed to generate the necessary bipolar gate voltages via a simple SMPS circuit. The display controller handles it all internally, programmed via an SPI interface.

One area we’re quite fond of in this project are the neat hand-drawn icons, and variable width font, giving the display a kind of note-like quality when drawn on the low-ish contrast e-paper display.

Air quality measurement projects grace these pages from time to time, like this hacked Ikea Vindriktning, and this very similar Wio-E5-based project we covered last month.

Jigglypuff Sensor Breathes CO2 So You Don’t Have To

We’ve seen a lot of environmental monitoring projects here at Hackaday. Seriously, a lot. They usually take the form of a microcontroller, a couple sensors, and maybe a 3D printed case to keep it all protected. They’re pretty similar functionally as well, with the only variation usually coming in the protocol used to communicate their bits of collected data.

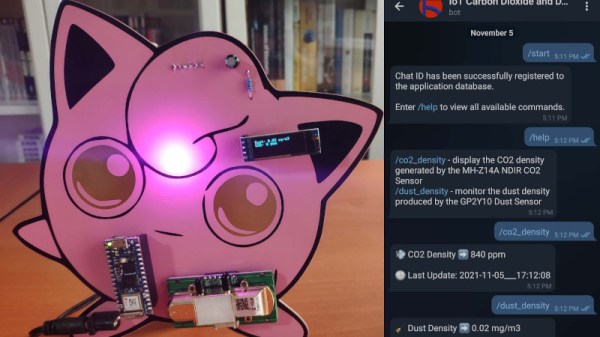
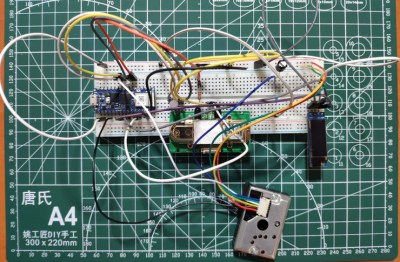
But even when compared with such an extensive body of previous work, this Jigglypuff IoT environmental monitor created by [Kutluhan Aktar] is pretty unusual. Sure, the highlights are familiar. Its MH-Z14A NDIR CO2 sensor and GP2Y1010AU0F optical dust detector are read by a WiFi-enabled microcontroller, this time the Arduino Nano RP2040 Connect, which ultimately reports its findings to the user via Telegram bot. There’s even a common SSD1306 OLED display on the unit to show the data locally. All things we’ve seen in some form or another in the past.

Testing the electronics on a bread board.

So what’s different? Well, it’s all been mounted to a huge Pokémon PCB, obviously. Even if you aren’t a fan of the pocket monsters, you’ve got to appreciate that bright pink solder mask. Honestly, the whole presentation is a great example of the sort of PCB artwork we rarely see outside of the BadgeLife scene.

Admittedly, there’s a lot easier ways to get notified about the air quality inside your house. We’re also not saying that haphazardly mounting your electronics onto a PCB designed to look like a character from a nearly 20+ year old Game Boy game is necessarily a great idea from a reliability standpoint. But if you were going to do something like that, then this project is certainly the one to beat.

Liberating The ESP8266 From Its Development Board

While the ESP32 is clearly a superior piece of hardware, we think you’ll agree that the ESP8266 is just too useful not to have a dozen or so kicking around the parts bin at any given time. Cheap, easy to use, and just enough capabilities to bring your projects into the wonderful world of IoT. But if you really want to get the most out of it, you’ll eventually have to skip the development board and start working with the bare module itself.

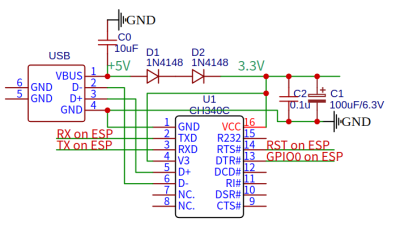
It can be a scary transition, but luckily, [Ray] has collected some notes that should prove helpful for anyone looking use modules like the ESP-12F in their own custom PCBs. From different tips on making sure the power-hungry modules get enough juice, to cost cutting measures that help reduce the ancillary parts needed in your circuit design, it’s a worthwhile read for new and experienced ESP8266 wranglers alike.

An auto-reset circuit with the CH340C

For example, [Ray] talks a bit about using the infamous GPIO10 pin. This pin is on the rear of the ESP8266 module, and on many development boards, it isn’t even connected. That’s because its internally hooked up to the ESP8266’s SPI flash chip, and using it can cause problems if you’re not careful. But as explained in the blog post, as long as you make sure the flash mode is set to “dual IO” (DIO), then GPIO10 can be used just like any other free pin.

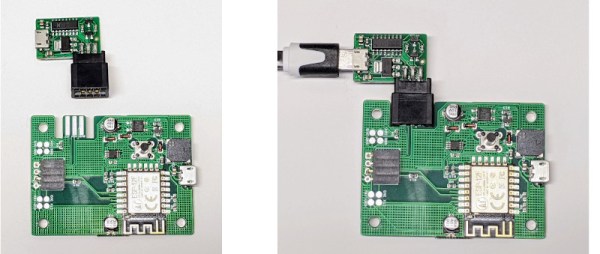
We also really liked the tip [Ray] shares at the end for making your boards more easily programmable. Sure you can leave an unpopulated header on the board, or fiddle with some pogo pin setup, but his edge connector approach is quite clever. Just slip the programmer on for the initial burn, and then after that you can update over the air.

There’s no denying how easy it is to throw something together with an ESP8266 development board, but we’ve covered so many incredible projects that have made use of the bare module’s diminutive dimensions that you’ll ultimately be missing out if you don’t cut out the middle-man.

Art of 3D printer in the middle of printing a Hackaday Jolly Wrencher logo

3D Printering: Why Aren’t Enclosures Easier?

For 3D printers that aren’t already enclosed, why is easily adding a cheap and effective enclosure still not a completely solved problem? The reason is simple: unless one’s needs are very basic, enclosures are more than just boxes.

Different people need different features, printers come in different shapes and sizes, and creating something that can be both manufactured and shipped cheaply is a challenge in itself. In this article I’ll explain how those things make boxing up your printer a tougher nut to crack then may seem at first glance.

Enclosures Have Different Jobs

People have different expectations of what an enclosure’s job should be, and that determines which features are important to them and which are not. Here is a list of meaningful features for 3D printer enclosures; not everything on this list is important to everyone, but everything on this list is important to someone. Continue reading “3D Printering: Why Aren’t Enclosures Easier?”