To say the Heathkit name is well known among Hackaday readers would be something of an understatement. Their legendary kits launched an untold number of electronics hobbies, and ultimately, plenty of careers. From relatively simple radio receivers to oscilloscopes and televisions, the company offered kits for every skill level from the post-war era all the way up to the 1990s.
 So it’s hardly a surprise that in 1977, seeing the success of early home computers like the Altair 8800 and IMSAI 8080, Heathkit decided to join the fray with a computer kit of their own. But by that point the home computing market had started to shift from a hobbyist’s pursuit to something the whole family could enjoy. Compared to the Apple II and TRS-80, both of which also launched in 1977, Heathkit’s machine seemed like the product of a bygone era.
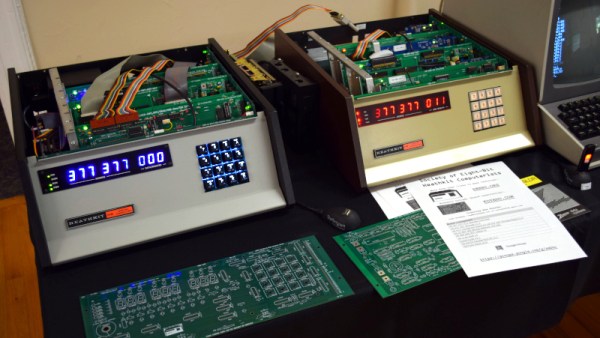
While it might not have gained the notoriety of the microcomputers it was designed to compete with, the Heathkit H8 is certainly not forgotten. Tucked away in a corner at the 2021 Vintage Computer Festival East was an impressive exhibit dedicated to the Society of Eight-Bit Heath Computerists (SEBHC) called Heathkit: Keeping the Legacy Alive. Presented by Glenn Roberts, this collection of original and modern hardware demonstrated the incredible lengths to which this group of passionate Heathkit owners have gone to not just preserve the memory of these often overlooked computers, but to continue to improve upon the kit’s unique design.
Continue reading “VCF East 2021: Preserving Heathkit’s 8-Bit Computers”