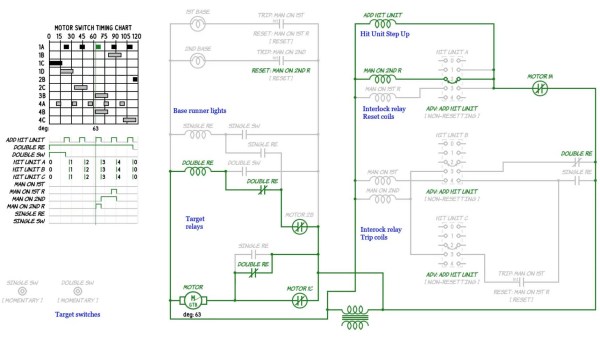
Hackaday Podcast 068: Picky Feeders, Slaggy Tables, Wheelie Droids, And Janky Batteries

Hackaday editors Elliot Williams and Mike Szczys ride the rails of hackerdom, exploring the sweetest hacks of the past week. There’s a dead simple component feeder for a pick and place (or any bench that hand-stuffs SMD), batteries for any accomplished mixologist, and a droid build that’s every bit as cool as its Star Wars origins. Plus we gab about obsolescence in the auto industry, fawn over a frugal microcontroller, and ogle some old iron.

Take a look at the links below if you want to follow along, and as always, tell us what you think about this episode in the comments!

Direct download (60 MB or so.)

Continue reading “Hackaday Podcast 068: Picky Feeders, Slaggy Tables, Wheelie Droids, And Janky Batteries”

From Zero To LED Cube In Less Than Seven Months

We know that LED video cubes are so last year, but that doesn’t mean we don’t still love to see them. Any project that incorporates over 24,000 LEDs is bound to be impressive, after all. But the more interesting bit about [Mike Cann]’s self-contained LED cube has more to do with the process he chose to get to the finished product.

There are two ways to approach a new project, especially when you’re new to hardware hacking like [Mike] is. One is to jump in with both feet and just see what happens, for good or for ill. The other is is to ease into it with a starter project, to find out where your limitations lay and work around them gradually. [Mike Cann] wisely chose the latter approach with his LED cube project, starting with an LED sand toy. The single 64 x 64 LED panel was a bit easier to work with, and got him up to speed on the care and feeding of such hardware, as well as the code needed to drive it. The video below tells the tale of scaling that project up by a factor of six to make the cube, a process that had its share of speedbumps. Everything ended up fitting together great, though, letting [Mike] get on to the software side. That’s where this project really shines — the smartphone app running the cube is really slick, and the animations are great.

There’s clearly room for new features on [Mike]’s cube, so here’s hoping he can carve out some time to make a great build even better. For inspiration he might want to check out this side-scrolling Castlevania cube, or perhaps read up on the finer points of OpenGL for LED cubes.

Continue reading “From Zero To LED Cube In Less Than Seven Months”

This Week In Security: DNS DDOS, Revenge Of The 15 Year Old Bug, And More

Another DDOS amplification technique has just recently been disclosed, NXNSAttack (technical paper here) that could be used against DNS servers.

We’ve covered amplification attacks before. The short explanation is that some UDP services, like DNS, can be abused to get more mileage out of a DDoS attack. The attacking machined send messages like this: “Hello Google DNS, This is the Hackaday server. Can you send me a really big DNS response packet?” If the DNS response is bigger than the request, then the overall attack is bigger as a result. The measure of effectiveness is the amplification factor. For every byte of DDoS sent by attacking machines, how much many bytes are actually sent to the victim machine? Mirai, for example, had an amplification factor of something around 2.6.

NXNSAttack has a theoretical per-byte amplification factor of 163. That’s not a missed decimal point, this has the potential to be quite the nasty problem. Continue reading “This Week In Security: DNS DDOS, Revenge Of The 15 Year Old Bug, And More”

Joy-Con Mod Gives Nintendo Switch Touchpad Control

While Valve’s Steam Controller ultimately ended up being a commercial flop, most users agreed its use of touch-sensitive pads in place of traditional analog joysticks or digital directional buttons was at least a concept worth exploring. Those same touchpad aficionados will likely be very interested in this modification by [Matteo Pisani], which replaces the analog joystick on a Nintendo Switch Joy-Con with a capacitive touch sensor.

As [Matteo] explains in his detailed write-up, the initial inspiration for this project was to create a permanent solution to joystick fatigue and drifting issues. He reasoned that if he removed the physical joystick completely, there would be no way for it to fail in the future. We’re not sure how many people would have taken the concept this far, but you can’t argue with the logic.

The original joystick is a fairly straightforward device, comprised of two analog potentiometers and a digital button. It’s connected to the Joy-Con’s main PCB with a 0.5 mm pitch flexible cable, so the first step for [Matteo] was to spin up a breakout for the cable in KiCad to make the development process a bit easier.

The board design eventually evolved to hold an Arduino Pro Mini, a digital potentiometer, and a connector for the circular touchpad. The Arduino communicates with both devices over I2C, and translates the high resolution digital output of the touch controller into an analog signal within the expected ranges of the original joystick. [Matteo] says he still has to implement the stick’s digital push button, but thanks to an impressive 63 levels of pressure sensitivity on the pad, that shouldn’t be a problem.

Now that he knows the concept works, the next step for [Matteo] is to clean it up a bit. He’s already working on a much smaller PCB that should be able to fit inside the Joy-Con, and we’re very interested in seeing the final product.

We’ve seen several interesting Joy-Con hacks since the Switch hit the market, including a somewhat less intense joystick swap. Between the Joy-Con and the legendary Wii Remote, Nintendo certainly seems to have a knack for creating input devices that catch the imagination of gamers and tinkerers alike.

Continue reading “Joy-Con Mod Gives Nintendo Switch Touchpad Control”

Is That An ESP32 On Your Wrist?

What could you do with a dual-core 240 MHz ESP32 that supports Arduino-style programming, with 16 MB of flash, 8 MB of PSRAM, and 520 k of RAM? Oh, let’s throw in a touchscreen, an accelerometer, Wifi, and Bluetooth. Besides that, it fits on your wrist and can show the time? That’s the proposition behind Lilygo T Watch 2020. If it sounds like a smartwatch, it is. At around $25 –and you can snag the hardware from a few different places — it is not only cheaper than the latest flagship smartwatch, but it is also infinitely more hackable.

OK, so the screen is only 1.54″, but then again, it is a watch. If Arduino isn’t your thing, you can use anything else that supports the ESP32 like Micropython or even Scratch. There are variants that have LoRA and GPS, at slightly higher prices. You can also find ones with heart rate monitors and other features.

Continue reading “Is That An ESP32 On Your Wrist?”

Spherical Quadruped Arduino Robot

[Greg06] started learning electronics the same way most of us did: buy a few kits, read a few tutorials, and try your hardest to put a few things together. Sound familiar? After a while, you noticed your skills started increasing, and your comfort level with different projects improved as well. Eventually, you try your hand at making your own custom projects and publishing your own tutorials.

Few are lucky to have a first-project as elaborate as [Greg06’s] quadruped robot. We don’t know about you, but for some of us, we were satisfied with blinking two LEDs instead of just one.

[Greg06’s] robot has a quadruped based, housed within a 3D printed spherical body. The legs are retractable and are actuated by tiny servo motors inside the body. [Greg06] even included an ultrasonic distance sensor for the obstacle avoidance mechanism. Honestly, if it weren’t for the ultrasonic distance sensor protruding from the spherical body, you might think that the entire robot was just a little Wiffle ball. This reminds us of another design we’ve seen before.

If that weren’t enough, the spherical head can rotate, widening the range of the ultrasonic distance sensor and obstacle avoidance mechanism. This is accomplished by attaching another servo motor to the head.

Pretty neat design if you ask us. Definitely one of the coolest quadrupeds we’ve seen.

3D Printed Switch Uses Paperclip

We live in a time when all manner of electronic components are practically a mouse click away. Still, we like to see people creating their own components. Maybe a stock part won’t fit or isn’t immediately available. Or maybe you just want to build it yourself, we get that. [Aptimex] shows off a design for a 3D printed slide switch that uses a paperclip for the contact material.

Of course, it had better be a metal paperclip and we’d make sure the shiny metal was pretty conductive. Of course, you could probably use thick wire to get the same effect. It sounds like [Aptimex] was inspired by an earlier Hackaday.io project that created a few different kinds of switches using similar techniques.

Continue reading “3D Printed Switch Uses Paperclip”