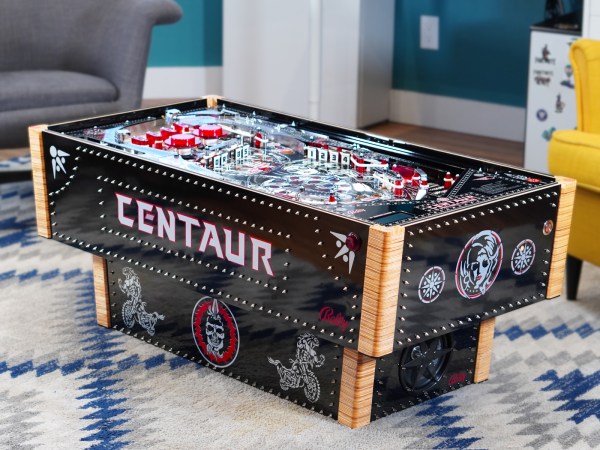
a render of the curved bartop arcade machine in fusion 360

Bartop Arcade Machine That Isn’t Afraid Of Change

Arcade machines have a distinct look and feel with large imposing cabinets and smaller bartop machines that try to keep the look and feel of a traditional upright arcade cabinet while taking up less space. An entirely new aesthetic has been given for this engineering marvel of a bartop arcade that [DIY Engineering] has made. Gone is the expansive angular box, and in its place are sleek and slender curves. The key piece that makes this build work is the curved monitor.

He started with a detailed design in Fusion360 that really focused on the tools and techniques that [DIY Engineering] knew would work. The backbone of the device was formed from wooden dowels around which 3d printed parts slid on. To the sides of the dowels, two pieces of acrylic are screwed on to act as an LED diffusor. To that acrylic, two pieces of CNC’d red oak are attached with two arcade buttons for pinball-style actuation. Over the top, cast acrylic was heated and then bent into the desired shape with the help of a two-part mold press. The screen slotted right in perfectly. Part of the display at the top was reserved for a marquee, and the look is extraordinary with the dark acrylic. Ten arcade buttons and an eight-way joystick offer an array of options for input.

Internally, a temperature-controlled fan and a Raspberry Pi are running the show. Controls are wired as GPIO and read by the Pi. So naturally, the games on the SD card tend to look best on a long vertical screen: vertical shooters and the like.

Arguably, the best thing about this project isn’t just the execution (which is fantastic) but the look behind the curtain at the process. So many potential problems were solved in the modeling stage, and fabrication went fairly smoothly as a result (or so we think youtube hides a multitude of sins). The results speak for themselves, and we think this is an enviable arcading machine. [DIY Engineering] has mentioned providing files in the future for you to build your own. If perhaps it seems a little intimidating, why not give a smaller 3D printable bartop a try?

Video after the break.

Continue reading “Bartop Arcade Machine That Isn’t Afraid Of Change”

Coaxcopter To Carry Man

One of the major perks of all the affordable flight controllers and motors available from the hobby market is that you can really experiment with some crazy aircraft designs. [amazingdiyprojects] is experimenting with a coaxial helicopter design, with the goal off possibly using for a manned version in the future. (Video link, embedded below.)

The aircraft uses a pair of coaxial counter-rotating motors with large propellers, with several redundant control surfaces below the propellers. One of the theoretical advantages of this arrangement, compared to the more conventional quadcopter type designs, is redundancy. While a quadcopter will start tumbling when a single motor fails, this design will still be able to descend safely with just one motor.

It is also not dependent on the main motors for yaw, pitch and roll control. In multirotors, the motors need to keep a significant amount of the motor’s available power in reserve to increase torque at a moment’s notice for attitude control. This craft can use all the available thrust from the motors for lift, since control is provided by the control surfaces. There are five sets of redundant control surfaces below the propellers, each set connected to a separate flight controller.

Another advantage of this design is efficient for a given footprint, since one large propeller will always be more efficient than multiple smaller propellers. One of the goals for [amazingdiyprojects] is to fit the full size craft in a shipping container or on a trailer for transport without dissasembly.

[amazingdiyprojects] has built manned drones before, using both electric motors and internal combustion engines. And don’t miss the most gonzo wind tunnel ever at 7:00 in the video below. Continue reading “Coaxcopter To Carry Man”

Pi Pico Emulates ROM For Speedy Retro Hacking

If you’ve ever worked on a system that loads its software from a ROM or EPROM, you know how much of a hassle it can be to make frequent changes to the code. Pulling the chip, flashing it, and sticking it back into the socket each time you change a line isn’t anyone’s idea of a good time. Which is why [Nick Bild] has come up with the PicoROM, a way to emulate a ROM chip using the Raspberry Pi Pico.

With the Pi Pico standing in for the original ROM, updating firmware takes a fraction of the time and doesn’t require you to actually disconnect any of the hardware. [Nick] had done something similar with FPGAs in the past, but the far cheaper and easier to work with Pi Pico makes this version particularly appealing. The secret to getting it to work is the overclocking potential of the Pico, which he says has been pushed to 400 MHz for this particular application.

PicoROM on a breadboard.

The downside is that you can’t access the Pico’s onboard flash when the chip is running that fast. To get around that limitation, all of the code is loaded into the microcontroller’s RAM. With a healthy 264 KB of memory this isn’t really a problem when emulating 32 KB chips, but [Nick] says his method would quickly fall apart for larger ROMs.

Beyond the Pi Pico itself, [Nick] is using a trio of 74LVC245AN 8-bit logic level shifters so the chip can talk to the 5 V logic of his homebrew 6502 computer. With everything wired up on a simple breadboard, PicoROM has no trouble serving up the operating system as it hums along at 2 MHz.

Of course, a modern high-performance microcontroller isn’t strictly necessary. In the past we’ve covered devices that could emulate an EPROM using 1990s era silicon.

Screen capture of the WWN project, from the project's website, showing the instructions for WWN which are themselves presented as a WWN site.

Making Web Pages With Word?

If you’ve ever examined the messy HTML that results from doing a Save As HTML from Microsoft Word, you can appreciate [Jim Yuill]’s motivation for his WordWebNav (WWN) project. [Jim] uses Word to document his technical projects, and wanted an easy way to generate web pages. Not only is Word-generated HTML nearly unreadable, [Jim] notes there are known bugs, as well. His project attempts to solve these shortcomings, and adds new features like a navigation pane and headers, among others. Here is a link to a dummy project which shows off these features.

There are, of course, other ways of generating web pages from your technical documentation — there is the Markdown / Pandoc combination, various Wiki solutions, or GitHub Pages, for example. If you’re Python-focused, there’s always the Jupyter Notebooks / JupyterLab approach which we wrote about in 2019. But these presume the source documents are in a certain format. If you have years of existing documentation in Word, or you prefer (or are required) to use Word, [Jim]’s WWN tool might be of interest.

The open source, Python-based program can be found in the project’s GitHub repository. [Jim] has a lot of experience writing software, and the clean and well-organized source code reflects this. Do you convert project documentation to HTML for browsing, be it local or online? If so, share your techniques in the comments below.

A Giant Engine Needs A Giant Engine Stand

Engine stands are great to have on hand for when you need to work on an engine outside a vehicle. However, if your engine is particularly large, you might find off-the-shelf solutions difficult to find. [Liebregts] was recently contacted by someone in just such a pickle, who had an 8-litre Bentley engine from 1928 and nothing to put it on. Thus, constructing a custom engine stand was in order.

The original home of the hefty 8-liter engine.

The stand is built out of stout 50x50x4mm steel tubing in order to handle the weight of the gigantic vintage engine. It’s designed with an eye to ground clearance, such that an engine crane can easily slide under the stand when it’s time to lift the engine back in the car. It also allows the whole engine to be turned upside down, and even raised and lowered. This makes it easier to get to different parts of the engine, while keeping the center of gravity where it needs to be to avoid the whole assembly falling over.

It’s not a hugely complicated build, but it goes to show just how much of a difference it can make when you have the right tools for the job. With the engine out and on its stand, it’s much easier to work on and handle the many complicated tasks in its restoration. It also benefits from being custom built to suit the dimensions of the Bentley engine. Everything fits and it just works!

While few of us have rare 1928 Bentleys in need of an engine-out service, it’s a build that should serve as great inspiration for those working on similar tasks. Meanwhile, consider building yourself a custom engine crane to help out around the garage.

Extending bicycles can lift it's rider a meter into the air on four pneumatic pistons

Extending Bicycle Will Let You Stand Out Above The Crowd

Some bicycles are built primarily for practicality, while others are more focused on novel looks. [Make It Extreme]’s latest project, the extending bicycle, falls squarely in the latter category.

Built around four custom-machined pneumatic pistons, this electric bike can lift the rider about a meter into the air with the flick of a switch. The front pair forms the bicycle’s forks, while the rear pair is mounted between the frame and swingarm. A small onboard compressor is used to charge a pair of modified fire extinguishers, which feed the pistons via pneumatic valves mounted on the handlebars. The wheels and brakes were scavenged from an old scooter. Since the length between the crankset and rear wheel never changes, there is no need to struggle with chain tensioners as the ride height changes.

While we would hate to face-plant from that height, it certainly looks like a fun ride and conversation starter. This is the case for many of [Make It Extreme]’s projects, like a ridable tank track and monowheel motorcycle.

Continue reading “Extending Bicycle Will Let You Stand Out Above The Crowd”

A Microcontroller Friendly AR Headset On The Cheap

Generating the real-time images required for augmented reality (AR) goggles usually requires a fair amount of processing power, to the point that DIY efforts based around the Raspberry Pi often have trouble keeping up. But what if your AR aspirations don’t require fancy high-resolution graphics? If text and the occasional icon is enough to get the job done, then these lo-fi AR goggles from [bobricius] might be the ideal solution.

As with previous homebrew AR rigs we’ve seen, this one starts with an affordable headset designed to project the display of a smartphone onto a pair of curved optical combiners. But instead of tucking a phone into the headset, [bobricius] is using a custom PCB that holds a pair of ST7789 1.3 inch 240 x 240 IPS displays. Connected over SPI and supported by just about any microcontroller you’d care to use, tossing some textual data over your field of vision can be accomplished in just a few lines of code.

[bobricius] has actually put together a couple different versions of the PCB for this project. One uses his custom ATSAMD21E18-based “ArmaBrain” module that packs the MCU and an array of common components onto a 28 mm square board that can be easily dropped into other projects. If you’d rather roll your own solution, the second version of the board that simply holds the two displays in the appropriate position and routes the SPI lines to a convenient header should do nicely.

We’ve seen augmented reality displays using microcontrollers like the ESP32 before, but those were essentially just remote displays for a more powerful system. We like this simplified approach, as there are plenty of applications where just getting a few lines of text or some low-resolution images would be more than sufficient for the task at hand. Plus, the commercially-made headset this project is based on certainly looks better than some of the other donor goggles we’ve contemplated modifying in the past.

Continue reading “A Microcontroller Friendly AR Headset On The Cheap”