Turbochargers as used on cars bear some similarities with jet engines. Fundamentally, both contain a turbine that harvests energy from hot gas, using it to spin a compressor which sucks in fresh air for combustion. Thus, turning a turbocharger into a jet engine is entirely possible, and [HRom] decided to have a crack at it.
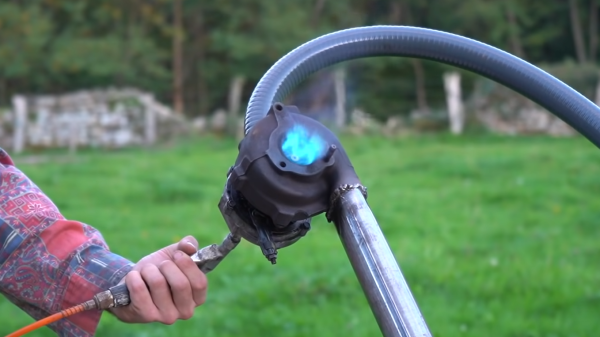
The build starts with a turbo that appears to have been used on a diesel engine from the Volkswagen group. The first step was to cut the integral exhaust manifold off the turbo housing. A combustion chamber is then added which takes in fresh air from the compressor housing, and delivers hot combustion products to the turbine inlet. The homebrewed jet engine burns propane as fuel, introduced into the chamber via a nozzle.
The initial test failed as combustion was occurring at the turbine exhaust rather than in the combustion chamber, likely due to the lack of a proper ignition source inside the combustion chamber. A redesign employed a bigger combustion chamber built out of a fire extinguisher, with smouldering wood pellets inserted inside to get the injected propane burning.
The redesign works, and the turbocharger jet engine releases a thunderous scream as it turns at ever-increasing speed. However, with no oiling system or any way of controlling air or fuel flow in the engine, it eventually stops in a huge puff of smoke. Regardless, the engine did run in a sustained manner even if the ignition method was rudimentary.
We’ve seen similar builds before, and the rudimentary construction means they’re typically nowhere near being flight-weight engines. They are incredibly cool, however, and a great way to learn the basic principles of how jet engines work. Video after the break.
Continue reading “Turbocharger Jet Engine Relies On Wood Pellet Ignition” →