Is 32-bits Really Dead?

While some of us are still clinging onto our favorite 8-bit microprocessors, ARM announced they will be killing off the 32-bit architecture in 2022 and/or 2023. Over on the GaryExplains YouTube channel, [Gary Sims] posted a great review of the current 32- vs 64-bit state-of-affairs — not just for ARM but for Intel and AMD processors as well. And it’s a dismal outlook for you 32-bit fans.

ARM announced last Fall that there would be no more 32-bit support as of 2022, then this March they made a similar announcement but with a 2023 deadline. [Gary] tries to parse these statements, and takes an educated guess at what the disparity means (spoiler alert — he predicts that one more 32-bit core will soon be released).

[Gary] clearly breaks down the 32-bit situation by operating systems such as Linux, Windows, MacOS, Android, and iOS, and how all of these have been transitioning to 64-bits over recent years. He does a thorough job, and concludes that the transition is already well underway. And while Linux and Windows have not completely dropped 32-bit support, the writing is on the wall.

Take note, however, that this discussion regards the Cortex-A family of cores found in smart phones, tablets, computers, and powerful embedded applications like autonomous vehicles. The popular 32-bit Cortex-M family of low-cost / low-power cores that are used in so many embedded system designs will remain 32-bits for the foreseeable future.

After watching [Gary]’s presentation, if you want to learn more, check out the writeup that [Maya Posch] did on the details of the latest ARMv9 ISA a few weeks ago. Also watch this 8-bit vs 32-bit presentation by our Editor-in-Chief [Mike Szczys]. Despite being from five years ago, it is still quite applicable today. What about 16-bit MCUs — the old Intel/AMD embedded 80186 processor, the 8051 follow-ons like the 80C196, 80C251, or 8051XA, the 6502 follow-ons like the 65C816, Zilog’s Z8000, the Renesas M16C, etc. — is anyone using them anymore? If so, or if you’re using a 4-bit MCU these days, let us know in the comments below.

Continue reading “Is 32-bits Really Dead?”

Baby C-17 Sends Imaginations Soaring

The C-17 Globemaster III is a military cargo jet that can carry what their commercial counterparts can’t, to places those other planes can’t go. The people who keep these planes flying are proud of their capable airlifter, but it’s hard to show them off. Solution: build a scaled-down version more suitable for driving off base for a parade down Main Street and other community events.

While the real thing was built under an expensive and contentious military procurement process, the miniature was built with volunteer labor using castoff materials. The volunteer force included maintenance crew whose job is to know the C-17 inside and out. Combined with fabrication skills that comes with the job, the impressive baby plane faithfully copied many curvatures and details from full-sized originals. (Albeit with some alteration for its cartoony proportions.) Underneath are mechanicals from a retired John Deere Gator utility vehicle. They usually resemble a large golf cart except with a cargo bed and more rugged suspension. Basically they are to golf carts as a C-17 is to a 767. Amusingly, the little plane has its own rear loading ramp, superficially preserving the cargo-carrying capacity of the original Gator chassis.

Interior features continue, though the official picture gallery doesn’t show them. There is a flight deck with control panels and various sights and sounds to keep visitors entertained. Enough details were poured into the exhibit that some people had to ask if the little plane can fly, and the answer is a very definite no. The wings, and the engine pods mounted to them, are only for show carrying The Spirit of Hope, Liberty & Freedom. It is quite a long official name for such a short stubby thing.

We always love to admire impressively put-together miniatures, and not all projects require skill of aircraft mechanics. Like this very approachable miniature forklift project. But there are plenty of other projects whose skills put us in awe, like this remote-control car powered by a miniature V-10 engine.

[via The Museum of Flight]

Enterprise Helm Commands The Entertainment Center

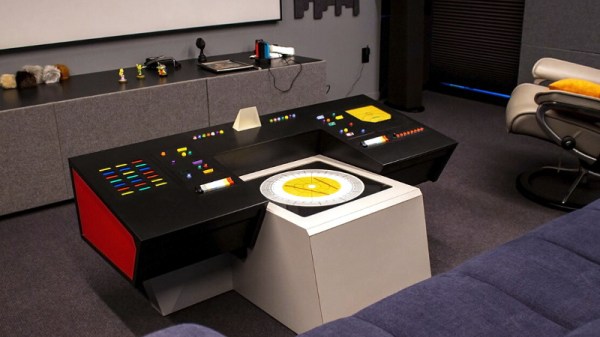
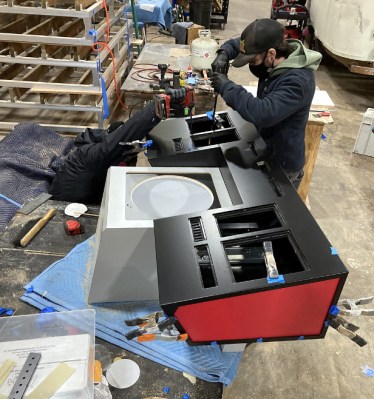
Many a young geek wished they could get a chance to sit at the helm of the USS Enterprise, wildly tapping on unlabeled technicolor buttons with the self-assured confidence of a proper Starfleet officer. For most of us it was a dream unrealized, but right now somebody in the Seattle, Washington area is getting to do exactly that in their media room. We won’t deny being jealous, but at least our collective egos can take some comfort in the knowledge that they had to outsource the construction of their replica helm to the fine folks at [Blackmouth Design].

There’s not a lot of technical details to be had, but considering the page for this project is only meant to show off the company’s design and fabrication skills, we can’t blame them too much. If we were in the business of selling these things, we’d probably keep some of the juicer details under wraps too.

But we do know there’s “Arduino technology” under the hood that fires up different light and sound effects depending on which of the vintage rocker switches has been flipped. The red momentary buttons lined up on the right side of the coffee table sized panel are tied into the home media center to do things like turn off the lights and lower the projector screen. Check out the video below for a brief demo.

In a post on Reddit, one of the engineers behind the project explains that the top surface of the helm is 3/16″ powder coated aluminum, with the plywood that makes up the base laminated in the classic Original Series color scheme of red, grey, and black. The artwork for the astrogator was created from scratch, backlit with LEDs, and placed behind a 1/4″ acrylic panel for protection. We imagine the fact that it’s parallel to the ground means it’s supposed to be a space to place your drinks or popcorn, though if it was in our house, nobody would be bringing food or drink anywhere near it.

In all honesty, while Hackaday is decidedly more about building than buying, we can’t fault anyone for forking over their hard earned cash for craftsmanship of this caliber. After all, we’ve had our eyes on that officially licensed tricorder replica for quite some time now.

Continue reading Enterprise Helm Commands The Entertainment Center”

Do Wristwatches Get Any Better Than A Cuckoo Clock?

There are few better ways of asserting your independent spirit as a hardware hacker than by creating your own special timepiece. Even more so if the timepiece is a watch, particularly in this era of smartwatches. Few home-made timepieces though have come as near to wristwatch Nirvana as the cuckoo clock wristwatch from [Kiyotaka Akasaka], which we would venture to name as having won wristwatches. Nobody will top this one in the field of home-made clocks!

Superlatives aside, this is an electronic cuckoo clock on the wrist, with an LED ring dial and a motorised cuckoo, all clothed in an authentically rustic tiny wooden cuckoo clock case. It communicates via BLE with a smartphone, and even has a sound channel for a cuckoo sound. Frustratingly there’s little in the way of detail about the electronics themselves, but we’re guessing that almost Bluetooth-capable microcontroller could be pressed into service. Take a look at the video below the break.

So we’ve established that it’s a cuckoo clock wristwatch, and that we like it, a lot. It is however not the only novelty cuckoo clock we’ve brought you.

Continue reading “Do Wristwatches Get Any Better Than A Cuckoo Clock?”

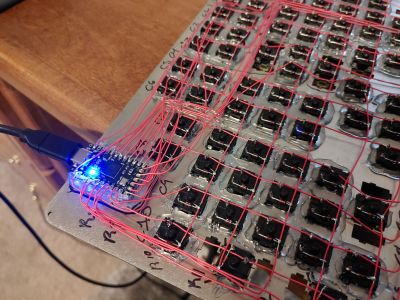
Huge Hand-Wired Ortho Is A Beautiful Battleship Keyboard

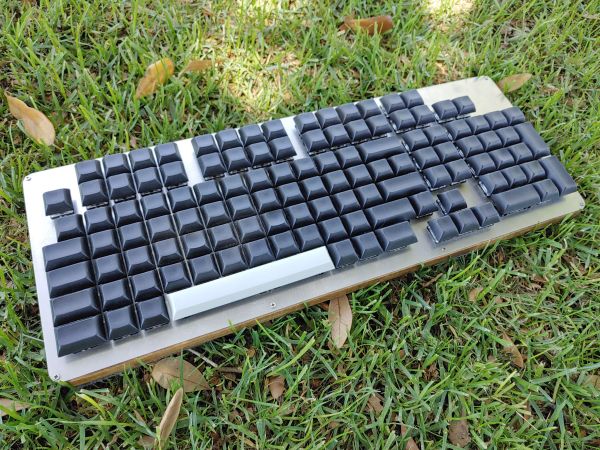
There are all sorts of reasons to build your own keyboard, and we would argue that the more custom the layout, the easier it is to justify the time and expense. At least, that’s what we’re going with for this post about [GoldenSights]’ big, beautiful custom ortholinear called Nearer, as in nearer to perfect. Just look at this battleship!

[GoldenSights] has long wanted a mechanical keeb, but has never been into any of the commercial offerings. That goes double since none of them seem to have a vertical Home/End cluster, which [GoldenSights] has become quite attached to thanks to a space-saving Logitech rectangle keeb. But if you’re going to make your own keyboard, you should go all out, right? Right. So [GoldenSights] started by adding another 12 F keys and making it ortholinear. Then things got personal with an extra Backspace where Num Lock usually lives, and dedicated keys for switching between English, Korean, and Chinese.

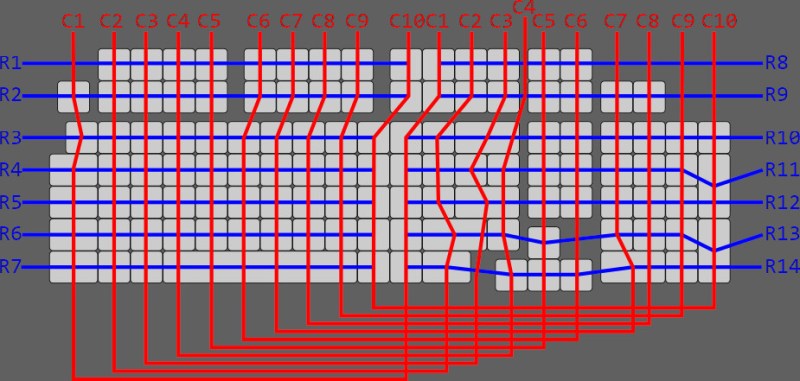
[GoldenSights] wanted USB-C and so they used an Elite-C microcontroller, but there’s one big problem — it only has 24 pins, and according to the matrix math, the board needs 27 total. Rather than using an I/O expansion chip or a second microcontroller, they wired it up as duplex matrix. This is an alternative way of wiring up a matrix so that it’s closer to being square by doubling up the rows and halving the number of columns.

We don’t think [GoldenSights] gives themselves enough credit here. They say that they lean toward calling it assembly rather than a build, but we disagree with that assessment. [GoldenSights] broke in this giant keeb with giant write-up of the build, so go see for yourself. There’s a ton of build pictures and a fair amount of hot glue, so be warned.

Let’s talk about those keycaps for a second. The space bar was supposed to be black PBT like the others, but the keycap manufacturer didn’t have a 6u space bar in black and sent a gray one instead. Honestly, we like the way it looks. And we love that [GoldenSights] painstakingly laid out the keys on foam board before committing to a laser-cut metal switch plate.

Want a space-saving ortholinear that doesn’t feel too cramped? Check out this wafer-thin keyboard that’s designed to squat over your inferior laptop keys.

Via KBD and r/mk

A Commodore 64 As You Have Never Seen One Before: Game Boy Form Factor!

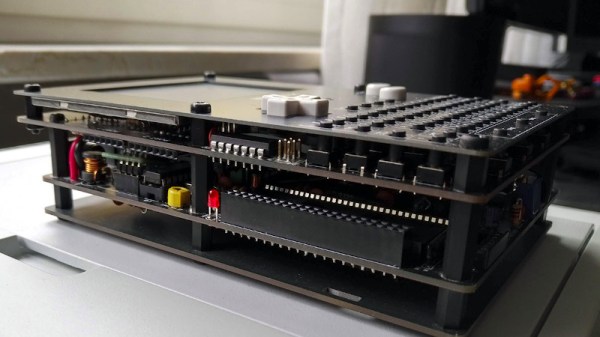
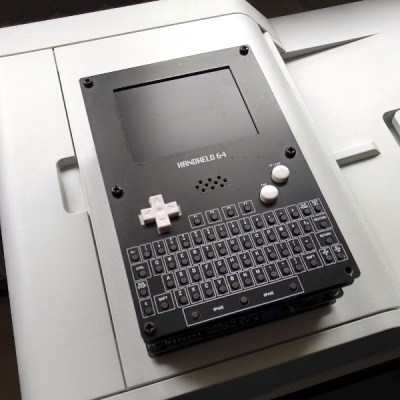
It’s now nearly four decades since the iconic Commodore 64 8-bit computer saw the light of day, and the vintage format shows no sign of dying. Enthusiasts have produced all kinds of new takes on the platform, but it’s fair to say that most of them have concentrated on the original style keyboard console form factors. A completely different take on a Commodore 64 comes from [UNI64] in the form of the Handheld 64, a complete Commodore 64 in a Game Boy style form factor that uses the original 64 chipset.

It achieves this improbable feat by sandwiching together several PCBs, with a tactile switch keyboard and LCD display at the top. It appears to bring the 64 ports out to headers, and the ROM cartridge port to an edge connector socket at the top of the device. A departure from the 1980s comes in using a Raspberry Pi Zero to emulate a 1541 floppy drive though.

Sadly unlike a Game Boy there’s no onboard battery, but don’t let that take away from the quality of this feat. A forum post from [3D-vice] has a set of decent-quality pictures, and even if you don’t have a handy 64 chipset lying about we’re sure you’ll still appreciate them. If home made 64s are your thing, take a look at how you can build one without Commodore parts.

Thanks [pbuyle] for the tip!

An Open-source Scientific RPN Calculator

Why reach for a bland, commercially available calculator when you be using a model that employs RPN (Reverse Polish Notation) in its calculations and be a custom build all at the same time? The kids may have colour TFTs and graphing functions, but your keyboard has no equals sign, and that means something.

Unfortunately for RPN enthusiasts, the RPN calculator is a little on the rare side. Since classic models from the 1970s and ’80s are rather pricey, [Anton Poluektov]’s just build his own called the OpenCalc. This glorious specimen is an open hardware RPN calculator with more than a nod to the venerable Hewlett Packard HP42 in its design.

At its heart is an STM32L476 low-power ARM processor and a Sharp Memory LCD, all on a PCB clad in a 3D-printed case you’d have been proud to own in the 1980s. It runs from a CR2032 which is more than can be said for some modern styles of calculator, and it gives the user everything you could wish for in a scientific calculator. The key legends are a set of printable stickers, which when printed on self-adhesive laser film prove durable enough to last. All the resources can be found in a GitHub repository, so if RPN is your thing there’s nothing to stop you building one for yourself.

If RPN interests you, it’s a subject we’ve looked at in greater detail in the past.