A Miniature MNT For Every Pocket

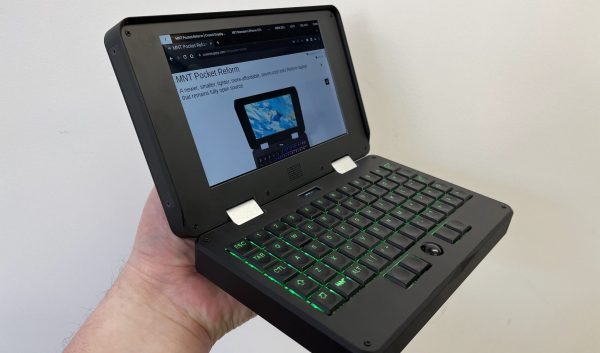
Last time Hackaday went hands on with a product from German company MNT, it was the Reform laptop; a full size computer with a full feature set and fully open source design. Now they’re back with the same value proposition and feature set crammed into a much more adorable (and colorful!) package with the MNT Pocket Reform. If you want the big Reform’s open source philosophy in a body fit for a coat pocket, this might be the computing device for you.

To refresh your memory, MNT is a company that specializes in open source hardware and the software to support it. They are probably best known for the Reform, their first laptop. Its marquis feature is a fully open design, from the mechanical components (designed with OSS tools) to the PCBAs (designed with KiCad) to the software (designed with, uh, software). When originally shipped that product packed a DIMM-style System On Module (SOM) with a default configuration containing a quad core NXP i.MX8M Quad and 4GB of RAM, as well as mini PCIe Card and M key m.2 2280 slots on the motherboard for storage and connectivity. That computer was designed to be easily serviceable and included a plethora of full sized ports along with easy to source cylindrical battery cells. The Pocket Reform takes the same intent and channels it into a much smaller package.

Continue reading “A Miniature MNT For Every Pocket”

PCIe For Hackers: The Diffpair Prelude

PCIe, also known as PCI-Express, is a highly powerful interface. So let’s see what it takes to hack on something that powerful. PCIe is be a bit intimidating at first, however it is reasonably simple to start building PCIe stuff, and the interface is quite resilient for hobbyist-level technology. There will come a time when we want to use a PCIe chip in our designs, or perhaps, make use of the PCIe connection available on a certain Compute Module, and it’s good to make sure that we’re ready for that.

PCIe is everywhere now. Every modern computer has a bunch of PCIe devices performing crucial functions, and even iPhones use PCIe internally to connect the CPU with the flash and WiFi chips. You can get all kinds of PCIe devices: Ethernet controllers, high-throughput WiFi cards, graphics, and all the cheap NVMe drives that gladly provide you with heaps of storage when connected over PCIe. If you’re hacking on a laptop or a single-board computer and you’d like to add a PCIe device, you can get some PCIe from one of the PCIe-carrying sockets, or just tap into an existing PCIe link if there’s no socket to connect to. It’s been two decades since we’ve started getting PCIe devices – now, PCIe is on its 5.0 revision, and it’s clear that it’s here to stay.

Continue reading “PCIe For Hackers: The Diffpair Prelude”

Hackaday Podcast 203: Flashlight Fuel Fails, Weird DMA Machines, And A 3D Printed Prosthetic Hand Flex

This week, Editor-in-Chief Elliot Williams and Managing Editor Tom Nardi meet up virtually to talk about all the hacks that are fit to print. This week’s episode starts off with a discussion about the recently unveiled 2023 Hackaday.io Low-Power Challenge, and how hackers more often than not thrive when forced to work within these sort of narrow parameters. Discussion then continues to adding a virtual core to the RP2040, crowd-sourced device reliability information, and mechanical Soviet space computers. We’ll wrap things up by wondering what could have been had Mattel’s ill-fated ThingMaker 3D printer actually hit the market, and then engage in some wild speculation about the issues plaguing NASA’s latest Moon mission.

Check out the links below if you want to follow along, and as always, tell us what you think about this episode in the comments!

Available in the cloud, or as download!

Continue reading “Hackaday Podcast 203: Flashlight Fuel Fails, Weird DMA Machines, And A 3D Printed Prosthetic Hand Flex”

Machining With Electricity Explored In The Hack Chat

As a Hackaday reader, it’s safe to assume you’ve got a better than average understanding of electricity. There’s also an excellent chance you’re familiar with machining, and may even have a lathe or old mill in the workshop. But combining the two, and actually machining a piece of metal with electricity, isn’t something that many home gamers can boast first-hand experience with.

Daniel Herrington

Of course, that doesn’t mean there isn’t an interest. To help answer the burning (or at least, sparking) questions from the community, CEO and founder of Voxel Innovations Daniel Herrington stopped by this week’s Hack Chat to talk about the cutting edge of both electric discharge machining (EDM) and the closely related field of electrochemical machining (ECM). While his company uses the technology to produce components at incredible scales, Daniel got his start tinkering in the garage like so many of us, enabling him to provide both a professional and hobbyist prospective on the technologies.

Naturally, the first big question to be addressed was the difference between EDM and ECM. Put simply, electric discharge machining uses high-voltage to literally blast away material from the workpiece. The resulting finish is generally rough, and progress through the material tends to be slow, but it’s relatively simple to implement.

In contrast electrochemical machining could be thought of as a sort of reverse electroplating process, as the material being removed from the workpiece is dissolved and transferred to the cathode — though in practice the flow of pressurized electrolyte keeps it from actually plating the negatively charged tool. ECM is a faster process than EDM and allows for an exceptionally smooth surface finish, but is considerably more challenging from a technical perspective. Continue reading “Machining With Electricity Explored In The Hack Chat”

Resurrecting PONG, One Jumper Wire At A Time

Between 1976 and 1978, over one million Coleco Telstar video game consoles were sold. The Killer App that made them so desirable? PONG. Yep, those two paddles bouncing a ball around a blocky tennis court were all the rage and helped usher in a new era. And as [Dave] of Dave’s Garage shows us in the video below the break, the bringing the old console back to life proved simpler than expected!

Thankfully, the console is built around what [Dave] quite aptly calls “PONG on a chip”, the General Instrument AY-3-8500 which was designed to make mass production of consoles possible. The chip actually contains several games, although PONG was the only one in use on the Coleco.

After removing the CPU from the non-functional console, [Dave] breathed life into it by providing a 2 MHz clock signal that was generated by an Arduino, of all things. A typical 2N2222 amplifies the audio, and a quick power up showed that the chip was working and generating audio.

Video is smartly taken care of just as it was in the original design, by combining various signals with a 4072 OR gate. With various video elements and synchronization patterns combined into a composite video signal, [Dave] was able to see the game on screen, but then realized that he’d need to design some “paddles”. We’ll leave that up to you to watch in the video, but make sure to check the comments section for more information on the design.

Is a breadboarded PONG console not retro enough for you? Then check out this old school mechanical version that was found languishing in a thrift store.

Continue reading “Resurrecting PONG, One Jumper Wire At A Time”

The Seven-Segment Display That’s Also An Input Device

We’re used to seeing all manner of seven-segment displays, be they mechanical, electronic, or something in between. But what all these displays have in common is that they’re, you know, displays. Using them as inputs would just be crazy talk, right?

Perhaps, but we like where [Dave Ehnebuske] is going with “InSlide,” the seven-segment input device. The idea for this comes from the “DigiTag” display, which we covered back in October, and divides a standard seven-segment character into three vertical strips — two skinny ones for the outside vertical segments, and one wide strip holding the horizontal elements. By sliding these strips up and down relative to each other, the standard nine digits, plus a few other characters, can be composed.

[Dave]’s take on this theme started by building his display from laser-cut plywood pieces, which is a nice choice because of the good contrast between the white wood and the engraver segments. Next, he embedded rare earth magnets in the slides and installed seven Hall effect sensors in the frame. The sensors are connected to an Arduino Nano via a 74HC165 parallel-load shift register, which lets multiple modules be daisy-chained together. He also built an Arduino library to read the current state of the segments; it supports the full hexadecimal character set, or even duodecimal if you like.

[Dave] has shared the library, and it looks like you can get the build files for the mechanism from the original project. That’s good, because this looks ripe for hacking. It looks like it would be pretty easy to motorize a display like this by adding rack-and-pinion gearing and steppers — something like that could make an interesting clock.

Walnut Case Sets This Custom Arduino-Powered RPN Calculator Apart From The Crowd

How many of us have an everyday tool that’s truly unique? Likely not many of us; take a look around your desk and turn out your pockets, but more often than not, what you’ll find is that everything you have is something that pretty much everyone else on the planet could have bought too. But not so if you’ve got this beautiful custom RPN calculator in a wooden case.

This one comes to us from [Shinsaku Hiura], who generally dazzles us with unique mechanical clocks and displays. This calculator solves a more practical problem — the dearth of RPN calculators on the market with the correct keyboard feel, specifically with the large keys and light touch he desired. Appropriately, the build started with a numeric keypad, which once liberated of its USB interface was reverse-engineered to figure out how the matrix was wired. Next up, a custom PCB to connect the keypad to an Arduino and a 20×4 LCD display was milled up, while a test case was designed and printed to check fitment. The final case was milled from a block of solid walnut and fitted with an acrylic window, for a sharp look with clean lines and pleasing colors.

As for the calculator itself, the demo below shows it going through its paces. The code is clever because it leverages the minimal number of keys available by hiding all the scientific and engineering functions behind a “secret silver key” that was once the equals key and obviously not needed in RPN. Hats off to [Shinsaku] for a handsome and unique addition to his desk.

Continue reading “Walnut Case Sets This Custom Arduino-Powered RPN Calculator Apart From The Crowd”