Later this month, people who use GitHub may find themselves suddenly getting an error message while trying to authenticate against the GitHub API or perform actions on a GitHub repository with a username and password. The reason for this is the removal of this authentication option by GitHub, with a few ‘brown-out’ periods involving the rejection of passwords to give people warning of this fact.
This change was originally announced by GitHub in November of 2019, had a deprecation timeline assigned in February of 2020 and another blog update in July repeating the information. As noted there, only GitHub Enterprise Server remains unaffected for now. For everyone else, as of November 13th, 2020, in order to use GitHub services, the use of an OAuth token, personal token or SSH key is required.
While this is likely to affect a fair number of people who are using GitHub’s REST API and repositories, perhaps the more interesting question here is whether this is merely the beginning of a larger transformation away from username and password logins in services.
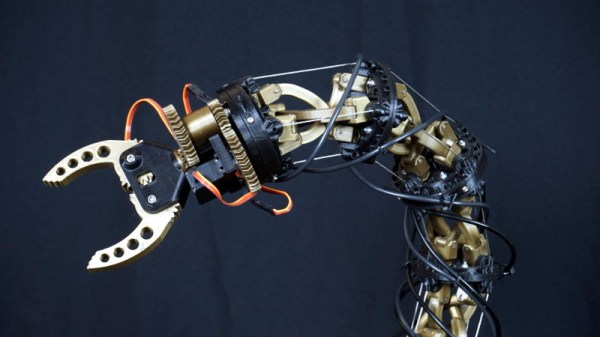
We all bring our own areas of expertise to our work when we build the projects that find their way in front of Hackaday writers, for instance a software developer brings clever brains to their microcontroller, or an electronic engineer might bring a well-designed piece of circuitry. [Yvo de Haas] is a mechanical engineer, and it’s pretty clear from his animatronic tentacle that he has used his expertise in that field to great effect.
If you think it looks familiar then some readers may recall that we saw a prototype model back in February at Hacker Hotel 2020. In those last weeks before the pandemic hit us with lockdowns and cancellations he’d assembled a very worthy proof of concept, and from what we can see from his write-up and the video below he’s used all the COVID time to great effect in the finished product. Back in February the control came via a pair of joysticks, we’re particularly interested to see his current use of a mini tentacle as a controller.
At its heart is a linkage of 3D-printed anti-parallelograms linked by gears, with cables holding the tension and controlling the movement of the tentacle from a set of winches. The design process is detailed from the start and makes a fascinating read, and with its gripper on the end we can’t wait for an event that goes ahead without cancellation at which we can see the tentacle for real.
For his project, [Ish] used an Arduino Nano 33 BLE Sense due to its built-in microphone, sizeable RAM for storing large chunks of data, and it’s BLE capabilities for later connecting with an app. He began his project by collecting background noise using Edge Impulse Studio’s data acquisition functionality. [Ish] really emphasized that Edge Impulse was really doing all the work for him. He really just needed to collect some test data and that was mostly it on his part. The work needed to run and test the Neural Network was taken care of by Edge Impulse. Sounds handy, if you don’t mind offloading your data to the cloud.
[Ish] ended up with an 86.3% accurate classifier which he thought was good enough for a first pass at things. To make his prototype a bit more “finished”, he added some status LEDs, providing some immediate visual feedback of his classifier and to notify the caregiver. Eventually, he wants to add some BLE support and push notifications, alerting him whenever his baby needs attention.
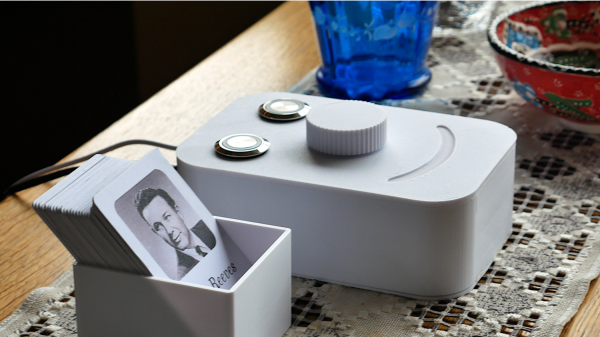
[ananords] and his girlfriend wanted to make a simple and easy to use music player for her grandmother. Music players like CD players and MP3s have gotten just a bit too difficult to handle, so they wanted to find a much simpler solution.
They conceived the idea of creating a little jukebox called Juuk, with a simple and easy to use interface. They created individual RFID cards with the artist’s photo on the front face, making it easy to select different options from the music library. Juuk has a built-in RFID reader that will recognize each RFID card and play the appropriate musical number from an SD card.
This simple interface is much more user-friendly than those awful touchscreen devices that we’re all forced to fiddle with today and also has a cool retro appeal that many of our readers are sure to appreciate. Juuk also has a pretty ergonomic interface with a big, easy-to-use knob for controlling the volume and two appropriately illuminated buttons, one green and one red, for simple stop and play options.
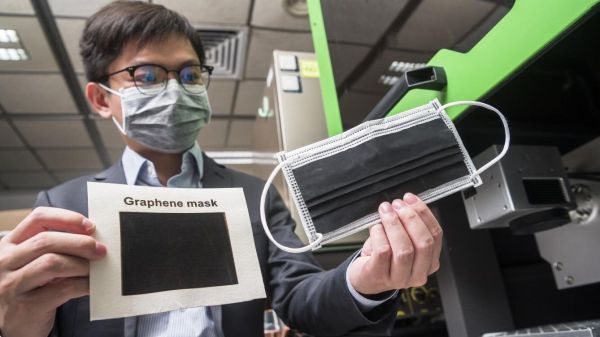
We are all intimate with face coverings to slow the spread of the coronavirus. Some are reusable, and some become waste after one use. [Dr. Ye Ruquan] and a research team from City University of Hong Kong, CityU, are developing an inexpensive reusable mask with outstanding antibacterial properties, and, get this, the graphene it contains will generate a tiny current when moistened by human breath. There isn’t enough power to charge your phone or anything, but that voltage drops as the masks get dirty, so it can help determine when it needs cleaning. The video after the break shows the voltage test, and it reminds us of those batteries.
All the remarkable qualities of this mask come from laser-induced graphene. The lab is producing LIG by lasering polyimide film with a commercial CO2 infrared model. In a speed test, the process can convert 100cm² in ninety seconds, so the masks can be made more cheaply than an N95 version with that melt-blown layer that is none too good for the earth. Testing the antibacterial properties against activated carbon fiber and blown masks showed approximately 80% of the bacteria is inert after 8 hours compared to the others in the single digits. If you put them in the sun for 10 minutes, blown fabric goes to over 85%, but the graphene is 99.998%, which means that one bacteria in 50K survives. The exact mechanism isn’t known, but [Dr. Ye] thinks it may have something to do with graphene’s sharp edges and hydrophobic quality. A couple of coronavirus species were also affected, and the species that causes COVID-19 will be tested this year.
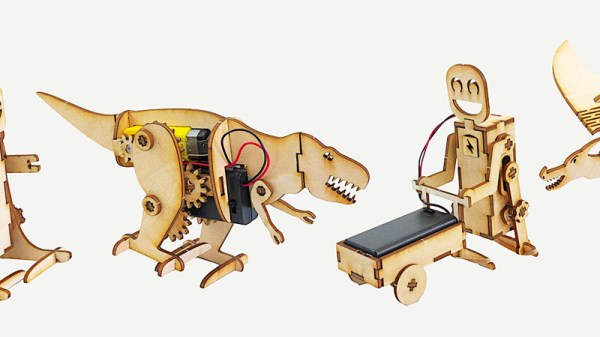
[Lance] loves making simple robots with his laser cutter. He finds great satisfaction from watching his robots operate using fairly simple mechanisms and designs a whole slew of them inspired by different animals, including a dinosaur and a dragon. His latest build is a jolly cart-pushing robot.
He cut each piece of his robot on his laser cutter, and in order to get the pieces to fit snugly together he made each tab a little bigger than its corresponding slot, ensuring the piece wouldn’t fall out. This also helps account for the loss in the material due to kerf, which is the bit of each piece of material that gets lost in the cut end of the laser cutter.
Making his robot walk was mostly as easy as attaching each leg to a simple DC motor such that the motor would rotate each leg in succession, pushing the robot along. From time to time, [Lance] also had to grease the robot’s moving parts using a bit of wax to help reduce friction. He even used a little rubber band to give the robot some traction.
[Lance] did a pretty good job detailing the build in his video. He also linked to a few other fun little robot designs that could entertain you as well. Pretty easy hack, but we thought you might find the results as satisfying as we did.
Over the last couple of years, we’ve seen a wave of impressive rugged mobile computing devices based on the ubiquitous Raspberry Pi. Sometimes they involve repurposing an existing heavy duty enclosure, and in others the Pi takes up residence in a 3D printed case which may or may not be as strong as it appears. In either event, they usually don’t lend themselves to duplication because of the time and expense involved in tracking down or printing all the parts required.
But the Raspberry Pi Quick Kit by [Jay Doscher] may change that. It represents what must surely be the simplest and fastest route to a building a rugged mobile ARM computer for your hacking adventures. Beyond the Pelican 1150 case that serves as the outer enclosure, you only need three printed parts and a handful of fasteners to complete the build. Of course you’ll need a Raspberry Pi and the official touch screen as well, but that’s sort of a given.
Electronics mounted to the 3D printed frame.
All of the electronics mount onto the three piece 3D printed frame, which is then press-fit into the opening of the Pelican case. Since you don’t need to pop any holes through the case itself, the assembled unit remains water and air tight. While [Jay] has recently shown off a very impressive 3D printed Pi enclosure, there’s really no beating a legitimate heavy duty storage case if you’re trying to protect the hardware.
When you want to use the Pi, just open the case and plug your power and accessories into the panel mount connectors under the display. There’s no integrated battery or keyboard on this build, but considering how small it is, that shouldn’t really come as a surprise.
[Jay] is targeting the Pi 4 for the Quick Kit, so that means WiFi and Bluetooth will come standard without the need for any external hardware. It looks like there might just be enough room to include an RTL-SDR receiver inside the case as well, but you’ll need to do a little redesigning of the 3D printed parts. If you do modify this design to pack in a few new tricks, we’d love to hear about it.