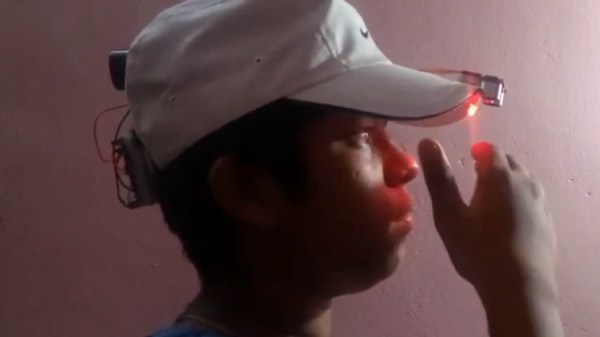
ATMega328 SSB SDR For Ham Radio

The humble ATmega328 microcontroller, usually packaged as an Arduino Uno, is the gateway drug for millions of people into the world of electronics and embedded programming. Some people just can’t pass up the challenge of seeing how far they can push the old workhorse, and it looks like [Guido PE1NNZ] is one of those. He has managed to implement a software-defined SSB ham radio transceiver for the HF bands on the ATMega328, and it looks like the project is going places.

The radio started life as a QRP Labs QCX, a $49 single-band CW (morse code) HF transceiver kit that is already one of the cheapest ways to get on the HF bands. [Guido] reduced the part count of the radio by about 50%, implementing much of the signal processing digitally on the ATmega328. On the transmitter side, the SSB signal is generated by making slight frequency changes to a Si5351 clock generator using 800kbit/s I2C, and controlling a very efficient class-E RF power amplifier with PWM for about 5W of output power. The increased efficiency means that there is no need for the bulky heat sink usually seen on SSB radios. The radio is continuously tunable from 80m to 10m (3.5 Mhz – 30 Mhz), but it does require plugging in a different low pass filters for each band. Continue reading “ATMega328 SSB SDR For Ham Radio”

Building A Serious Solar Inverter Battery Pack

If you’re out in the wilderness, having plenty of electricity on hand is a blessing. Eschewing fossil fuels, [LithiumSolar] is, as their name suggests, a fan of other technologies – undertaking the construction of a 3.5kWh solar generator that’s rugged and ready for the outdoors.

The build starts with 18650 lithium-ion cells sourced from a recycler, packed inside obsolete modem battery packs. After harvesting 390 cells, the best 364 are chosen and assembled into plastic holders to create a 14S26P configuration. A spot welder is employed to weld the pack together, with XT60 connectors used as the main bus connectors, albeit in a very non-standard configuration. Balance leads are hooked up to a 14S battery management system, to keep things in check. The huge pack is then installed inside a stout Craftsman toolbox, along with a MPPT solar charger module, and a 1500W inverter for output.

The build video is a great resource for anyone interested in building custom 18650 packs or battery solar power systems. [LithiumSolar] does a great job of clearly explaining each step and the reasons for part selections along the way. Of course, in a neat dovetail to this project, we’ve even seen solar-powered spot welders before – which would be useful if you need to replicate this build out in the field somewhere. Video after the break.

Continue reading “Building A Serious Solar Inverter Battery Pack”

EPaper Tablet Gets Desktop Linux Install

ePaper is an interesting thing, providing a non-backlit viewing experience that is much more akin to reading a book than staring at a screen. The reMarkable tablet is a device designed around just such a display, and [Davis Remmel] has been hacking away at the platform. His latest work brings full-fat Linux to the fore.

The work builds upon [Davis]’s earlier work, installing a microSD slot in the tablet to make development easier. Getting Linux running required a custom kernel, but once sorted, working with the reMarkable is easy. apt is available for easy software installs, and the tablet is demonstrated using several different pieces of software, like mtPaint and Xournal.

The golden part of all this has been getting automated partial screen refreshes working. ePaper displays take a long time to refresh the whole screen. Being able to do faster partial writes makes for a much faster interface, which is evident when some of the drawing software is demonstrated. Even Doom runs, but remains largely unplayable, sadly – the ePaper is still a long way off hitting 25 fps.

We look forward to seeing where [Davis] takes this project, and how display performance improves with newer reMarkable tablets. With the reMarkable 2 out for pre-order, there could be a step change in display speed on the horizon. We’re betting that there’s big things to come yet for ePaper – 2020 may finally be its year.

Losing A Wheel On Your Commute; 3-Wheelers Vie For The Open Road

We live at an interesting point in time for the technologically minded motor vehicle enthusiast, and we stand on the brink of a major directional shift in  how we imagine a car. Within ten years it’s likely that the electric motor will have moved from an extravagance or a fringe choice to a mainstream one, and a piston engine will be the preserve of an ever smaller niche market.

The Electrameccanica Solo three-wheeler car.

Along the way is it possible that the very form factor of an automobile will change, or will cars in decades hence have the same basic shape as those we’re used to? The Canadian company Electrameccanica certainly think so, because they’ve launched a refreshingly different take on commuter transport for one. Their Solo is a three-wheeler car, with two wheels at the front and one trailing wheel at the back configuration. It’s a bold design, but if it’s such an obvious one then why don’t we drive three-wheelers already?

It’s time to examine a few of the properties of a three-wheeler, and along the way visit some of the past attempts at this configuration.

Continue reading “Losing A Wheel On Your Commute; 3-Wheelers Vie For The Open Road”

Useless Machine For An Existential Quandary

There’s no project that dives into existential quandaries more than a useless machine, as they can truly illustrate the futility of existence by turning themselves off once they have been powered on. Typically this is done with a simple switch, but for something that can truly put the lights out, and then re-illuminate them, [James]’s latest project is a useless machine that performs this exercise with a candle.

The project consists of two arms mounted on a set of gears. One arm has a lighter on it, and the other has a snuffer mounted to a servo motor. As the gears rotate, the lighter gets closer to the candle wick and lights it, then the entire assembly rotates back so the snuffer can extinguish the flame. Everything is built around an Arduino Nano, a motor driver powering a Pitman gear motor, and a set of Hall effect sensors which provide position data back to the microcontroller.

If you’re in the mood for a little existential angst in your own home, [James] has made the project files available on his GitHub page. We always appreciate a useless machine around here, especially a unique design like this one, and one which could easily make one recognize the futility of lighting a candle at all.

Continue reading “Useless Machine For An Existential Quandary”

Coronavirus Testing: CRISPR Technology Set To Streamline Viral Testing

If we could run back 2020 to its beginning and get a do-over, chances are pretty good that we’d do a lot of things differently. There’s a ton of blame to go around on COVID-19, but it’s safe to say that one of the biggest failures of this whole episode has been the lack of cheap, quick, accurate testing for SARS-CoV-2, the virus behind the current pandemic. It’s not for lack of information; after all, Chinese scientists published the sequence of the viral genome very early in the pandemic, and researchers the world over did the same for all the information they gleaned from the virus as it rampaged around the planet.

But leveraging that information into usable diagnostics has been anything but a smooth process. Initially, the only method of detecting the virus was with reverse transcriptase-polymerase chain reaction (RT-PCR) tests, a fussy process that requires trained technicians and a well-equipped lab, takes days to weeks to return results, and can only tell if the patient has a current infection. Antibody testing has the potential for a quick and easy, no-lab-required test, but can only be used to see if a patient has had an infection at some time in the past.

What’s needed as the COVID-19 crisis continues is a test with the specificity and sensitivity of PCR combined with the rapidity and simplicity of an antibody test. That’s where a new assay, based on the latest in molecular biology methods and dubbed “STOPCovid” comes in, and it could play a major role in diagnostics now and in the future.

Continue reading “Coronavirus Testing: CRISPR Technology Set To Streamline Viral Testing”

Improving 3D Printed Supports With A Marker

Anyone who’s spent some quality time with a desktop 3D printer is familiar with the concept of supports. If you’re working with a complex model that has overhanging features, printing a “scaffolding” of support material around it is often required. Unfortunately, supports can be a pain to remove and often leave marks on the finished print that need to be addressed.

Looking to improve the situation, [Tumblebeer] has come up with a very unique modification to the traditional approach that we think is certainly worthy of closer examination. It doesn’t remove the need for support material, but it does make it much easier to remove. The method is cheap, relatively simple to implement, and doesn’t require multiple extruders or filament switching as is the case with something like water-soluble supports.

The trick is to use a permanent marker as a release agent between the top of the support and the area of the print it’s actually touching. The coating of marker prevents the two surfaces from fusing, while still providing the physical support necessary to keep the model from sagging or collapsing.

To test this concept, [Tumblebeer] has outfitted a Prusa i3 MK3S with a solenoid actuated marker holder that hangs off the side of the extruder assembly. The coil is driven from the GPIO pins of a Raspberry Pi running OctoPrint, and is engaged by a custom command in the G-code file. It keeps the marker out of the way during normal printing, and lowers it when its time to lay down the interface coating.

[Tumblebeer] says there’s still a bit of hand-coding involved in this method, and that some automated G-code scripts or a custom slicer plugin could streamline the process considerably. We’re very interested in seeing further community development of this concept, as it seems to hold considerable promise. Having a marker strapped to the side of the extruder might seem complex, but it’s nothing compared to switching out filaments on the fly.

Continue reading “Improving 3D Printed Supports With A Marker”