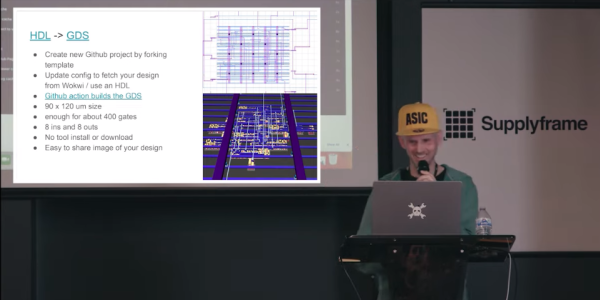
Two circuit boards connected with wires

Glow In The Dark Computer Memory Illuminates The Fundamentals

Computer memory has taken on many forms over the years, from mercury-based delay-line tubes to handwoven magnetic core. These days, volatile storage using semiconductors has become ubiquitous with computing, but what if there was a better way? [Michael Kohn] has been working on a new standard for computer memory that uses glow in the dark stickers.

Clearly we jest, however we’re still mighty impressed by the demonstration. Eight delightful star-shaped phosphorescent stickers represent eight bits of memory, totaling one byte. The glow in the dark material is stuck to the inside of short cylinders, each of which contains a white LED and a phototransistor. The memory array is wired up to an iceFUN FPGA board, which is then connected via level shifters to a Western Design Center MENSCH single board computer.

Continue reading “Glow In The Dark Computer Memory Illuminates The Fundamentals”

Treasure Hunting With A Handful Of Common Components

Sometimes simpler is better — when you don’t need the the computational power of an onboard microcontroller, it’s often best to rely on a simple circuit to get the job done. With cheap Raspberry Pis and ESP32s all over the place, it can be easy to forget that many simpler projects can be completed without a single line of code (and with the ongoing chip shortage, it may be more important now than ever to remember that).

[mircemk] had the right idea when he built his simple induction-balance metal detector. It uses a couple of 555 timers, transistors, and passives to sense the presence of metallic objects via a coil of wire. He was able to detect a coin up to 15 cm away, and larger objects at 60cm — not bad for a pile of components you probably have in your bench’s spare parts drawer right now! The detector selectivity can be tuned by a couple of potentiometers, and in true metal detector fashion, it has a buzzer to loudly blare at you once it’s found something (along with a LED, in case the buzzer gets too annoying).

All in all, this metal detector looks like a terribly fun project — one perfectly suited to beginners and more seasoned hackers alike. It serves as a great reminder that not every project needs WiFi or an OLED display to be useful, but don’t let that stop you from overdoing things! If touchscreens are more your speed, [mircemk] has got you covered with a smartphone-integrated version as well.

Continue reading “Treasure Hunting With A Handful Of Common Components”

DIY I2C Tester

[Dilshan] built a dedicated I2C tester which allows for I2C bus control over USB using simple commands such as init, read, write, etc. The Linux kernel has had I2C driver support for a couple of decades, but you’ll be hard pressed to find a computer or laptop with a I2C connector (excluding Bunnie Huang’s Novena hacker’s laptop, of course). This tester does require a Linux host, and his programs use libusb on the computer side and V-USB on the embedded side.

[Dilshan] put a lot of time into building this project, and it shows in the build quality and thorough documentation. With its single-sided PCB and all thru-hole construction, it makes a great beginner project for someone just getting into the hobby. At the heart of the tester is an ATmega16A in a 40-pin PDIP package (despite the Microchip overview page calling it a 44-pin chip), supported by a handful of resistors and transistors. Schematics are prepared in KiCad, code is compiled using gcc and avr-gcc, and he provides a label for the enclosure top. The only thing missing is information on the enclosure itself, but we suspect you can track that down with a little sleuthing (or asking [Dilshan] himself).

If you use I2C quite a lot, give this project a look. Easy to build, useful in the lab, and it looks nice as well. We have featured [Dilshan]’s work over the years, including this logic pattern generator and his two-transistor-on-a-breadboard superheterodyne receiver.

Compact Slayer Exciter For Your High Voltage Needs

Tesla coils are incredible pieces of hardware, but they can be tricky to build. Between the spark gap, capacitors, and finely tuned coils, it’s not exactly a beginners project. Luckily, there’s hope for anyone looking for a less complex way to shoot some sparks: the Slayer Exciter. This device can be thought of as the little cousin to the Tesla coil, and can be used for many of the same high voltage experiments while being far easier to assemble.

Now [Jay Bowles] is obviously no stranger to building his own Tesla coils, but since so many of his fans wanted to see his take on this less complex option, he recently built his own Slayer Exciter. After putting on a few of his own unique touches, the end result looks very promising. It might not be able to throw sparks as far as some of the other creations featured on his YouTube channel, but it’s still impressive for something so simple.

[Jay] uses two transistors in parallel for reliability
When we say simple, we mean it. Building a bare-bones Slayer Exciter takes only takes five components: the two coils, a transistor, a diode, and a resistor. For this build, power is provided by a trio of rechargeable 9 V batteries in the base of the unit which can be easily swapped out as needed.

In the video, [Jay] does a great job explaining and illustrating how this basic circuit creates exceptionally high frequency energy. In fact, the frequency is so high that the human ear can’t hear it; unfortunate news for fans of the Tesla coil’s characteristic buzz.

Generally speaking Slayer Exciters would have the same sort of vertical coils that you’d see used on a traditional Tesla coil, but in this case, [Jay] has swapped that out for a pancake coil held in the upper level of the device. This makes for a very compact unit that would be perfect for your desk, if it wasn’t for the fact that the arcs produced by this gadget are hot enough to instantly vaporize human skin. Just something to keep in mind.

We’ve seen Slayer builds in the past, but none as well designed as this one. Incidentally, if you’re wondering about the array of neon indicator lights that [Jay] uses to visualize the electrical field, we covered that project as well.

Continue reading “Compact Slayer Exciter For Your High Voltage Needs”

The Truth Is In There: The Art Of Electronics, The X-Chapters

If you’ve been into electronics for any length of time, you’ve almost certainly run across the practical bible in the field, The Art of Electronics, commonly abbreviated AoE. Any fan of the book will certainly want to consider obtaining the latest release, The Art of Electronics: The x-Chapters, which follows the previous third edition of AoE from 2015. This new book features expanded coverage of topics from the previous editions, plus discussions of some interesting but rarely traveled areas of electrical engineering.

For those unfamiliar with it, AoE, first published in 1980, is an unusually useful hybrid of textbook and engineer’s reference, blending just enough theory with liberal doses of practical experience. With its lively tone and informal style, the book has enabled people from many backgrounds to design and implement electronic circuits.

After the initial book, the second edition (AoE2) was published in 1989, and the third (AoE3) in 2015, each one renewing and expanding coverage to keep up with the rapid pace of the field. I started with the second edition and it was very well worn when I purchased a copy of the third, an upgrade I would recommend to anyone still on the fence. While the second and third books looked a lot like the first, this new one is a bit different. It’s at the same time an expanded discussion of many of the topics covered in AoE3 and a self-contained reference manual on a variety of topics in electrical engineering.

I pre-ordered this book the same day I learned it was to be published, and it finally arrived this week. So, having had the book in hand — almost continuously — for a few days, I think I’ve got a decent idea of what it’s all about. Stick around for my take on the latest in this very interesting series of books.

Continue reading “The Truth Is In There: The Art Of Electronics, The X-Chapters”

Gigantic FPGA In A Game Boy Form Factor, 2019 Supercon Badge Is A Hardware Siren Song

Look upon this conference badge and kiss your free time goodbye. The 2019 Hackaday Superconference badge is an ECP5 FPGA running a RISC-V core in a Game Boy form factor complete with cartridge slot that is more open than anything we’ve ever seen before: multiple open-source CPU designs were embedded in an open system, developed using the cutting-edge in open-source FPGA tools, and running (naturally) open-source software on top. It’s a 3,000-in-one activity kit for hardware people, software people, and everyone in between.

The brainchild of Jeroen Domburg (aka Sprite_TM), this design has been in the works since the beginning of this year. For more than 500 people headed to Supercon next week, this is a source of both geeky entertainment and learning for three action-packed days and well beyond. Let’s take a look at what’s on the badge, what you need to know to hack it, and how the design serves as a powerful development tool long after the badge hacking ceremonies have wrapped up.

Continue reading “Gigantic FPGA In A Game Boy Form Factor, 2019 Supercon Badge Is A Hardware Siren Song”

Retrotechtacular: Remembering Radio Shack P-Box Kits

If you are under a certain age, you probably associate Radio Shack with cellphones. While Radio Shack never gave us access to the variety and economy of parts we have today, they did have one thing that I wish we could get again: P-Box kits. The obvious questions are: What’s a P-Box and why do I want one? But the kit wasn’t to make a P-Box. P-Box was the kind of box the kit came in. It was like a piece of perfboard, but made of plastic, built into a plastic box. So you bought the kit — which might be a radio or a metal detector — opened the box and then built the kit using the box as the chassis.

The perfboard was pretty coarse, too, because the components were all big discrete components. There was at least one that had an IC, but that came premounted on a PC board that you treated like a big component. One of my favorites was a three-transistor regenerative shortwave receiver. In those days, you could pick up a lot of stations on shortwave and it was one of the best ways at the time to learn more about the world.

On the left, you can see a picture of the radio from the 1975 catalog. You might think $7.95 is crazy cheap, but that was at least a tank full of gas or four movie tickets in those days, and most of us didn’t have a lot of money as kids, so you probably saved your allowance for a few weeks, did chores, or delivered papers to make $8.

Continue reading “Retrotechtacular: Remembering Radio Shack P-Box Kits”