An Airbag Charge To Launch A Projectile

It’s not particularly easy to buy small explosive charges. At least, it’s not in the UK, from where [Turbo Conquering Mega Eagle] hails. But it is surprisingly easy to get your hands on one because most people drive around with one right in front of them in the form of their car airbag. In a burst of either genius or madness, we can’t decide which, he decided to use an airbag charge to launch a projectile.

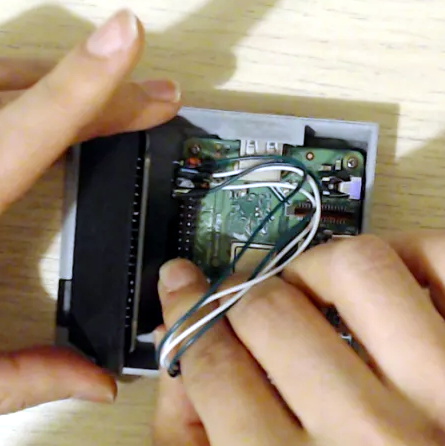
As you can see in the video below, he launches straight into dismantling the centre of a Renault steering wheel before seemingly abandoning caution and taking a grinder to the charge inside. It’s a fascinating deconstruction though, because it reveals not one but two differently sized charges separated by a space which appears to contain some kind of wadding.

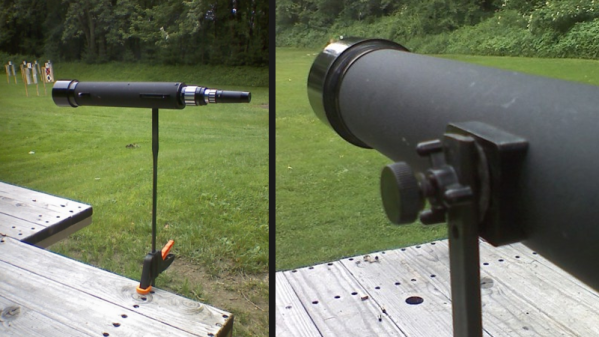
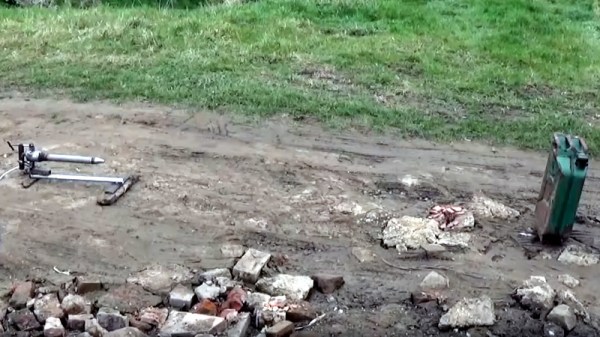
His projectile is a piece of steel tube with a turned steel point, spigot launched over a tube placed in front of a breech in which he places the charge. The launch tube has a piece of metal welded within it, he tells us to render it legal by being unable to launch a projectile from within it. Upon firing at a scrap jerry can it has enough energy to easily pass through both its steel walls, so it’s quite a formidable weapon.

He assures the viewer that with the spigot-launched design he’s not breaking the law, but we’re not sure we’d like to have to explain that one to a British policeman. He does make the point though that while it’s an impressive spectacle it’s also quite a dangerous device, so maybe don’t do this at home.

If ripping airbags to pieces isn’t your thing, how about making one from scratch?

Continue reading “An Airbag Charge To Launch A Projectile”

Spotting Scope Mount Makes For More Comfortable Target Scoring

One of the big bottlenecks in target shooting is the scoring process. Even if it’s not a serious match, it’s still important to know where holes have landed because it’s important feedback on technique and performance. A spotting scope, which is really just a kind of telescope optimized for getting a sharp view of a distant target, is often used to see hits on a target without leaving the firing line. Usually they’re mounted on tripods and optimized for seated use, but [Steve Thone] came up with a clever hack for more comfortable use and mounting that works better for him while engaging in bulls-eye shooting from the standing position.

[Steve] took a ratcheting bar clamp and drilled a few holes near the end of the bar. Using these holes, the spotting scope is mounted directly to the bar and the clamp grips a shooting table or bench in place of a stand. He also put a 90 degree twist in the bar so that the clamp and scope could be oriented perpendicular to one another.

The result is a quick and easy-to-use mounting solution that, unlike a tripod, doesn’t eat up precious table space. Stability may be inferior to a tripod, but it’s serviceable enough that other shooters showed up with their own versions the week after [Steve] used his. After all, target shooters tend to be DIY types with an interest in both low-tech hacks like this one as well as higher-tech projects like rifle-mounted sensors.

Home Brewing Rig Gets A Particle Upgrade

Home brewing is a pastime that can be as much an art or a science as you make it, depending on your predilections. [Brandon Satrom] is one who leans very much towards the science side. There’s plenty that can be done to monitor and control a brew, and [Brandon] is one of many who have built custom hardware to help get the best possible results. Now, that hardware was due for an upgrade.

[Brandon]’s original BrewBuddy system relied on the Particle Photon, a useful platform that was nonetheless getting on in years. With the launch of the new Particle Argon, [Brandon] set his sights on new features that were possible with the added horsepower available. Graphics were added to the LCD screen, and a piezo sensor to detect the start of the fermentation process. This is in addition to the original temperature monitoring and plotting features of the first build.

The upgrade from one microcontroller platform to another can be fraught with headaches, but in this case, only minor changes were needed. 3 lines of code were changed to account for different pin assignments, and the rest fell neatly into place. It’s a testament to the compatibility of the Particle platforms that this upgrade was so easy.

We’ve talked about the 3rd generation Particle boards before, and we expect to see them turning up in many more builds to come. Video after the break.

[Thanks to dcschelt for the tip!]

Continue reading “Home Brewing Rig Gets A Particle Upgrade”

Extracting Bismuth From Pepto Bismol

Bismuth is a very odd metal that you see in cosmetic pigments and as a replacement for lead, since it is less toxic. You will also see it — or an alloy — in fire sprinklers since it melts readily. However, the most common place you might encounter bismuth is Pepto Bismol — the ubiquitous pink liquid you use when your stomach is upset. [NileRed] tried extracting the bismuth from Pepto Bismol some time ago, but didn’t get good results. He decided that even though the process would not be cost-effective he wanted to try again, and you can see the crystals produced in the video below.

It turns out that you don’t need the pink liquid brand name. [Red Nile] started with ten boxes of generic chewable tablets — that’s 480 pills. A little bit of dilute hydrochloric acid eats the pills apart and generates a few reactions that he explains in the video.

Continue reading “Extracting Bismuth From Pepto Bismol”

This Arduino Feeds The Dog

Part of the joy of owning a dog is feeding it. How often do you get to make another living being that happy? However, sometimes you can’t be there when your best friend is hungry. [El Taller De TD] built an auto dog feeder using an Arduino and stepper motor. The video and links are in Spanish, but if your Spanish is rusty, YouTube’s caption autotranslation isn’t bad and Google Translate can help you with the web site.

The electronics are reasonably simple: an Arduino, a Bluetooth module, and a stepper motor driver. Mechanically, the motor and some PVC pipe are all you need. There’s a small phone application to drive the Bluetooth using App Inventor.

Continue reading “This Arduino Feeds The Dog”

Octavo Systems Shows Off With Deadbug Linux Computer

Once upon a time, small Linux-capable single board computers were novelties, but not anymore. Today we have a wide selection of them, many built around modules we could buy for our own projects. Some of the chipset suppliers behind these boards compete on cost, others find a niche to differentiate their product. Octavo Systems is one of the latter offering system-in-package (SiP) modules that are specifically designed for easy integration. They described how simple it would be to build a minimal computer using their SC335x C-SiP, and to drive the point home they brought a deadbug implementation to Embedded World 2019. [Short video after the break.]

Most of us encounter Octavo modules as the heart of a BeagleBoard. Their increasing integration made tiny wonders like PocketBeagle possible. But bringing out all those pins for use still required a four-layer circuit board. Octavo’s pitch for hardware professionals center around how easy integration saves time for faster time to market, and fortunately for us easy integration also translates to a more accessible device for our projects. It’s one thing to publish a document describing a hypothetical single-layer PCB for an Octavo module, it’s quite something else to show that concept in action with no PCB at all.

Of course, this little machine only has access to a fraction of the module’s functionality, and it is certainly overkill if the objective is just to blink a few LEDs. If so, we’d just use 555 timers! But it does show how simple a bare bones “Hello World” machine can be built, removing intimidation factor and invite more people to come play.

One of the three top winners in our circuit sculpture contest was a wireframe Z80 computer. There’s quite a jump from a Z80 to an Octavo SC335x, but we’ve already seen one effort by [Zach] over Supercon 2018 weekend to build a deadbug computer with an Octavo module. It won’t be long before someone one-ups this minimalist LED blinker with something more sophisticated and we can’t wait to see it. Continue reading “Octavo Systems Shows Off With Deadbug Linux Computer”

RetroPie NES Clock Tells You When It’s Game Time

We’ve all seen the 3D printed replicas of classic game consoles which house a Raspberry Pi; in fact, there’s a pretty good chance some of the people reading this post have one of their own. They’re a great way to add some classic gaming emulation to your entertainment center, especially compared to the bare PCB chic of just having a Pi hanging off your TV’s HDMI port.

[Victor Heid] loved the look of these miniature consoles, but wanted to challenge himself to design something that was also multi-functional and unique. So he decided to create an NES-inspired case for the Raspberry Pi 3 A+ that doubles as a LED matrix clock with a decidedly retro feel. Frankly, even if it was just a clock we would have been impressed with the final product; but the fact that it’s also a fully functional RetroPie build really goes above and beyond.

It should be obvious just looking at the completed product that [Victor] put a lot of effort into sanding and finishing the 3D printed case. But we don’t have to imagine the process, since he was kind enough to thoroughly detail the steps and materials he used. As you might have guessed, the short version is a lot of filler and a lot of time; but it’s worth looking at the complete write-up if you’ve ever considered trying to make your own printed parts look less…printed. His method of applying the lettering on the front of case using a laser printer, some Mod Podge, and a healthy dose of patience is also something you might want to file away for a future project.

The electronics for this project are exceptionally simple, as [Victor] used the Pimoroni Scroll pHAT HD rather than trying to roll his own LED matrix in such a limited space. So it was just a matter of connecting up the wires to the Pi’s GPIO header and getting the various bits of software talking to each other, which he also details for anyone who might be interested.

It’s been a few months since the Raspberry Pi 3 A+ was unveiled, and we’re finally starting to see projects that make use of the new board’s reduced footprint. The ability of hardware like the A+, combined with the lackluster attempts by manufactures to produce official “mini” systems, seems to have set the stage for hackers to once again outshine commercial offerings. Not that we’re complaining, of course.