Be Anyone Or Anything With Facial Projection Mask

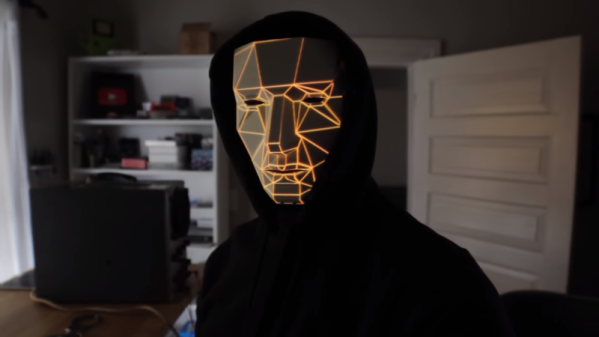
In the market for a low-poly change to your look? Hate the idea of showing up for a costume party only to find out someone is wearing the same mask as you? Then this face changing front-projection mask may be just the thing for you.

To be honest, we’re not sure just how much [Sean Hodgins]’ latest project has to do with cosplay. He seems to be making a subtle commentary about dealing with life in the surveillance state, even though this is probably not a strategy for thwarting facial-recognition cameras. [Ed Note: Or maybe it’s just Halloween?]

The build consists of a Raspberry Pi and a pico projector of the kind we’ve seen before. These are mated together via a custom PCB and live inside a small enclosure that’s attached to the end of a longish boom. The boom attaches to the chin of 3D-printed mask, which in turn is connected to the suspension system of a welding helmet. Powered by a battery pack and controlled by a smartphone app, the projector throws whatever you want onto the mask – videos, effects, even images of other people. Even with some Photoshop tweaks to account for keystone distortion from the low angle of projection, there’s enough distortion that the effect is more artistic than masquerade. But honestly, having your face suddenly burst into flames is pretty cool. We just wonder what visibility is like for the wearer with a bright LED blasting into your eyes.

As a bonus, [Sean] has worked this build into a virtual treasure hunt. Check out 13thkey.com and see what you can make from the minimal clues there.

Continue reading “Be Anyone Or Anything With Facial Projection Mask”

Amstrad Portable Gets A Modern LCD Transplant

Playing classic games on the real hardware is an experience many of us enjoy, but sometimes the hardware is just a bit too retro for modern sensibilities. A case in point is the miserable monochrome LCD that was originally installed in the Amstrad PPC640 portable 8086 PC that [Drygol] recently picked up. He decided that his portable Amstrad sessions would be far more enjoyable if he swapped it out for a display that didn’t have 30+ years on the clock.

To quell the complaints of any of the vintage hardware aficionados out there, it’s worth mentioning that the original LCD was actually damaged and needed to be replaced anyway. Granted [Drygol] could have tried to find a contemporary panel to replace it with, but looking at the incredible before and after shots of the modded PPC640, it’s hard to argue he didn’t make the right decision by throwing a modern display into the otherwise largely original computer.

Getting the new LCD’s PCB ready for installation.

[Drygol] says he picked up a cheap 4:3 LCD TV on eBay, and as luck would have it, found that the new panel dropped perfectly into the original frame. Getting it buttoned back up required the removal of the RF can and all the female connections on the TV’s PCB, plus he had to cut some holes in the back of the display enclosure to mount the LCD’s controls, but overall it looks very stock.

Of course, getting the new LCD display in the original frame was only half the battle, it still needs to be connected up to the computer somehow. To get everyone playing nicely with each other, [Drygol] is using a commercially available MDA/CGA/EGA to VGA converter that is installed where the batteries would have gone originally. Wired to the PPC640’s external monitor connector, it allows him to drive the new display without having to use the original LCD interface.

[Drygol] has made something of a name for himself by performing some of the most impressive restorations and modifications of retro hardware in recent memory. From the unbelievable work that went into repairing a smashed Atari 800XL case to his gorgeous custom Amiga A500, his projects are sure to please the retro hardware lovers in the audience.

Continue reading “Amstrad Portable Gets A Modern LCD Transplant”

Multimeter Display Perked Up With Nixies, LEDs, And Neon Tubes

Just because something is newer than something else doesn’t automatically make it better. Of course the opposite is also true, but when it comes to displays on bench multimeters, a fancy LCD display is no guarantee of legibility. Take the Hewlett Packard HP 3478A multimeter; the stock transflective display with its 14-segment characters is so hard to read that people usually have to add a backlight to use it.

That wasn’t good enough for [cyclotronboy], though, who chose to completely replace the stock 3478A display with Nixie tubes. He noticed that with a little modification, six IN-17 tubes just fit in the window vacated by the LCD. He sniffed out the serial data stream going to the display with a collection of XOR gates and flip-flops, which let him write the code for a PIC18F4550. The finished display adds a trio of rectangular LEDs for the + and – indicators, and an HDLO-1414 four-character alphanumeric display to indicate units and the like. And the decimal points? Tiny neon bulbs. It already looks miles better than the stock display, and with the addition of a red filter, it should look even better.

If you’re stuck with a lame LCD multimeter but Nixies don’t quite do it for you, worry not – an LED conversion is possible too.

Syringes Become Rockets In This Flying Build

Syringes have all kinds of useful applications in the workshop, from injecting fluids to helping pick up tiny components. There’s always room for a bit of levity however, and [Tom Stanton] decided to have a play with some syringe rocket builds.

The basic idea involves blocking the end of a syringe, and then pull the plunger to create a vacuum in the tube. When released, the plunger will rush forward from the atmospheric pressure counteracting the vacuum, hitting the end of the tube and launching the syringe forward.

[Tom]’s initial attempts with small syringes were fun, but larger builds struggled with breakages, sealing issues, and excessive weight. Some more luck was had with a vacuum cannon build, which was able to launch a projectile to a decent height, albeit without a lot of stability. [Tom] wrapped things up by designing a small 3D printed launcher that fits 10mm syringes and lets you shoot them around the workshop with abandon.

It’s fun to see the concept explored in detail, with [Tom] doing a great job of explaining the basic physics behind the phenomenon. If you’re hungry for more, consider using syringes as basic hydraulic actuators for model builds. Video after the break.

Continue reading “Syringes Become Rockets In This Flying Build”

RPi4: Now Overclocked, Net-Booted, And Power-Sipping

It has now been a few months since the launch of the Raspberry Pi 4, and it would only be fair to describe the launch as “rocky”. While significantly faster than the Pi 3 on paper, its propensity for overheating would end up throttling down the CPU clock even with the plethora of aftermarket heatsinks and fans. The Raspberry Pi folks have been working on solutions to these teething troubles, and they have now released a bunch of updates in the form of a new bootloader, that lets the Pi 4 live up to its promise. (UPDATE: Here’s the download page and release notes)

The real meat of the update comes in an implementation of a low power mode for the USB hub. It turns out that the main source of heat on the SoC wasn’t the CPU, but the USB. Fixing the USB power consumption means that you can run the processor cool at stock speeds, and it can even be overclocked now.

There is also a new tool for updating the Pi bootloader, rpi-eeprom, that allows automatic updates for Pi 4 owners. The big change is that booting the Pi 4 over the network or an attached USB device is now a possibility, which is a must if you’re installing the Pi permanently. There are some fixes that caused problems with certain HATs, in which the Pi 4’s 3.3 V line was cycled during a reboot.

With a device as complex as a Raspberry Pi it comes as no surprise that it might ship with a few teething troubles. We’ve already covered some surrounding the USB-C power, for example. And the overheating. Where the Pi people consistently deliver though is in terms of support, both official and from the community, and we’re very pleased to see them come through in this case too.

Protect Your Batteries Before You Wreck Your Batteries

[Jan] is solving a problem many of us have had, deeply discharging our project’s batteries and potentially damaging the cells.

His board can handle batteries from 6 to 34 volts and supports both LiPo or Lion batteries. The board can be flexible about its cut-off voltage. It also has a feature we really like; the user can set a delay before it shuts off the battery: useful in cases where a heavy peak current draw causes the battery to operate at a lower-than-threshold voltage for a few seconds. Once the board is shut down it takes a manual reset to allow power to be drawn again.

His latest iteration of the board is an impressive 1 sq. inch in size! This can fit in just about any project and it’s even flexible in the choice of battery connector. Next time we have a high current draw project with expensive batteries or maybe a monitoring device that’s expected to run a long time we may throw one of these boards in there just to be safe.

Retrotechtacular: The Speaking Clock Goes Silent

It used to be that time was a lot more relative than it is today. With smartphones synced to GPS and network providers’ clocks, we all pretty much have access to an authoritative current time, giving few of us today the wiggle room to explain a tardy arrival at work to an impatient boss by saying our watch is running slow.

Even when that excuse was plausible, it was a bit weak, since almost every telephone system had some sort of time service. The correct time was but a phone call away, announced at first by live operators then later by machines called speaking clocks. Most of these services had been phased out long ago, but one, the speaking clock service in Australia, sounded for the last time at the end of September.

While the decommissioned machine was just another beige box living in a telco rack, the speaking clocks that preceded it were wonderfully complex electromechanical devices, and perfect fodder for a Retrotechtacular deep-dive. Here’s a look at the Australian speaking clock known as “George” and why speaking clocks were once the highest of technology.

Continue reading “Retrotechtacular: The Speaking Clock Goes Silent”