Electrifying A Vintage Outboard Motor

Clamped or bolted to the stern of the boat, outboard motors offer a very easy and (relatively) economical way of powering small craft. The vast majority of these outboards are gasoline powered, with electric models generally limited to so-called “trolling motors” which are often used to move slowly and quietly during fishing. That might be fine for most people, but not [Olly Epsom].
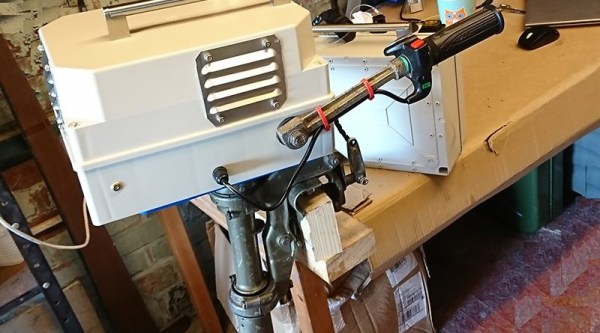
An engineer focusing on renewable energy by profession, [Olly] wanted to equip his small inflatable dinghy with a suitably powerful “green” propulsion system. Deciding nothing on the market quite met his requirements, especially for what manufacturers were charging, he decided to convert an old gas outboard to electric. Not only did he manage to do it for less money than a turn-key system would have cost, but he ended up with a system specifically geared to his exact requirements. Something he says will come in handy if he ever gets around to converting the dinghy to remote control so he can use it as a wildlife photography platform.

Put simply, an outboard motor consists of a gasoline engine with a vertical shaft that’s coupled to a right-angle gearbox with a propeller on the end. Beyond that they’re a fairly “dumb” piece of gear, so replacing the engine on top with something else should be (at least in theory) a pretty simple job. Especially on the small older model that [Olly] decided to use as a donor unit. The 1974 Johnson 2 HP motor didn’t have any tricky electronics in it to contend with; the thing didn’t even have a clutch.

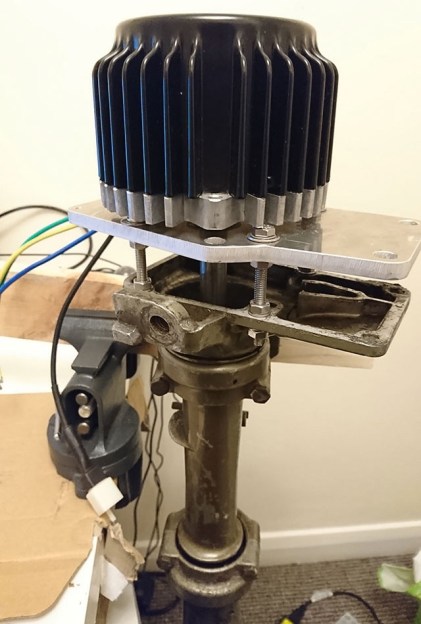
Once [Olly] had removed the old gas engine from the top of the outboard, he designed an adapter plate in OnShape and had it cut out of aluminum so he could mount a beefy 1 kW 48 V brushless electric motor in its place. Connecting the new electric motor to the carcass of the outboard actually ended up being simpler than putting the original motor on, as this time around he didn’t need to reconnect the cooling pumps which would usually pull water from down by the propeller and recirculate it through the engine.

While the mechanical aspects of this project are certainly cool, we’re especially interested in the control system for this newly electric outboard. It uses a 3.2 inch Nextion color touch screen and Arduino Nano to provide a very slick looking digital “dashboard” which can convey motor status and other information at a glance. Unfortunately, [Olly] says the details on that part of the project will be saved for a future post, leaving us with only a single picture of the system’s interface for us to drool over until then.

We’ve seen the occasional seafaring project that made use of an electric trolling motor, and we’ve even seen an electric drill put in some overtime spinning a prop in the water. Converting gasoline boat over to electric is however a rarity. But much like electric car conversions, such projects may become more common as the cost and complexity of powerful electric propulsion systems continues to fall.

[Thanks to Alex for the tip.]

Adventures In Automating A Candle Factory

Have you ever considered the manufacture of candles? Not necessarily manufacturing them yourself, but how they are manufactured in a small-scale industrial setting? It’s something that has been of great concern to Michael Schuldt as he grappled with the task of automating a simple manual candle production process.

It’s not just an interesting subject, but the topic of manufacturing automation is something we can all learn from. This was the subject of his Adventures in Manufacturing Automation talk at the recent Hackaday Superconference which you’ll find below the break. Let’s dive in and see what this is all about!

Continue reading “Adventures In Automating A Candle Factory”

35C3: Biggest Communication Congress, Yet Little Chaos

Every year for the past 35 years, the German Chaos Computer Club has met just after Christmas for a few days of “Spaß am Gerät” — having fun with the machines. And that’s everything from trying to bring an old PDP-8 back into running condition to forging new software to replace the old and busted social media platforms that permeate our lives. The sum total of around 17,000 people doing the nerdy stuff that they love, and sharing it together, is both amazing and inspiring. Four days of little sleep and much socializing later, I bet there was still another four days’ worth of stuff to see.

The official theme this year was “Refreshing Memories” which honestly sounds a bit too much like a cola slogan, but was a great opportunity to think back on the hacks of the past that got us where we are. Assemblies put up shrines to their hacker heroes of the past. Retro computers were everywhere, in the talks and on the floor. This year’s Congress was a great time to look back and remember, but also to create new memories for the future. On that front, it was a total success.

But the unofficial theme this year was “Smooth Running”. Everything went very well, which is no small feat considering that the infrastructure, decoration, security, and even the medical response teams are from the Chaos community. It’s the depth of engagement that makes this work: of the 17,000 people who showed up, just over 4,000 of them volunteered for “angel” shifts — meaning they helped guard the doors, staff the info desks, or build up or tear down. It was the largest ever CCC, and you could feel it, but they pulled it off, and then some.

The angels are geeks just like you and me, and since everything went so smoothly, they had time to play. For instance, the phone operations people offer DECT phone service so that attendees can bring in their home phones and use them at Congress. In years past, the lines to register and enroll phones were painfully long. This year, it all happened online, and the result is that the phone ops crew got bored. That explains how they had time to establish roaming home-phone wireless service in some of the normal Leipzig city trams. Wait, what?

Continue reading “35C3: Biggest Communication Congress, Yet Little Chaos”

State Machine Controls Garage Door Over The Internet

Home automation has been a hot-button topic time and again since the dawn of the personal computer age. These days, thanks to modern communications technology, it’s possible to do some pretty cool stuff. [Brad Harbert] decided to automate his garage door, controlling it over the Internet.

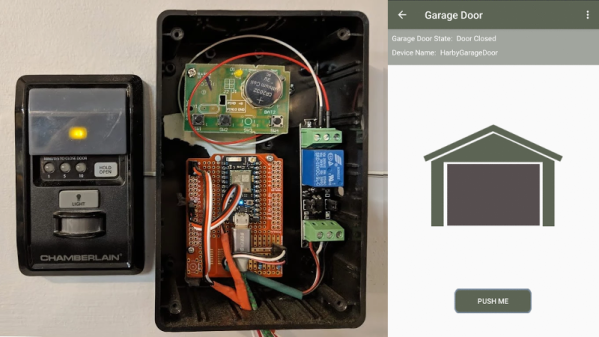
The build relies on a Particle Photon to do the heavy lifting of connecting the door to the Internet. Particle offer a cloud service that makes setting up such a project easy for the first timer, and [Brad] was able to get things working quickly. A relay is used to activate the garage door remote button, as it was desired to leave the main control board of the garage door opener untouched. Reed switches are used to sense the position of the door, and [Brad] coded a state machine to ensure the door’s current state is always known.

It’s a simple project, but [Brad]’s use of state machine techniques and position sensing mean it’s less likely he’ll get home to find his garage open and his possessions missing. If you’re new to programming simple physical devices, you could take a page out of his logbook. Of course we’ve seen similar builds before, like this one from parts from the scrapbin.

Linux Fu: The Kitchen Sync

One of the great things about Linux and similar operating systems is they are configurable. If you don’t like something, there’s a great chance you can change it easily with a few entries in a file somewhere. For example, take bash — a very popular shell by any measure. If you want a different style of command line editing, there’s an option. You want the tab key to match files regardless of case? Another option. Usually, these are set in one of your so-called profile files like .bashrc in your home directory.

As long as you are sitting in front of your single computer working, this is great. You customize your .bashrc and other files to your heart’s content and then you work in an environment that acts the way you want it to. The problem is when you have a lot of computers. Maybe you have a web server, a desktop, a firewall machine, and a few dozen Raspberry Pi computers. How do you keep all the configurations the same? Then once they are the same, how do you keep them up to date?

Continue reading “Linux Fu: The Kitchen Sync”

Is Baking A Raspberry Pi The Recipe For Magic Smoke?

No, Hackaday hasn’t become a baking blog. We’re just here to give you a bit of advice: if [MickMake] ever offers you one of his fresh-baked Pis, proceed with caution. While we have no doubt that there will be some interesting smells wafting out of his kitchen, these aren’t the tasty pies you’re looking for. There’s no delicious home-baked treat when that timer dings, just a handful of Raspberry Pis that have had an exceptionally hard day.

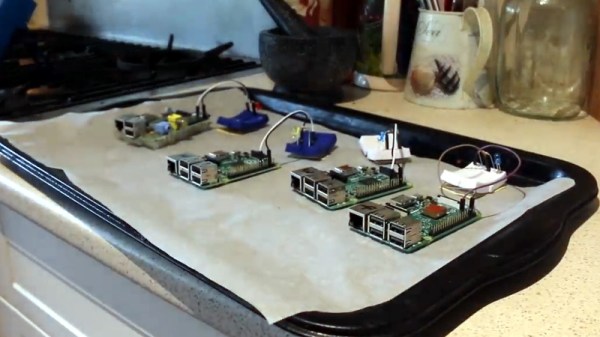
To properly explain the odd sight of some Raspberry Pis laid out on a cookie sheet, we need to take a step back. [MickMake] originally set out to see how everyone’s favorite Linux SBC would handle the harsh Australian heat, and thought that setting them up on his car’s dashboard would be a suitable torture test. But as luck would have it, a storm rolled in while he was making the video which brought temperatures down to a “cool” 30 C (86 F); basically jacket weather at the bottom of the world. So naturally, he decided to put them in his oven instead.

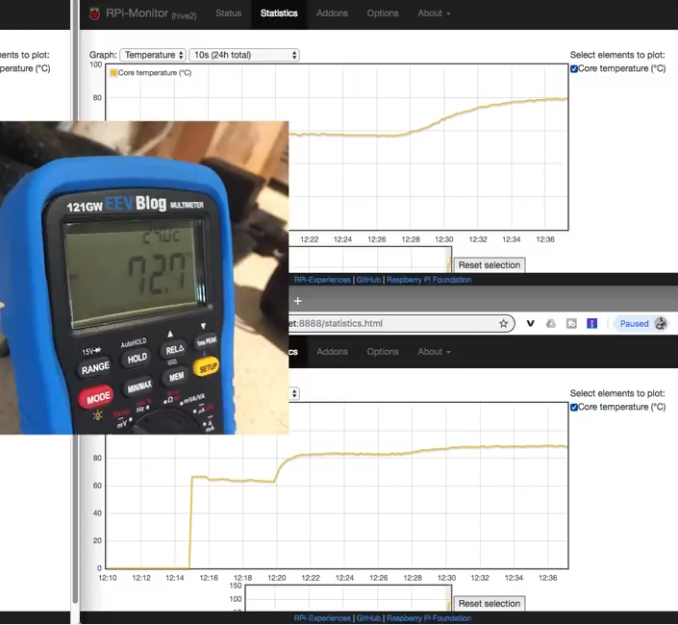
Placed on an insulating sheet and with a thermocouple between them to get an accurate idea of the temperature they were experiencing, an original Pi, a Pi 2, and a pair of Pi 3s were sent on the ride of their lives. In addition to monitoring them over the network, he also added a “heartbeat” LED to each Pi so he’d be able to tell at a glance if any of them had given up the ghost. As if these poor little Pis didn’t have it bad enough already, [MickMake] decided to take things a step farther and run sysbench on them while they took their trip through Hades.

The Pis are actually rated for temperatures up to 85C, and all the participants of the experiment hit that point without any issues. At 87.3 C (~190 F) the original Pi dropped off the network, but its LED was seen bravely blinking on. At 105.7 C (~222 F) it finally breathed its last, followed by the pair of Pi 3s tapping out at 112 C (233 F). The Pi 2 fought on, but it fell right at the 119 C (246 F) mark.

But what about when they cooled off? Somewhat surprisingly, [MickMake] successfully powered all four back up and was unable to find any damage to the Pis, either physically or operationally. Even the SD cards survived, and the Pis popped right back onto the network and were ready for another round of Silicon Chef. Not bad considering they were subjected to temperatures three times higher than the official limit.

Testing electronics in your home oven might seem a bit suspect, and admittedly we’d probably turn down a slice of the next few frozen pizza’s [MickMake] runs through it, but it’s not really so far removed from how proper reliability testing is performed.

Continue reading “Is Baking A Raspberry Pi The Recipe For Magic Smoke?”

Transistor Tester Becomes Car Display

These days, the electronics hobbyist is lucky to have access to a wide range of ready-made modules that enable sensors, screens, and microcontrollers to all be linked up with ease. However, this manner of working generally ends up with a project that becomes more of a PCB salad than a finished product. Oftentimes, it’s possible to find something off the shelf that’s close to your requirements, and repurpose it to work. That’s exactly what [Aaron] did.

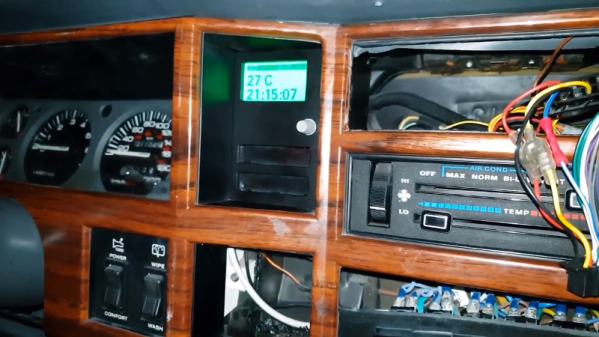
[Aaron] wanted to install a display in his classic Jeep to display the time and some basic parameters. A screen and a microcontroller were called for, and a cheap open-source transistor tester had exactly that already. Consisting of an ATmega-328P linked up to an 128 x 64 graphic LCD module, it had most of what [Aaron] needed from the get go.

To repurpose the device, [Aaron] started by swapping the 8 MHz crystal for a 16 MHz one to make it more easily programmable through the Arduino IDE. Then, a custom firmware was written, which communicates with a DS3232 real time clock, temperature and pressure sensors, and also monitors battery voltage. It’s all neatly installed in the vehicle behind a 3D printed faceplate, and the graphic LCD is clear and easy to read – if you speak German.

[Aaron] has helpfully outlined the various online resources that helped with the hack, including the transistor tester schematic. Our very own [Adam Fabio] reviewed these units in 2015.

If you’ve cleverly reused some existing hardware yourself, be sure to let us know on the tip line. Video after the break.

Continue reading “Transistor Tester Becomes Car Display”