There are birthday presents, and then there are birthday presents. You know, the amazing ones that are the polar opposite of phoning it in. This is one of those presents.
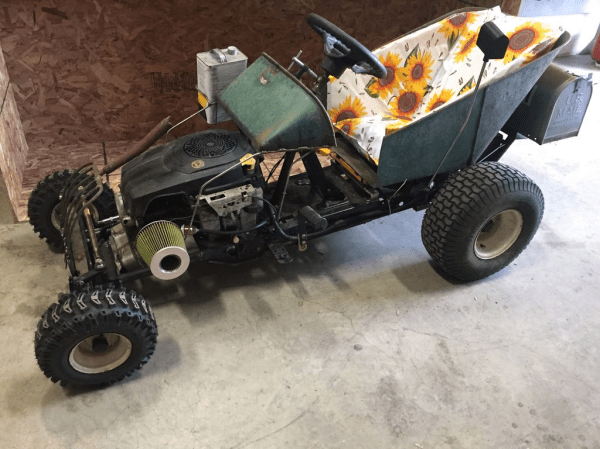
So, [peterbrazil]’s wife is a rural mail carrier on a small island. For her upcoming birthday, he wanted to build a lil’ something she could show off in the local Tractor Days Parade. He found an old Cub Cadet riding mower that was destined for the dump, and the rest is well-documented history.
This glorious conversion required a lot of frame work, but it’s obvious this wasn’t [peterbrazil]’s first rodeo. He got some tires and tie rods from a friend who used to race lawnmowers (yeah, really) and went from there. He wanted this rat rod to be totally slammed (lowered as far as possible), but that would prohibit [Mrs. peterbrazil] from riding it ’round the farm after her parade dust settles. Instead, he went for the raked look, which means the front is lower than the back.
We love all of the reuse here, which includes a wheelbarrow cleverly cut into a seat and a dashboard, an old mailbox for a bed/cargo box, and a pitchfork grill. There are some modern touches as well, like a 3D printed mailbox shift knob with a working door, printed ignition switch box for the dash, and an adapter that makes room for a huge cone air filter. The seat cushion is a nice touch, too—the sunflower fabric adds both femininity and farm flavor to the build.
Always wanted to build a hot rod, but don’t have the garage space? Get some traction with an R/C rod.