Arduboy Gets Even Smaller With New Nano Edition

One of the selling points of the Arduboy is how slim [Kevin Bates] was able to get the Arduino-compatible game system, which is perhaps less surprising when you realize that it originally started out as a design for an electronic business card. But compared to the recently unveiled Nano version, it might as well be the old school “brick” Game Boy.

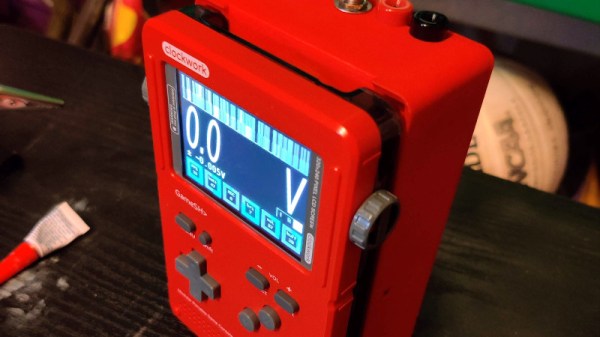
Now to be clear, [Kevin] isn’t looking to put these into official production. Though it does sound like the bare PCBs might be going up for sale in the near future. This was simply an experiment to see how far he could shrink the core Arduboy hardware while still keeping it not only playable but also code-compatible with the full-size version. While “playable” might be a tad subjective in this case, the video after the break clearly demonstrates that it’s fully functional.

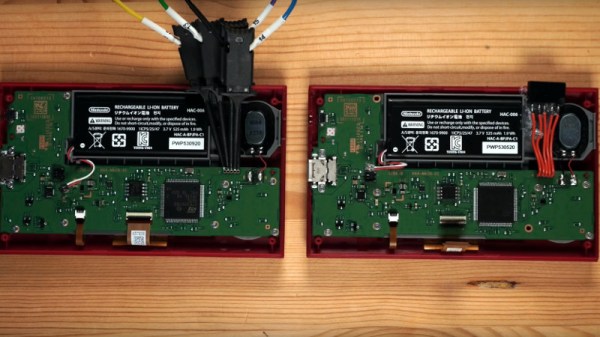
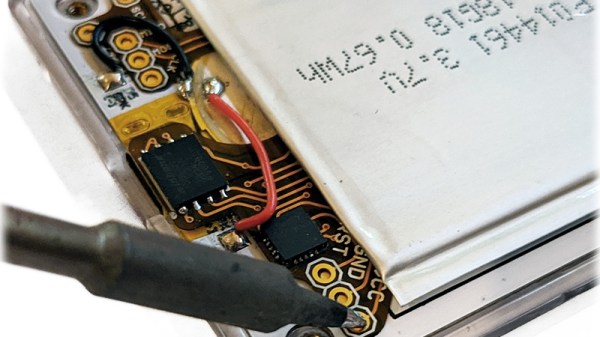
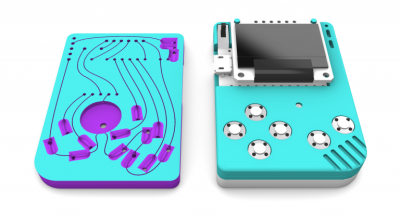
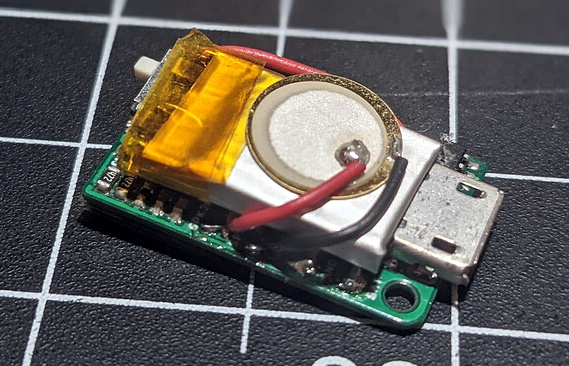
Inside the 3D printed case is the same ATmega32U4 that powers the Arduboy, a 64×32 0.49″ OLED display, and a tiny 25 mAh pouch battery. There’s even a miniature piezo speaker for the bleeps and bloops. All of the pinouts have remained the same so existing code can be moved right over, though the screen is now connected over I2C. [Kevin] has released the schematics for the board in keeping with the general open nature of the Arduboy project, though for now he’s decided to hold onto the board files until it’s clear whether or not there’s a commercial future for the Nano.

We’ve seen attempts to shrink the Arduboy down before, most notably down to the point it could fit inside of a Dreamcast Visual Memory Unit, but the Nano certainly raises (or is that lowers?) the bar considerably.

Continue reading “Arduboy Gets Even Smaller With New Nano Edition”

A Straightforward Guide To Unlocking The Nintendo Game And Watch

Nintendo’s reborn tiny handheld game has certainly attracted the attention of hardware hackers, and we’ve been treated to a succession of exploits as its secrets have been one by one unlocked. With relatively straightforward hardware it conceals potential far beyond a simple Mario game or two, and it’s now at the stage of having a path to dumping both its SPI Flash and internal Flash, unlocking its processor, and running arbitrary code. The process of unlocking it is now atraightforward enough to warrant a HOWTO video, to which [stacksmashing] has treated us. It’s early days and this is still touted as for developers rather than gamers, but it serves to show where work on this console is going.

The console’s STM32 architecture means that programming hardware is straightforward enough to find, though we’re cautioned against using the cheap AliExpress type we might use with a Blue Pill or similar. Instead the snap-off programmer that comes with an STM Nucleo board is a safer choice that many people are likely to have already.

The relative simplicity of the process as seen in the video below must conceal an immense amount of work from multiple people. It’s a succession of scripts to sequentially unlock and back up the various firmwares with STM payloads for each step. Finally the STM32 itself is unlocked, and the backed-up Nintendo firmware can be returned to the device or instead a custom firmware can be created. Aside from the DOOM we’ve already seen there are work-in-progress NES and Game Boy emulators, and fascinatingly also work on bare-metal games.

Given the lack of custom chips in this console it is easily possible that its hardware could be directly cloned and that Nintendo might have unintentionally created a new general purpose hacker’s handheld gaming platform. There are a few hardware works-in-progress such as increasing the SPI Flash size and finding the unconnected USB pins, so we look forward to more exciting news from this quarter.

Continue reading “A Straightforward Guide To Unlocking The Nintendo Game And Watch”

Play A Game Of Multimeter

There are many different single board computers that are general purpose, but there’s another breed targeted at specific applications. One such is the Clockworkpi, a handheld Game Boy-style games console, which may be aimed at gamers but has just as much ability to do all the usual SBC stuff. It’s something [UncannyFlanigan] has demonstrated, by turning the Clockworkpi into a multimeter. And it’s not just a simple digital multimeter either, it’s one that sports graphing as well as instantaneous readings.

At its heart is an Arduino board that supplies the analogue to digital conversion, with opto-couplers for isolation between the two boards. A simple three-way switch selects voltage, current, and resistance ranges, and the ClockworkPi interface is written in Python. We can see that this could easily be extended using the power of the Arduino to deliver more functionality, for which all the code is handily available in a GitHub repository. It’s not a perfect multimeter yet because it lacks adequate input protection, but it shows a lot of promise.

If you’re intrigued by this project then maybe you’ll be pleased to know that it’s not the first home made multimeter we’ve featured.

WiiBoy Color Is Exactly What It Sounds Like

Anyone can go out and buy a handheld console, and if you want to be the cool kid on the school bus, you can always ask your parents to take you out to get one. But if you want real street cred that lasts through your adult years, you’ve gotta put something together yourself. [GingerOfMods] has done just that with the Wiiboy Color. 

Yes, it’s another home-console-turned-portable, and it’s perfomed with exquisite execution. The Wii motherboard is cut and sliced to the absolute bare minimum, as the aim was to build the entire system to the rough form factor of the original Game Boy Color. Custom PCBs were then used to link the chopped ‘board to peripherals, such as the USB drive used to load games and the circuitry from a Gamecube controller. The screen is a beautiful looking 3.5″ IPS LCD, running at 480p and originally intended for use as an automotive backup camera. Battery life is around 2-3 hours, with a USB-C port included for easy charging. More details are included on the forum build log.

It’s a tidy build, and the 3D printed case, Switch joysticks and DS Lite buttons give it a near-production quality finish. [GingerOfMods] intends to build more for commissions, though expect a hefty price tag given the labor and custom work involved. We’ve seen other portable Wiis before too, like this tightly-packed Kapton-heavy build. Video after the break.

Continue reading “WiiBoy Color Is Exactly What It Sounds Like”

Official Arduboy Upgrade Module Nears Competition

We’ve been big fans of the Arduboy since [Kevin Bates] showed off the first prototype back in 2014. It’s a fantastic platform for making and playing simple games, but there’s certainly room for improvement. One of the most obvious usability issues has always been that the hardware can only hold one game at a time. But thanks to the development of an official add-on, the Arduboy will soon have enough onboard storage to hold hundreds of games

Even the rear silkscreen was a community effort.

The upgrade takes the form of a small flexible PCB that gets soldered to existing test points on the Arduboy. Equipped with a W25Q128 flash chip, the retrofit board provides an additional 16 MB of flash storage to the handheld’s ATmega32u4 microcontroller; enough to hold essentially every game and program ever written for the platform at once.

Of course, wiring an SPI flash chip to the handheld’s MCU is only half the battle. The system also needs to have its bootloader replaced with one that’s aware of this expanded storage. To that end, the upgrade board also contains an ATtiny85 that’s there to handle this process without the need for an external programmer. While this is a luxury the average Hackaday reader could probably do without, it’s a smart move for an upgrade intended for a wider audience.

The upgrade board is currently available for pre-order, but those who know their way around a soldering iron and a USBasp can upgrade their own hardware right now by following along with the technical discussion between [Kevin] and the community in the “Project Falcon” forum. In fact, the particularly astute reader may notice that this official upgrade has its roots in the community-developed Arduboy cartridge we covered last year.

Continue reading “Official Arduboy Upgrade Module Nears Competition”

Slide Your Switch Into A Gamecube Controller

The Gamecube was certainly a divisive design when it was released back in 2001, but the fact that people are still happily hacking away at its controller nearly 20 years later proves that Nintendo must have gotten something right. The latest project from Nintendo wizard [Bill Paxton] turns the unique Gamecube controller into an even more unique mobile dock for the Switch.

To build this “Gamecube Grip”, [Bill] literally cut an original controller and its PCB in half so they could be relocated on either end of the 3D printed central frame. Internally, the controller PCB is wired up to a GC+ board, which is an open hardware project that uses a PIC18F25K22 microcontroller to bring enhanced features to the classic peripheral such as adjustable stick dead zones and rumble intensity. From there, it’s connected to the switch with a GBros adapter from 8bitdo.

The grip also includes an Anker PowerCore 20,100 mAh battery that should keep the system going for hours, and some components liberated from a third party Switch dock. Everything has been finished off with the attention to detail that we’ve come to expect from [Bill] and his projects, including the seemingly flawless glossy paint job that’s something of hallmark for his custom gaming creations.

Continue reading “Slide Your Switch Into A Gamecube Controller”

3D Printing For Wire Paths Yields An Arduboy Minus The PCB

What is part way between a printed circuit board and a rats-nest of point-to-point wiring? We’re not sure, but this is it. [Johan von Konow] has come up with an inspired solution, 3D printing an Arduboy case with channels ready-made for all the wires. The effect with his 3DPCBoy is of a PCB without the PCB, and allows the console to be made very quickly and cheaply.

The Arduboy — which we originally looked at back in 2014 — is a handheld gaming console in a somewhat Gameboy-like form factor. Normally a credit-card sized PCB hosts all the components, including a microcontroller, display, and buttons. Each has a predictable footprint and placement so they can simply be wired together with hookup wire, if you don’t mind a messy result.

Here the print itself has all the holes ready-created for the components, and the path of the wires has a resemblance to the sweeping traces of older hand-laid PCBs. The result is very effective way to take common components — and Arduino pro micro board for the uC, an OLED breakout board, and some buttons — and combine them into a robust package. This technique of using 3D prints as a combination of enclosure and substrate for components and wiring has an application far beyond handheld gaming. We look forward to seeing more like it.

[Via the Arduboy community forum, thanks Kevin Bates for the tip.]