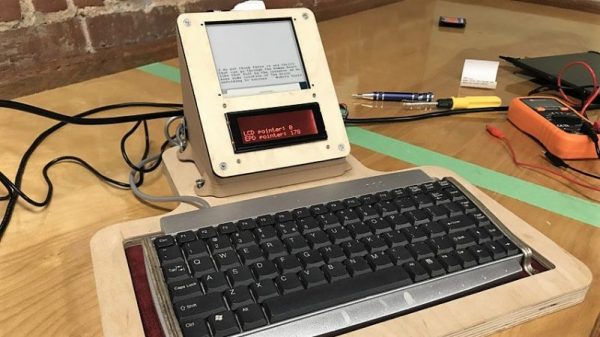
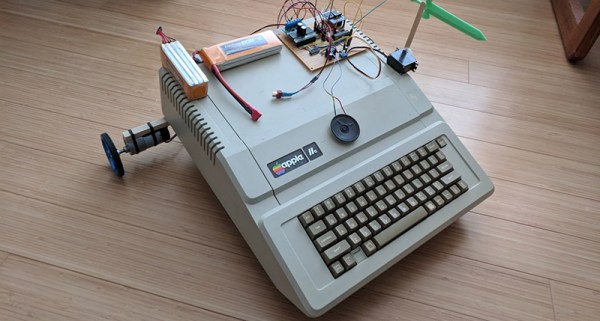
You Can Add Wireless Charging To IPhone… Kinda

We could watch cellphone teardown videos all day long. There’s something pleasing about seeing how everything is packed into such a small enclosure. From the connectors, to that insidious glue, to the minuscule screws, [Scotty Allen] has a real knack for giving us a great look at the teardown process. Take a look at his latest video which attempts to add wireless charging to an iPhone. I think there’s a lot to be said for superb lighting and a formidable camera, but part of this is framing the shots just right.

Now of course we’ve taken apart our fair share of phones and there’s always that queasy “I think I’m going to break something” feeling while doing it. It’s reassuring that [Scotty] isn’t able to do things perfectly either (although he has the benefit of walking the markets for quick replacement parts). This video is a pretty honest recounting of many things going wrong.

The iPhone 6 and 7 are not meant to have wireless charging, but [Scotty’s] working with a friend named [Yeke] who created an aftermarket kit for this. The flexible PCB needs to be folded just right, and adhesive foam added (along with a magical incantation) to make it work. That’s because the add-on is a no-solder job. Above you can see it cleverly encircles one of the mating connectors and relies on mechanical pressure to make contact with the legs of that connector. Neat!

In the second half of the video [Scotty] meets up with [Yeke] to discuss the design itself. We find it interesting that [Yeke] considers his work a DIY item. Perhaps it’s merely lost in translation, but perhaps [Yeke’s] proximity to multiple flexible PCB manufacturers makes him feel that this is more like playing around for fun than product design. Any way you look at it, the ability to design something that will fit inside that crazy-tight iPhone case is both impressive and mesmerizing. Having seen some of the inductive charging hacks over the years, this is by far the cleanest way to go about it.

We caught up with [Scotty] during last year’s Supercon. We may not be able to drop everything and move to Shenzhen, but hearing about the experience is just enough to keep us wanting to!

Continue reading “You Can Add Wireless Charging To IPhone… Kinda”

Arduino Gets Command Line Interface Tools That Let You Skip The IDE

Arduino now has an officially supported command-line interface. The project, called arduino-cli, is the first time that the official toolchain has departed from the Java-based editor known as the Arduino IDE. You can see the official announcement video below.

Obviously this isn’t a new idea. Platform IO and other command-line driven tools exist. But official support means even if you don’t want to use the command line yourself, this should open up a path to integrate the Arduino build process to other IDEs more easily.

The code is open source, but they do mention in their official announcement that you can license it for commercial use. We assume that would mean if you wanted to build it into a product, not just provide an interface to it. This seems like something Arduino expects, because a lot of the command line tools can produce json which is a fair way to send information to another application for parsing.

The command line interface doesn’t just build a sketch. You can do things like install and manage libraries. For example, to create a new sketch:

Continue reading “Arduino Gets Command Line Interface Tools That Let You Skip The IDE”

Quadcopter Ditches Batteries; Flies On Solar Power Alone

It seems kind of obvious when you think about it: why not just stick a solar panel on a quadcopter so it can fly on solar power? Unfortunately, physics is a cruel mistress, and it gets a bit more complex when you look at problems like weight to power ratios, panel efficiency, and similar tedious technical details. This group of National University of Singapore students has gone some way to overcome these technical issues, though: they just built a drone that is powered from solar power alone, with no batteries or other power source.

Their creation is a custom-built quadcopter made with carbon fiber that weighs just 2.6kg (about 5.7lbs), but which has about 4 square meters (about 43 square feet) of solar panels. By testing and hand-selecting the panels with the best efficiency, they were able to generate enough power to drive the four rotors, and have managed to achieve altitudes of up to 10 meters. The students have been working on prototypes of this since 2012, when their first version could only generate 45% of the power needed for flight. So, reaching 100% of flight power in the demo shown below is a significant step.

Continue reading “Quadcopter Ditches Batteries; Flies On Solar Power Alone”

Air Conditioner Remote Reverse Engineered Despite Esoteric Protocol

Infra-red remote control is something of a Done Deal when it comes to hardware hacking, it has been comprehensively reverse engineered, and there exist libraries and software packages to seamlessly take care of all its quirks. Just occasionally though, along comes an IR remote whose protocol doesn’t follow that well-worn path

[William Dudley] found himself in this position with an air-conditioning unit remote control. He found it sent a stream of data with all settings of the machine rather than the single command codes you might expect from a familiar TV remote. The solution was to reverse engineer and reimplement the IR codes.

His reverse engineering relied on an Arduino and IR receiver which he used to sniff the packets coming out of the remote. Eventually he was able to recognise some of the functions from the remote, and create his own protocol that can recreate most of the remote’s functions. This was pushed over to a Raspberry Pi Zero which uses an IR LED to command the air conditioner, joining the ranks of his growing home automation setup.

The write-up makes for a fascinating primer on analysis of obscure IR protocols, and is well worth a read for anybody with an interest in the topic. Meanwhile if you want more IR reverse engineering stories, try this tale of a bathroom scale.

UnMaker 2.0 Is Wile E Coyote’s Dead Blow Hammer

Hammers! They’re good for knocking in nails, breaking things apart, and generally smashing up the joint, if you’re in such a mood. Typically, they’re made of iron or steel and come in a variety of sizes depending on the purpose — from tiny chipping hammers for delicate sculpture work, to the heavy-duty sledge for tearing through building materials. But what if you built your own comically large mallet? Enter UnMaker 2.0.

The hammer receiving an eye-catching lick of paint.

Basically, it’s a really big hammer. It’s vaguely reminiscent of a dead blow type design, in that it consists of a moderately shock-absorbing outer shell filled with heavier material. In this case, steel ball bearings find a home inside the shell made out of maple and with a traditional tapered handle. In many ways it’s quite a typical build — other than the fact of its gigantic size and 34-pound head weight. Both of these make it a shoe-in for the ACME catalog. That roadrunner won’t know what hit him.

[Kevin] reports that it is not so much “swung” as it is “raised and allowed to drop”, due to its impressive weight. Clearly, it packs a punch. It’s a solid follow-on from the group’s former work – a truly gigantic utility knife.

Better Motion Through Electrostatic Actuators

If you want something to move with electricity, odds are you’ll be using magnets. Deep inside every servo, every motor, and every linear actuator is a magnet and some coils of wire. There is another way of making things move, though: electrostatics. These are usually seen in tiny MEMS devices, and now we have tiny little electrostatic speakers making their way into phones and other miniature devices.

For [Nathann]’s Hackaday Prize entry, he’s building electrostatic actuators on the cheap, and not just tiny ones, either. He’s building ‘human’ scale electrostatic devices.

The reason electrostatic devices are usually very small is simple: the force of any actuator is dependent on the distance between the plates and the voltage. Moving the plates closer together is right out, or else they would be touching, so the solution to building bigger electrostatic actuators is increasing the voltage. [Nathann] is doing this with a cheap boost converter that’s actually sold as a taser module. These modules are small, output about 800kV, and cost around five bucks.

The prototype for this project is basically a 3D printed box with intersecting fins. These fins are covered in aluminum foil, and the box is filled with oil to prevent arcing. Will it work? That remains to be seen, but this project is a great example of what can be done with some creative part sourcing, a 3D printer, and a tiny bit of know-how. It’s some of the best work the Hackaday Prize has to offer, and we’re amazed that [Nathann] put in the work to make this happen.

You’ve Never See A Solid-State Oscilloscope Like This One

Remember a the time before oscilloscopes had a brain? It’s easy to forget as we’ve become accustomed to a class of simple solid state oscilloscope using a microcontroller as signal processor and a small LCD display to show the resulting waveforms. They are commonly available as inexpensive kits, and while their bandwidth is not huge they give a good account of themselves in low frequency applications. But of course, originally the signal processing was handled in a much simpler way.

[SimpleTronic] reminds us that a small solid state oscilloscope does not need a microcontroller, with a ‘scope on a breadboard that displays waveforms on an LED matrix in a much more traditional manner. This is very much an analogue oscilloscope, in which the X deflection circuitry of the CRT is replaced by a decade counter stepping through the columns of LEDs on the display, and the Y deflection circuitry by some analogue signal conditioning followed by an LM3914 bar graph display chip driving the display rows. There are a few refinements such as a trigger circuit, but it remains a very understandable and surprisingly simple device.

It has a claimed bandwidth of 40 kHz defined by its sweep ranges rather than its analogue bandwidth, and an input voltage range from 50 mVpp to 50 Vpp. It’s hardly a useful instrument due to its low bandwidth, but its strength lies in novelty and in understanding a traditional oscilloscope rather than in its utility. You can see it in action in the video we’ve placed below the break.

‘Scopes of limited use appear from time to time on these pages. A favourite of ours is this soldering iron.

Continue reading “You’ve Never See A Solid-State Oscilloscope Like This One”