3D Printing A Printing Press

If you move among artists, you may have encountered a few printmakers. They create a drawing by cutting through a wax layer that has been deposited on a sheet of copper, then etching the plate and removing the wax. Ink is then rolled onto the plate and cleaned from the flat surface, remaining in the cracks created by the etching. A print is made by putting inked plate and a sheet of paper through a roller press at significant pressure, squeezing the ink from the cracks onto the paper. The result is a beautiful print, but the press required to do the job is by no means cheap.

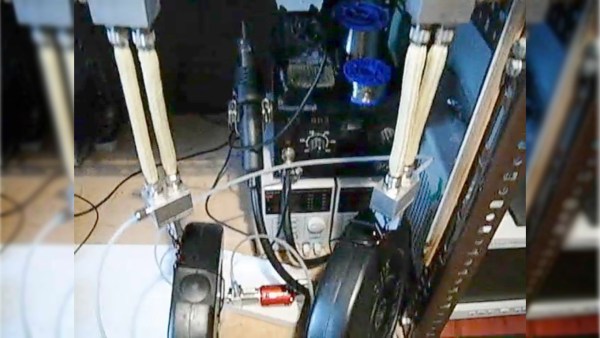
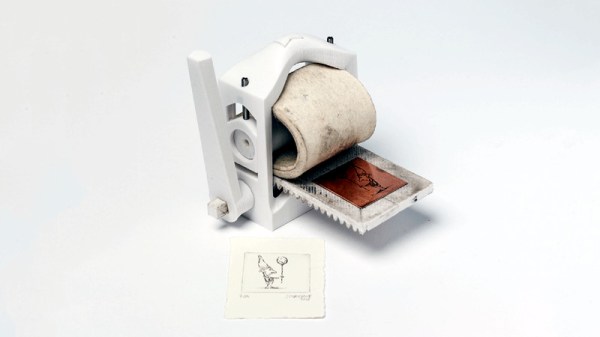
[Martin Schneider] has addressed this expense with his Open Press project, by producing a printmaking press that can be 3D-printed for a fraction of the outlay of a traditional press. It’s by no means a large model, but appears no less functional for it.

The form of the press is straightforward enough, with a print bed that is drawn between a pair of rollers by a rack-and-pinion gear, and as you would imagine the construction is quite substantial. It’s all CC licensed, and you can make one for yourself if you would like, by downloading the files from Thingiverse.

It’s fair to say that printmaking hasn’t appeared much here, but we can see this press could have significant use beyond artistic applications. Meanwhile it’s a great example of 3D printing providing the means to reduce the barrier to entry for something that was previously quite an expensive pursuit.

Rasberry Pi PoE Hat Released

It was announced at the beginning of March, but now the Raspberry Pi Power over Ethernet (PoE) hat is out. Thanks to the addition of a new 4-pin header on the Raspberry Pi 3 Model B+, the Pis can get power from an Ethernet cable, provided you’ve got the setup to deliver PoE.

This is a remarkable bit of engineering, even though it’s just adding Power over Ethernet to a small single board computer. Mechanically, the PoE hat doesn’t increase the 3D bounding box volume of the Raspberry Pi at all. It adds cooling with a fan controlled over I2C. Even more bizarrely, the transformer is mounted in a PCB cutout, and we’re desperate to know how that was specced, designed, and assembled. Yeah, it might just be an add-on for the Raspberry Pi, but there’s some clever work that went into designing it.

The Raspberry Pi gained PoE capability with the introduction of the Raspberry Pi 3 Model B+ last March, a release that did require a slight change to the hardware and pinout of the Raspberry Pi. Compared to the Pi 3 Model B, the Pi 3 Model B+ sports a four-pin header right next to the Ethernet jack and one of the mounting holes. This is the same location of the ‘Run’ header found in the Pi 3 Model B, and probably caused much consternation to anyone who built a hat to take advantage of having a real power button on their Pi.

Nevertheless, what’s done is done, and now we have a real PoE solution for the Raspberry Pi. This is bound to be a boon for anyone who wants to build a Raspberry Pi cluster computer, or anyone who is dropping a few Pis into a server rack that already has PoE hardware.

You can pick up a PoE Pi hat through the usual suspects (Farnell, RS, and other resellers) for $20.

Hydraulic artificial muscles

Soft Hydraulic Muscles Lift Weights As A Team

Working with hydraulics usually means having a fluid tank and valves. [consciousflesh] does away with both those for his DIY hydraulic artificial muscles. Instead, he uses a pair of muscles, both preloaded with fluid. To contract one, he pumps the fluid into the other, expanding that one, and vice versa. A bidirectional gear pump moves the fluid while also acting as a valve. And flexible materials replace heavy metal cylinders.

As we said, this is a DIY project. He made the muscles by surrounding silicone tubes with aramid fiber sleeves, giving added strength. The blocks at either end are also custom-made. The gear pump is one he purchased and made substantial modifications to, including removing the tank and fixing a brushless DC motor to one end. The final custom piece was a controller board for the motor. A Gerber file, schematic, and technical drawings, along with further details are all on his Hackaday.io page. Meanwhile, check out the load test in the video below as the muscles lift and lower 5 kg (11 lbs) each.

A search of Hackaday shows hydraulic artificial muscles may be rare, so perhaps this will be the first of many. For example, how about replicating how human arm muscles work together, one contracting while the other expands? We’ve seen that done already using pneumatics with [James Hobson’s] exoskeleton arms. Perhaps someone should do it with these pairs of flexible hydraulic muscles?

Continue reading “Soft Hydraulic Muscles Lift Weights As A Team”

Demystifying The ESP8266 With A Series Of Tutorials

If your interest has been piqued by the inexpensive wireless-enabled goodness of the ESP8266 microcontroller, but you have been intimidated by the slightly Wild-West nature of the ecosystem that surrounds it, help is at hand. [Alexander] is creating a series of ESP8266 tutorials designed to demystify the component and lead even the most timid would-be developer to a successful first piece of code.

If you cast your mind back to 2014 when the ESP8266 first emerged, it caused great excitement but had almost no information surrounding it. You could buy it on a selection of modules, but there were no English instructions and no tools to speak of. A community of software and hardware hackers set to work, resulting in a variety of routes into development including the required add-ons to use the ever-popular Arduino framework. Four years later we have a mature and reliable platform, with a selection of higher-quality and well supported boards to choose from alongside that original selection.

The tutorials cover the Arduino and the ESP, as well as Lua and the official SDK. They are written for a complete newcomer, but the style is accessible enough that anyone requiring a quick intro to each platform should be able to gain something.

Our community never ceases to amaze us with the quality of the work that emerges from it. We’ve seen plenty of very high quality projects over the years, and it’s especially pleasing to see someone such as [Alexander] giving something back in this way. We look forward to future installments in this series, and you should keep an eye out for them.

Perf Board Pyrotechnics Courtesy Of A High-Voltage Supply

You may have asked yourself at one time or another, “Self, what happens when you pass 100 thousand volts through a printed circuit board?” It’s a good question, and [styropyro] put together this fascinating bit of destructive testing to find out.

Luckily, [styropyro] is well-positioned to explore the high-voltage realm. His YouTube stock-in-trade is lasers, ranging from a ridiculously overpowered diode-laser bazooka to a bottle-busting ruby laser. The latter requires high voltage, of course, and his Frankenstein’s lab yielded the necessary components for this destructive diversion. A chopper drives dual automotive ignition coils to step the voltage up to a respectable 100 kV. The arcs across an air gap are impressive enough, but when applied to a big piece of copper-clad protoboard, the light show is amazing. The arcs take a seemingly different path across the board for each discharge, lighting up the path with an eerie blue glow accompanied by a menacing buzz. Each discharge path may be random, but they all are composed of long stretches across the rows and columns of copper pads that never take the more direct diagonal path. [styropyro]’s explanation of the math governing this behavior is feasible, but really we just liked looking at the pretty and dangerous display. Now if only the board had been populated with components…

No, there’s not much of a hack here, but it’s cool nonetheless. And it’s probably a well-earned distraction from his more serious stuff, like his recent thorough debunking of the “Chinese laser rifle” that was all over the news a while back.

Continue reading “Perf Board Pyrotechnics Courtesy Of A High-Voltage Supply”

You Can Add Wireless Charging To IPhone… Kinda

We could watch cellphone teardown videos all day long. There’s something pleasing about seeing how everything is packed into such a small enclosure. From the connectors, to that insidious glue, to the minuscule screws, [Scotty Allen] has a real knack for giving us a great look at the teardown process. Take a look at his latest video which attempts to add wireless charging to an iPhone. I think there’s a lot to be said for superb lighting and a formidable camera, but part of this is framing the shots just right.

Now of course we’ve taken apart our fair share of phones and there’s always that queasy “I think I’m going to break something” feeling while doing it. It’s reassuring that [Scotty] isn’t able to do things perfectly either (although he has the benefit of walking the markets for quick replacement parts). This video is a pretty honest recounting of many things going wrong.

The iPhone 6 and 7 are not meant to have wireless charging, but [Scotty’s] working with a friend named [Yeke] who created an aftermarket kit for this. The flexible PCB needs to be folded just right, and adhesive foam added (along with a magical incantation) to make it work. That’s because the add-on is a no-solder job. Above you can see it cleverly encircles one of the mating connectors and relies on mechanical pressure to make contact with the legs of that connector. Neat!

In the second half of the video [Scotty] meets up with [Yeke] to discuss the design itself. We find it interesting that [Yeke] considers his work a DIY item. Perhaps it’s merely lost in translation, but perhaps [Yeke’s] proximity to multiple flexible PCB manufacturers makes him feel that this is more like playing around for fun than product design. Any way you look at it, the ability to design something that will fit inside that crazy-tight iPhone case is both impressive and mesmerizing. Having seen some of the inductive charging hacks over the years, this is by far the cleanest way to go about it.

We caught up with [Scotty] during last year’s Supercon. We may not be able to drop everything and move to Shenzhen, but hearing about the experience is just enough to keep us wanting to!

Continue reading “You Can Add Wireless Charging To IPhone… Kinda”

Arduino Gets Command Line Interface Tools That Let You Skip The IDE

Arduino now has an officially supported command-line interface. The project, called arduino-cli, is the first time that the official toolchain has departed from the Java-based editor known as the Arduino IDE. You can see the official announcement video below.

Obviously this isn’t a new idea. Platform IO and other command-line driven tools exist. But official support means even if you don’t want to use the command line yourself, this should open up a path to integrate the Arduino build process to other IDEs more easily.

The code is open source, but they do mention in their official announcement that you can license it for commercial use. We assume that would mean if you wanted to build it into a product, not just provide an interface to it. This seems like something Arduino expects, because a lot of the command line tools can produce json which is a fair way to send information to another application for parsing.

The command line interface doesn’t just build a sketch. You can do things like install and manage libraries. For example, to create a new sketch:

Continue reading “Arduino Gets Command Line Interface Tools That Let You Skip The IDE”