I’ve Seen The Future And It’s Full Of Freakin’ Huge Bricks

“Did you know you can 3D-print LEGO bricks that can actually be used as regular LEGO?”–me, in 2009

Those magical words made real to me the wonder that was 3D printing. It was a magical time! Everyone was 3D printing everything, though most of it wasn’t very good because the technology wasn’t there. But just as every technology goes through an evolution, the goalposts of coolness move on past what used to be remarkable to the new thing everyone’s talking about.

These days, no one is going to be more than mildly curious about your 3D-printed LEGO brick. Still, when you look at that uneven lump of plastic as being just one step in an evolution, it’s pretty momentous. What I’m saying is that we’re looking at a future that can be described in three words: Freakin’ Huge Bricks.

Continue reading “I’ve Seen The Future And It’s Full Of Freakin’ Huge Bricks”

PocketCHIP As A Hardware Hacker’s Terminal

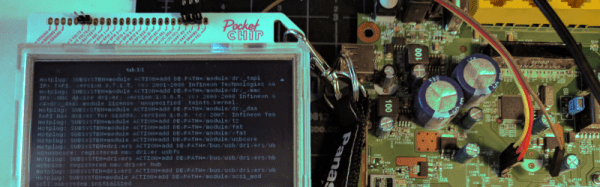
Conferences these days can be tricky places to be at – especially hardware and hacker cons. If you aren’t the one doing the hacking, then you can be sure your devices are being probed, pinged and possibly, hacked. It certainly isn’t the place to bring your precious laptop. Besides, as the day wears on and your feet start aching, regular laptops start feeling bigger and heavier. What you need is a burner laptop – one that is lightweight, cheap and that you don’t mind getting hacked. [dalmoz] wrote a short, to-the-point, tutorial on making use of PocketCHIP as a hardware-hacker’s best friend when it comes to UART connections. It’s also handy to use as a stand alone serial monitor for your projects without having to dedicate a USB port and screen real estate.

The PocketCHIP is a dock for the C.H.I.P. microcomputer and adds a LED backlit touchscreen display, QWERTY keyboard and LiPo battery in a lightweight, molded case. For $70, you get a 1 GHz ARM v7 processor, 512MB RAM, Mali 400 GPU, WiFi and Bluetooth. It’s light enough to be hung around your neck via its lanyard slot. And all of the GPIO pins are conveniently broken out, including the UART pins. Right now, it’s in the hands of Kickstarter backers, but the Next Thing Co website indicates availability sometime this month.

On the hardware side, all you need to do is add header pins to TX, RX and GND (and maybe 5 V and 3 V if required) on the PocketCHIP GPIO header and you’re good to go. On the software side, things are equally easy. The UART pins are meant to provide debug access to the CHIP itself and need to be released from internal duty. Once the UART port is identified, a single terminal command frees its status as a debugging interface. After that, use any terminal emulator – [dalmoz] recommends Minicom – and you’re all set. In the unlikely event that all you have is an Arduino lying around, [dalmoz] posted a simple sketch that can be used to make sure you have it working. Great hacking tip, ’cause it is as simple as it gets. If you’d like to know more about the CHIP project, check out its documentation and Github repository – it’s all open source.

This Electric Longboard Collapses For Air Travel

How do you manage to get an electric off-road longboard past TSA and onto an international flight? Simple — make it a collapsible longboard that fits into a carry-on bag.

The mechanical and electrical feats accomplished by [transistor-man] may not be the most impressive parts of this hack. We’re pretty impressed by the build, starting as it did with the big knobby tires and front truck from an unused mountain board and the hub motor from a hoverboard, turning this into a trike. The incredible shrinking chassis comes courtesy of a couple of stout drawer slides and cam locks to keep it locked in place; collapsed, the board fits in a carry on bag. Expanded, it runs like a dream, as the video below shows.

But we think the really interesting part of this hack is the social engineering [transistor-man] did to ensure that the authorities wouldn’t ground his creation for electrical reasons. It seems current rules limit how big a battery can be and how many of them can be brought on a flight, so there was a lot of battery finagling before his creation could fly.

Electric longboards look like a real kick, whether they be all-aluminum or all-plastic, or even all-LEGO. This one, which went from concept to complete a week and a half before the flight, really raises the bar.

Continue reading “This Electric Longboard Collapses For Air Travel”

Finding The Sun And Moon The New Old-Fashioned Way

The ability to build a robot to take care of a tedious task for you is power indeed. For a few centuries, the task of helping determine one’s location fell to the sextant. Now, you can offload that task to this auto-sextant, courtesy of [Raz85].

To be clear, this robo-sextant doesn’t give you your exact location, but it does find and display the bearing and altitude of the most luminous object around and display them on the LCD — so, the sun and moon. A pair of cheap servos handle the horizontal and vertical movement, an Arduino Uno acts as the brains and nervous system, and a photoresistor acts as the all-seeing eye. Clever use of some cardboard allow [Raz85] to keep the photoresistor isolated from most all light except what the sextant is currently pointed at. Servos have a limited field of movement, so you might need to adjust [Raz85]’s code accordingly if you’re rebuilding this one yourself.

After taking three minutes to make its rounds of the sky, the Uno records the servos’ positions when fixed on the sun or moon, translating that data into usable coordinates. Don’t forget the best part, it runs on batteries making it convenient for all your wave-faring excursions!

Continue reading “Finding The Sun And Moon The New Old-Fashioned Way”

Language Parsing With ANTLR

There are many projects that call out for a custom language parser. If you need something standard, you can probably lift the code from someplace on the Internet. If you need something custom, you might consider reading [Federico Tomassetti’s] tutorial on using ANTLR to build a complete parser-based system. [Frederico] also expanded on this material for his book, but there’s still plenty to pick up from the eight blog posts.

His language, Sandy, is complex enough to be a good example, but not too complex to understand. In addition to the posts, you can find the code on GitHub.

Continue reading “Language Parsing With ANTLR”

A 3D-Printed Coffee Grinder

It’s safe to say that a Venn diagram of Hackaday readers and coffee drinkers would have significant intersection, many of you will be lovers of the bean. Some of you will be happy enough with a spoonful of instant granules and a bit of boiling water, but among your number there will undoubtedly be owners of significant quantities of coffee-related machinery and paraphernalia.

If your coffee enthusiasm extends to grinding your own direct from the bean, then [Christian Pederkoff]’s project should hit the mark, he’s created a rather neat 3D-printed coffee grinder. Sadly the creation of a steel burr and ring was beyond his 3D-printing capabilities so those parts come from a commercial grinder, but the housing, shaft coupler and hopper are all from his printer. Power is from a conveniently available source, he’s made use of an automotive windscreen wiper motor. The whole is a straightforward and easy-to-assemble unit that we think would sit well alongside many readers’ coffee making equipment.

If coffee projects are your thing, we have a few for your entertainment. Another not quite so neat enclosure for a coffee grinder, for example, or a tea-light-powered filter coffee machine for power cut beverage satisfaction.

Hackaday Prize Entry: Mini DRO For A Lathe

A manual lathe has dial wheels to control the feed of the main carriage and the cross slide to help take cuts on the workpiece. These feed wheels always have some backlash and require frequent resetting of the “zero”. The usual process would be to take measurements on the workpiece with either a vernier caliper or a micrometer at intervals which requires stopping the machine, adding up to increased machine time. The addition of a digital readout not only simplifies the process, but also reduces machining time substantially. Since the DRO magnetic strips are directly attached to the cross slide, the effects of backlash are mitigated.

[Igor] has just such a manual lathe and built his own mini DRO unit from scratch a couple of years back. Most DRO’s have encoder strips and sensors attached to the cross slide with a larger display unit attached separately on a stalk, with wires running between the two. [Igor] kept things simple by building a unit that fit within the space constraints he had. His unit consists of just two sensor modules – each attached directly to the slide. The main unit houses a linear hall sensor, electronics, buttons, a small LCD and batteries. The second axis unit houses just the sensor with a cable connecting it to the main unit for data and power. At the heart of the system is a pair of NSE-5310 linear hall sensor encoder chips. These work in conjunction with multipole magnetic strips. The encoder provides a 12-bit output, and the magnetic strips have poles spaced 2 mm apart. This translates to a theoretical resolution of almost 0.5 microns, but of course, the machine mechanics limit the actual results. The encoder chips talk to an ATtiny2313 over the I2C bus. Three buttons and the power supply round-up the hardware. To run it off a single 1.5 V rechargeable battery, [Igor] used a boost converter to get 3.3 V. The 5 V needed for the LCD is obtained by a voltage doubler connected to a PWM output from the microcontroller and regulated by a Zener diode. The second sensor unit connects via a TRRS 3.5 mm socket.

He added a Bluetooth module as an after thought, but ran out of GPIO pins as well as program space and had to get creative to make it work. The plan was to transmit the data to an Android tablet which would work as a large, remote, wireless display. He never did use that feature though, being satisfied with the small LCD display. There’s several things that went wrong in the build, and if he were to replicate the project again, several changes and improvements would help. So if anyone plans on doing something similar, do check up [Igor]’s project logs first.