TiLDA MKπ, The EMF Camp 2016 Badge

The Scottish Consulate has stamped its last passport, the Dutch fire tower has belched its final flame, and the Gold Members Lounge has followed the Hacienda and the Marquee into clubland oblivion. EMF Camp 2016 is over, so all the 1500 or so attendees have left are the memories, photographs, and festival diarrhoea to remind them of their three days in the Surrey countryside.

Well, not quite all, there is the small matter of the badge.

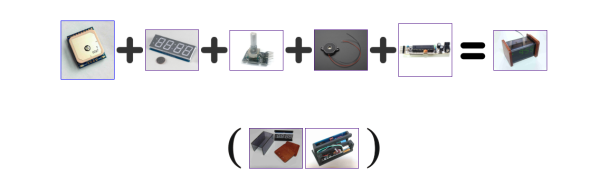
In the case of EMF 2016 it was called TiLDA MKπ, and since there was a point earlier in the year when it seemed the badge might never see the light of day it represents a significant achievement from the EMF badge team.

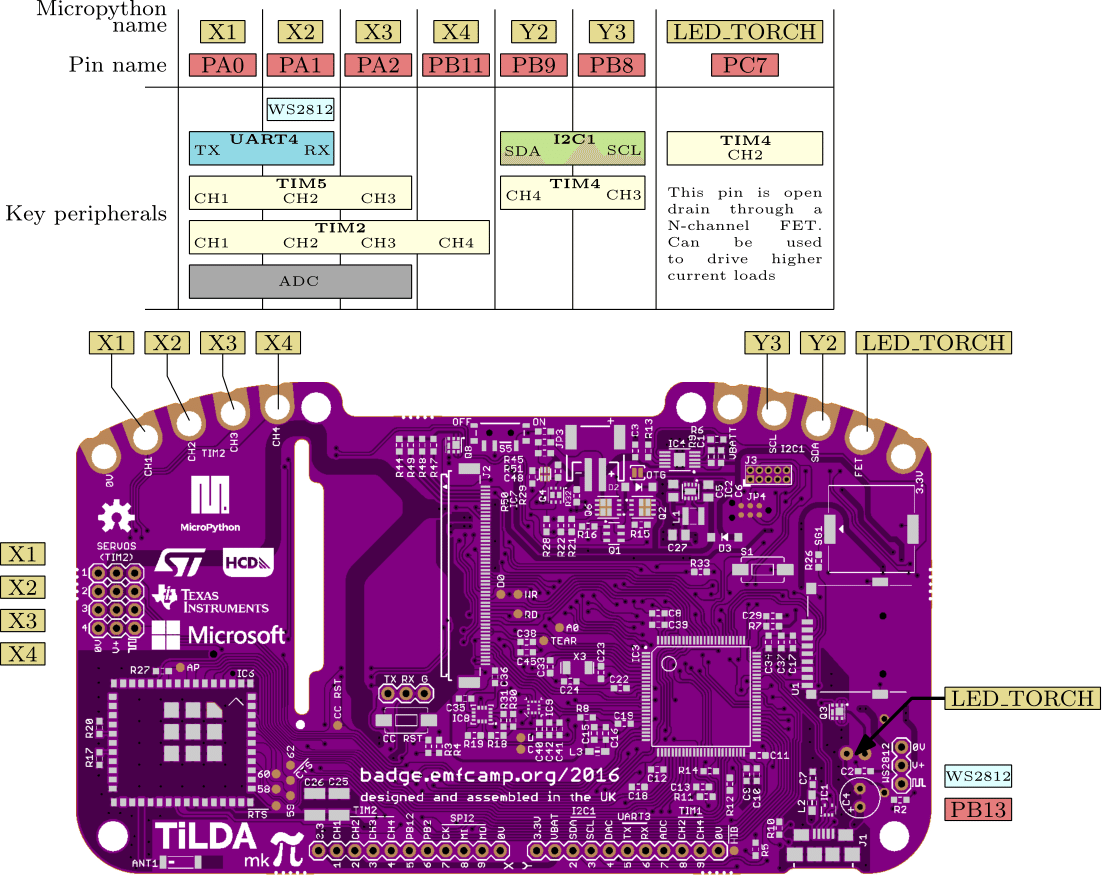
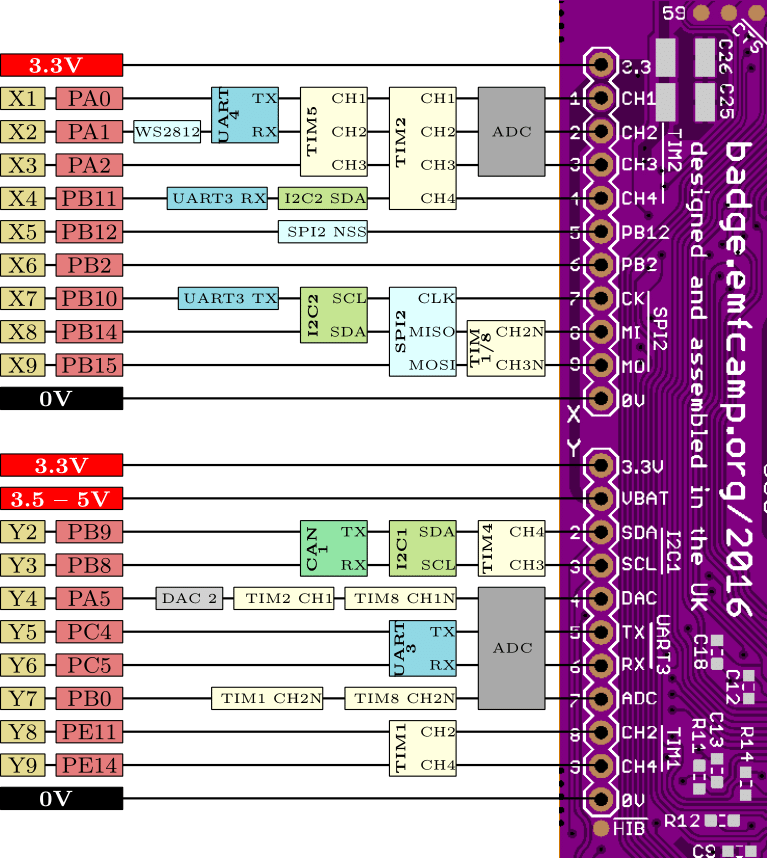
The badge features an STM32L486VGT6 ARM Cortex M4 running at 80MHz, a 320×240 pixel colour LCD, magnetometer and accelerometer, and a CC3100 WiFi processor. The firmware provides a simple interface to an app store containing an expanding array of micropython apps from both the EMF Camp team and submitted by event attendees. As shipped the badge connects to one of the site networks, but this can be adjusted to your own network after the event. It’s been designed for ease of hacking, requiring only a USB connection and mounting as a disk drive without need for special software or IDE. A comprehensive array of I/O lines are brought out to both 0.1″ pitch pins and 4mm edge-mounted holes. At the EMF Camp closing speeches there was an announcement of a competition with a range of prizes for the best hardware and software uses for the badge.

shane-tweetThe TiLDA causes a sticky moment for our colleague, Tindie scribe Shane.
The TiLDA causes a sticky moment for our colleague, Tindie scribe Shane.

As is so often the case the badge was not without its teething troubles, as the network coped with so many devices connecting at once and the on-board Neopixel turned out to have been mounted upside down. Our badge seemed to have a bit of trouble maintaining a steady network connection and apps frequently crashed with miscellaneous Python errors, though a succession of firmware updates have resulted in a more stable experience. But these moments are part of the badge experience; this is after all an event whose attendees are likely to have the means to cope with such problems.

All the relevant files and software for the badge are fully open-source, and can be found in the EMF Camp GitHub repositories. We’ve put a set of images of the board in a gallery below if you are curious. The pinout images are courtesy of the EMF badge wiki.

We’ve featured EMF badges before, here’s our look at the EMF 2014 device.

Hackaday Prize Entry: Solar WiFi Rover Roves At Night

[TK] has a stretch goal for his RC car project — enabling it to recharge on solar power during the day and roam around under remote Internet control at night. It’s like a miniature, backyard version of NASA’s Curiosity rover.

Right now, he’s gotten a Raspberry Pi Zero and a camera on board, and has them controlling the robot over WiFi. He looks like he’s having a great time piloting it around his house. Check out the video down below for (crashy) remote-controlled operation.

We can’t wait to see if solar power is remotely possible (tee-hee!) as an option for this vehicle. The eventual plan to connect it via 3G cellular modem is still off in the future, and will probably demand more of the smarts of the Raspberry Pi than at present. But we love the idea of a long-running autonomous vehicle, so we’re pulling for you, [TK]!

Continue reading “Hackaday Prize Entry: Solar WiFi Rover Roves At Night”

Puzzlingly Simple Tutorial On GPS Time Corrected Clock

We’re not sure if [Derek Lieber] is messing with us or proving a point. Why are you doing this [Derek]? We know there’s technically enough information to build the clock. You even included the code. Couldn’t you have at least thrown in a couple of words? Do we have to skip straight to mediaglyphics?

Anyway, if we follow the equation. The equation… If you take a gps module, a 7 segment display with an HT16K33 backpack, a digital potentiometer, a piezo, and a boarduino we suppose we could grudgingly admit that these would all fit together to make a clock. We still don’t like it though, but we’ll admit that the nice handmade case was a nice touch, and that the pictures do give us enough details to do it ourselves.

It was also pretty cool when you added the Zelda theme song as an alarm sound. Also pretty neat that, being GPS corrected, there’s no need to ever set the time. We may also like the simplicity of the only inputs being the potentiometer, which is used to set the alarm time. It’s just. Dangit [Derek]. Nice clock build, we like it.

Commodore PET Mods At VCF West 2016

28193708113_821f852139_z
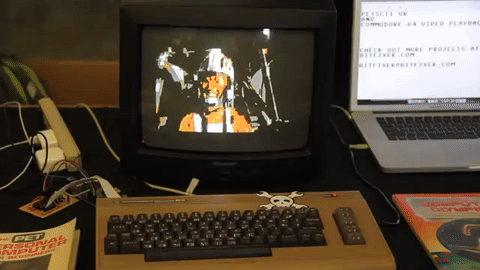
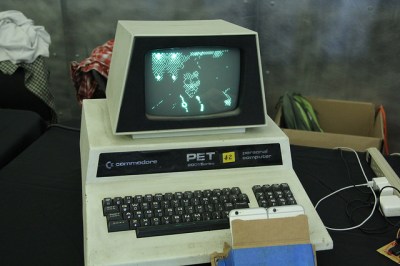
Here at the Vintage Computer Festival, we’ve found oodles of odds and ends from the past. Some, however, have gotten a modern twist like [bitfixer’s] recent Commodore PET project upgrades.

First off is [bitfixer’s] Augmented Reality upgrade. By the power of two iPhones and one raspberry Pi, the user dons a Google-Cardboard-esque heads-up-display and can visualize a 3D, ASCII rendering of the world before them. Not only does this view show up in the HUD, however, it’s also streamed to a Raspberry Pi whch then serializes it info a video display on the Commodore PET.

28191391174_7186b4758d_z
TRON Legacy, can you tell??

This hack builds on some of [bitfixer’s] prior work getting ASCII video streaming up-and running. Of course, the memory on the Commodore PET is nowhere near capable of being able to process these images. In fact, streaming and storing the video data onto the PET’s memory would fill it up in under one second! Instead, [bitfixer] relies on some preprocessing thanks to the far-more-powerful (by comparison) Raspberry Pi and iPhone processors that are capturing the images.


Next off is [bitfixer’s] full-color video display on the same Commodore PET. Again, leveraging another RaspPi to encode and reduce the video to bitmap images, the Commodore PET simple grabs these images and streams them to the screen as fast as possible–at a beloved 5.8 frames per second.


Pwning With Sewing Needles

If you don’t have root, you don’t own a device, despite what hundreds of Internet of Things manufacturers would tell you. Being able to access and write to that embedded Linux system in your new flashy gadget is what you need to truly own a device, and unfortunately this is a relatively uncommon feature. At this year’s DEF CON, [Brad Dixon] unveiled a technique that pwns a device using only a sewing needle, multimeter probe, or a paperclip. No, it won’t work on every device, and the devices this technique will work with are poorly designed. That doesn’t mean it doesn’t work, and that doesn’t mean the Pin2Pwn technique isn’t useful, though.

The attack relies on how an embedded Linux device boots. All the software needed to load Linux and the rest of the peripheral magic is usually stored on a bit of Flash somewhere on the board. By using a pin, probe, or paperclip to short two data pins, or two of the latch pins on this memory chip, the bootloader will fail, and when that happens, it may fall back to a uboot prompt. This pwns the device.

There are a few qualifications for this Pwn using a pin. If the device has JTAG, it doesn’t matter – you can already own the device. If, however, a device has a locked-down JTAG, unresponsive serial ports, or even their own secure boot solution, this technique might work.

Two data pins on a TSSOP Flash shorted by a multimeter probe

This exploit works on the property of the bootloader. This bit of code first looks at a piece of Flash or other memory separate from the CPU and loads whatever is there. [Brad] found a few devices (mostly LTE routers) that would try to load Linux from the Flash, fail, try to load Linux again, fail, and finally drop to a uboot prompt.

As with any successful exploit, an equally effective mitigation strategy must be devised. There are two ways to go about this, and in this case, the software side is much better at getting rid of this attack than the hardware side.

Since this attack relies on the software falling back to uboot after an unsuccessful attempt at whatever it should be booting, the simplest and most effective mitigation technique is simply rebooting the device if the proper firmware can’t be found. Having a silent serial console is great, but if the attack relies on falling back to uboot, simply not doing that will effectively prevent this attack.

The hardware side is a little simpler than writing good firmware. Instead of using TSSOP and SOIC packages for storing the device firmware, use BGAs. Hide the pins and traces on an inner layer of the board. While this isn’t a foolproof way of preventing the attack – there will always be someone with a hot air gun, magnet wire, and a steadier hand than you – it’s hard to glitch a data line with a sewing needle if you can’t see the data line.

Editor Wars: The Revenge Of Vim

Rarely on these pages have I read such a fluff piece! Al Williams’ coverage of Emacs versus Vim was an affront to the type of in-depth coverage our Hackaday readers deserve. While attempting to be “impartial” he gave a seven-sentence summary of Vim, the Ultimate Editor. Seven sentences! Steam is pouring out of my ears like Yosemite Sam.

yosemite+samAl, like a lot of you out there, thinks that he “knows how to use vi”. I’m here to tell you that he doesn’t. And unless you’ve spent the last few years alone in a cave high in the Himalayas, with only food, drink, a laptop, and Vim Golf, you probably don’t either. Heck, I don’t consider myself a Vim master, but I’m going to write this overwrought essay praising it (using Vim, naturally).

The reason I’m writing this is not to perpetuate the vi-versus-Emacs war. That idea is silly anyway, and was probably invented by Emacs folks to steal some of vi’s limelight. You see, vi-versus-Emacs is a red herring. Vi and Vim are so strange, so different from any other editor you might use, that it makes Emacs look simply boring in comparison: it’s just a normal editor with decent extensibility (if you can stand Lisp), horrible key combinations that may or may not cause carpal tunnel syndrome, and code bloat that rivals Microsoft Word. If you’re comfortable using Pico or Nano or Joe or Notepad++ or Gedit or Kate, or anything else for that matter, you can be comfortable using Emacs in a month or so. It’s really just another editor. Yawn.

Vi is something else. It’s a programming language for editing text that’s disguised as an editor. If you try to use it like a normal text editor, you will suffer. If you approach your text editing chores like factoring code into functions, you’re starting to understand Vi.

Continue reading “Editor Wars: The Revenge Of Vim”

Differential Analyzer Cranks Out Math Like A Champ At VCF 2016

Here at VCF, we stumbled across a gigantic contraption that spanned several tables. Rube Goldberg machine this was not. Instead, this device actually does something useful! [Tim Robinson’s] differential analyzer can solve differential equations through several stages of mechanical integrators. The result is a pen-plot graph of the solution to the input equation, input by displacing a rod as a function of time.

Differential analyzers have been around for over a century. [Tim’s] claim to fame is that this particular DA is constructed entirely from Meccano-branded parts. We’re thrilled to see Meccano, over 100 years old at this point, continue to find new uses outside the toy box.

diff_analyzer
The Torque Amplifier

The differential analyzer is riddled with mechanisms that are bound to swing some heads for a double-take. Since the input shaft that transmits the input function f(x), has very little friction, the result can only be carried through the remainder of the machine with some means of torque amplification. To do so, [Tim], and most other DA designers implement a torque analyzer. For [Tim], though, this feat proved to be more difficult (and more triumphant) than other solutions, since he’s using a set of parts that are entirely from Meccano. In fact, this feature took [Tim] through about 20 iterations before he was finally satisfied.

VCF West continues to run through the end of the weekend at the Computer History Museum in Mountain View, CA. If you haven’t already packed your bags for DEF CON, stop by for a few more bewildering brain teasers.