Illustrated Kristina with an IBM Model M keyboard floating between her hands.

Keebin’ With Kristina: The One With The Index Typewriters

You may have noticed that I neglected to write an introductory paragraph for the last one of these — I was just too excited to get into the keyboards and keyboard accessories, I guess. I can’t promise that I’ll always have something to say up here, but this week I definitely do: thank you for all the tips I’ve received so far! The readers are what make Hackaday great, and this little keyboard roundup column is no exception. Fabulous fodder, folks!

Kamina Chameleon

[deshipu]'s DIY keyboard with various center modules
This is [deʃhipu]’s daily driver. Vroom!
Like any keyboard enthusiast worth their soldering iron, [deʃhipu] keeps trying for the ultimate keyboard — ideally, one that runs CircuitPython and makes a great daily driver for high-speed typing.

The latest version is the Kamina, a one-piece split with a SAMD21 brain that is slim and narrow without being cramped. [deʃhipu] started by splitting the Planck layout, spreading it, adding a number row, and eventually, an extra column of Kailh Chocs on the right hand. One-piece splits are great as long as the split suits your shoulders, because everything stays in place. When you do move it around, both halves move as one and you don’t have to mess with the positioning nearly as much as with a two-piece. And of course, since he designed it himself, it fits.

The really cool thing here is the center module concept. It’s functional, it looks nice, and as long as it doesn’t get in the way of typing, seems ideal. So far, [deʃhipu] has made a couple different versions with joysticks, encoders, and buttons, and is currently working on one with a Home button made for cell phones to take advantage of their built-in optical trackpads.

Esrille NISSE Looks Nice

This is the Esrille NISSE keyboard and it comes in two sizes! Okay, the two sizes don’t look that different, but the key spacing specs say otherwise. To me, this looks like an Alice with a better and ortholinear layout. These bat-wing beauties are new to me, but they’ve been around for a few years now and are probably difficult to stumble upon outside of Japan. Although Esrille doesn’t seem to make any other keyboards, they do make a portable PC built on the Raspberry Pi compute module.

The Esrille NISSE keyboard
Image via Esrille.

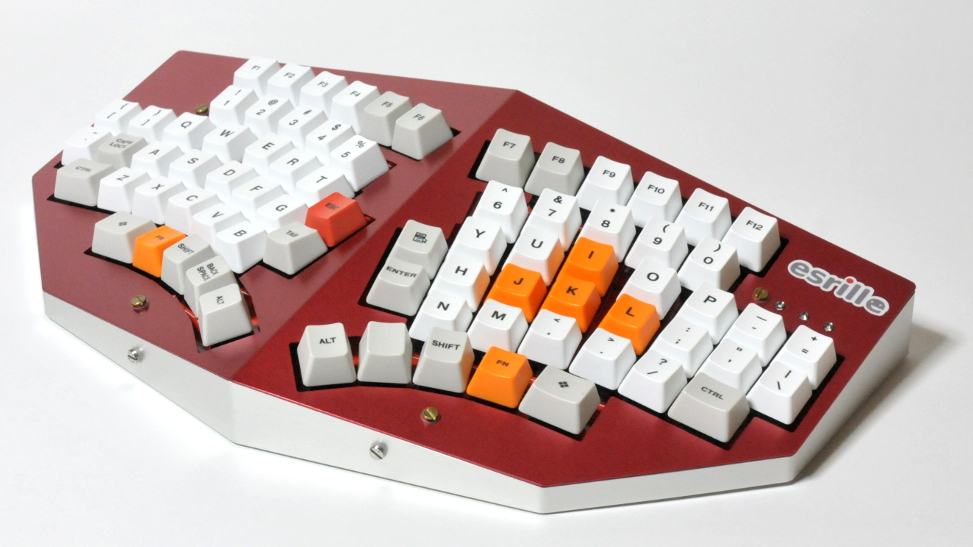
I love me a one-piece split when its done properly, and this one seems to be pretty darn close to perfect. How do I know? You can print out a paper-craft version to try out either of the two sizes. I didn’t take it quite that far, but you can bet that I opened the smaller size’s image in a new tab and put my hands all over the screen to test the layout.

I especially like the thumb clusters and the inside keys on this thing, but I think the innermost thumb keys would be too painful to use, and I would probably just use my index finger. I would totally buy one of these, but they’re a little too expensive, especially since the smaller one costs more. (What’s up with that?) The great news is that the firmware is open-source. Between that and the paper-craft models, a person could probably build their own. Check out [xahlee]’s site for a review and a lot more pictures of the NISSE and similar keebs.

Continue reading “Keebin’ With Kristina: The One With The Index Typewriters”

Casting Silicone Parts With 3D-Printed Inserts For Stiffness

Prolific maker [Jan Mrázek] shared his process for casting soft silicone parts that nevertheless have some added stiffness, which he accomplished by embedding porous, 3D-printed “ribs” into the pieces during the casting process. The 3D-printed inserts act as a sort of skeleton, and as a result, the parts have a soft silicone surface but gain structure and rigidity that simply wouldn’t be obtained if the part were cast entirely in silicone. The nice thing is that no new materials or tools were needed; [Jan] 3D printed both the molds for the parts as well as the structural inserts. It’s always nice when one can use the same tool and materials to accomplish different functions.

The parts [Jan] is making are interesting, as well. He observed that the process of swapping resin in his printer’s build tank was an unpleasant experience for a number of reasons, chief among them being that resin is sticky and messy, and the shape of the build tank doesn’t make pouring resin from it a clean job.

His solution was to design a pour spout that could be pressed onto the build tank, and some specially-designed squeegees to allow scraping the tank clean with ease. Silicone is the ideal material for the parts because it turns out that sticky resin beads nicely on silicone’s surface. Anywhere else, resin tends to spread out and form a sticky mess, but on silicone resin it forms tidy drops and is much easier to clean up.

It’s a technique worth keeping in mind, because one never knows when it could come in handy. Fabricating soft robots for example tends to involve silicone casting and clever techniques. See [Jan]’s parts in action in the video, embedded below.

Continue reading “Casting Silicone Parts With 3D-Printed Inserts For Stiffness”

Light Painting With An 19th Century Inspired Plotter

The geometric chuck was a device that stacked up multiple rotating wheels that could vary their speed and their offset to a central shaft, in order to machine ornate designs using a lathe. It’s this piece of machining obscura from the 19th century that inspired this light painting build from [Ted Kinsman].

Rather than the complicated gears and wheels used in the distant past, [Ted] instead elected to use stepper motors. Three stepper motors are stacked on top of each other, each one able to rotate at an independent rate. The design only implements three steppers as the slip rings needed to send power and control signals to each stepper are prohibitively expensive.

An Arduino is programmed to run the show, changing the speed of each motor and thus the patterns the system generates. Put LEDs on the spinning plates, or install a pen to mark a piece of paper, and it’s possible to generate all manner of beautiful spirograph-like patterns. Vary the motor speeds or the positioning of the lights, and the patterns vary in turn.

It’s a fun build for light painting, with some great visuals produced. We also appreciate the use of the Arduino which makes varying the parameters far easier than having to change out gearsets in classical designs.

If you miss the old school spirograph, you can always build one out of Lego. Else, consider experimenting with other light painting techniques. If you’ve built a fancy rig of your own, be sure to let us know!

[Thanks to zit for the tip!]

Practical Print Makes IPad A Magnificent Eye Piece

Be it the ever shrinking size of components, the miniscule size of the printing on such pieces, or the steady march of time that makes visits to the optometrist an annual ritual, many of us could use some assistance when things start getting fuzzy at the workbench. Arm-mounted LED magnifying lenses can be a handy helper. Zooming in on a macro photo on a smartphone is also a common option that we’ve used many times.

[Timo Birnschein] started down a similar path when he realized that his iPad Pro comes with an app called simply “Magnifier”. A 12” iPad isn’t exactly the most convenient device to hold while trying to solder small parts, so he spent some time designing and 3D printing a specialty iPad stand that he calls a “Quick and Dirty High Performance EE Microscope.” We call it a magnificent tool hack!

Rotating the iPad diagonally so that the camera is closest to the subject leaves plenty of room to work and makes great use of the available screen space. [Timo] reports that at 50% magnification the 12” screen makes even 0603 SMD parts easy to read. Now he rejoices to have more to do with his iPad than watching YouTube and reading Hackaday- although we don’t know why you couldn’t do both.

The STL files have been released on Thingverse for your experimentation. [Timo] notes that he’d like to add an LED ring to brighten things up, and a fume extractor to protect the delicate lens on the iPad. We have to wonder if some plastic wrap over the lens might produce the same effect at almost no cost. Whatever [Timo] decides to do, we’re sure it’ll be brilliant.

If you don’t have an iPad and a 3D printer, you might enjoy an earlier post that shows how you can use your phone as a microscope. If Lego and Raspberry Pi are your go-to parts, you can set your sights on this Lego/Pi/Arduino microscope.

Do you have your own preferred solution for seeing yourself through a hazy situation? Be sure to write it up, and then drop it in the Tip Line!


Hackaday Podcast 129: Super Clever 3D Printing, Jigs And Registration Things, 90s Car Audio, And Smooth LED Fades

Hackaday editors Mike Szczys and Elliot Williams have found a critical mass of projects this week that wouldn’t be possible without 3D printers. There’s an absolutely astounding model roller coaster that is true to the mechanisms and physics of the original (and beholden to hours of sanding and painting). Adding sheet material to the printing process is a novel way to build durable hinges and foldable mechanisms. Elliot picks out not one, but two quadruped robot projects that leverage 3D-printed parts in interesting ways. And for the electronics geeks there’s a server rack stuffed with Raspberry Pi, and analog electronic wizardry to improve the resolution of the WS2811 LED controller. We wrap it all up with discussions of flying boats, and adding Bluetooth audio to old car head units.

Take a look at the links below if you want to follow along, and as always, tell us what you think about this episode in the comments!

Direct download (60 MB or so.)

Places to follow Hackaday podcasts:

Continue reading “Hackaday Podcast 129: Super Clever 3D Printing, Jigs And Registration Things, 90s Car Audio, And Smooth LED Fades”

Scanning Medium Format Film On A 35mm Scanner

Scanning film is great for archival purposes as well as sharing said photos digitally. However, if you’re scanning 120 film, aka medium format, it can be expensive to get the requisite hardware. 35mm scanners are comparatively more common, so [Christian Chapman] decided to modify one to suit medium film instead.

The hack is for the Plustek 8100, and requires modifying the scanner in two ways. Firstly, the driver has to be scanned to sweep a longer range to take into account the bigger film. Secondly, a part of the film carriage has to be replaced so it doesn’t show up in the scanners field of view.

The former is achieved by using the sane-genesys scanner software backend, which can be easily modified to adjust the scan length values appropriately. The latter is achieved via 3D printing replacement components that fit without blocking the requisite area.

It’s a tidy hack and one that allows [Christian] to both scan medium format film as well as overscan 35mm film to capture details from the sprocket hole area. We’ve seen fully custom film scanner builds before, too. If you’ve built your own scanner, be sure to drop us a line!

Measuring Planck’s Constant With LEDs And A DMM

The remarkable thing about our universe is that it’s possible to explore at least some of its inner workings with very simple tools. Gravity is one example, to which [Galileo]’s inclined planes and balls bear witness. But that’s classical mechanics: surely the weirdness that is quantum mechanics requires far more sophisticated instrumentation to explore, right?

That’s true enough — if you consider a voltmeter and a Mark 1 eyeball to be sophisticated. That’s pretty much all you need for instruments to determine Planck’s constant to a decent degree of precision, the way that [poblocki1982]’s did. There’s a little more to it, of course; the method is based on measuring the voltage at which LEDs of various wavelengths start shining, so a simple circuit was built to select an LED from the somewhat grandly named “photon energy array” and provide a way to adjust and monitor the voltage and current.

By performing the experiment in a dark room with adapted eyes, or by using an opaque tube to block out stray light, it’s possible to slowly ramp the voltage up until the first glimmer of light is seen from each LED. Recording the voltage and the wavelength gives you the raw numbers to calculate the Planck constant h, as well as the Planck error Δh, with the help of a handy spreadsheet. [poblocki1982] managed to get within 11% of the published value — not too shabby at all.

Does this all still sound too complicated for you? Maybe a Watt balance made from Lego is more your speed.