That kinetic sand stuff is pretty cool. It’s soft, it builds motor skills, and outside of sprinkling it on carpet, it’s not messy. If you don’t know, it’s 98% sand and 2% polydimethylsiloxane, which is a major component of Silly Putty, and according to a certain yellow and red clown, it’s safe enough to put in chicken nuggets. [Chris]’s wife bought him some, probably because she wanted to see him play around with something that isn’t potentially deadly for a change. In the course of researching its magical properties, he found out that it doesn’t really have a thermal breakdown point, per se. At high enough temperatures, It vitrifies like a sand castle in a mushroom cloud. Between this property and its malleability, [Chris] thought he’d have a reasonable substitute for founding sand. As you can see in his latest experiment, he was right. As a bonus, he managed to turn the benign into the dangerous.
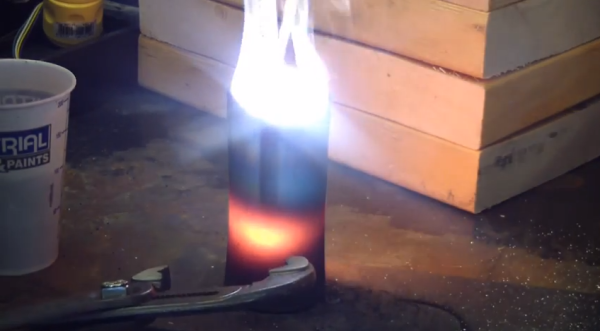
[Chris] had never cast aluminium before, so he decided to start small by making an offset cam for a rotary broach. He packed some magic sand in a wax paper cup and shoved the cam in to make the negative. Then he cut down some aluminium rod and put it in a graphite crucible. He stuck his DC arc welder’s electrode down into the crucible and cranked it up to 50A. That wasn’t enough, so he went to 110. The crucible was soon glowing orange. He carefully poured the molten aluminium into the mold. Make the jump to see how it panned out.
Spoiler alert: there’s no cussin’ this time!
Continue reading “And So Castings Made Of (Kinetic) Sand . . . Turn Out Pretty Well, Actually”

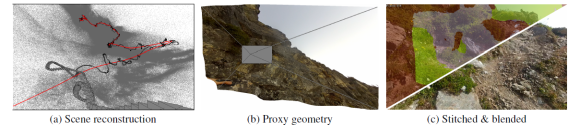 First person video – between Google Glass, GoPro, and other sports cameras, it seems like everyone has a camera on their head these days. If you’re a surfer or skydiver, that might make for some awesome footage. For the rest of us though, it means hours of boring video. The obvious way to fix this is time-lapse. Typically time-lapse throws frames away. Taking 1 of every 10 frames results in a 10x speed increase. Unfortunately, speeding up a head mounted camera often leads to a video so bouncy it can’t be watched without an air sickness bag handy. [Johannes Kopf], [Michael Cohen], and [Richard Szeliski] at Microsoft Research have come up with a novel solution to this problem with