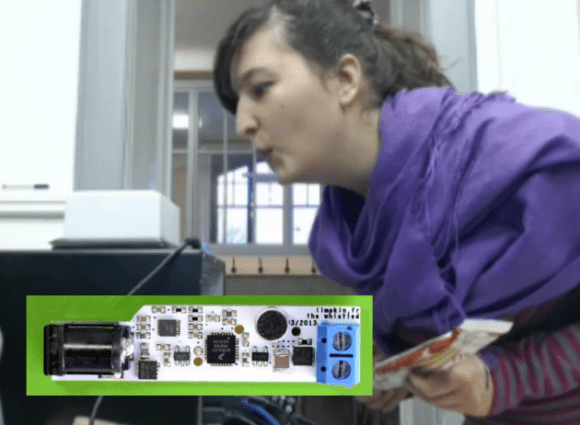
Homebrew GPS Gets ±1 Meter Resolution With A Raspberry Pi

GPS

We’ve been following the work of [Andrew Holme] and his homebrew GPS receiver for a while now. A few years ago, [Andrew] built a four-channel GPS receiver from scratch, but apparently that wasn’t enough for him. He expanded his build last year to track up to eight satellites, and this month added a Raspberry Pi for a 12-channel, battery-powered homebrew GPS receiver that has an accuracy of about 3 feet.

The Raspi is attached to an FPGA board that handles the local oscillator, real-time events, and tracks satellites automatically. The Pi handles the difficult but not time-critical math through an SPI interface. Because the Pi is attached to the FPGA through an SPI interface, it can also load up the FPGA with even more custom code, potentially turning this 12-channel receiver into a 16- or 18-channel one.

An LCD display attached to the FPGA board shows the current latitude, longitude, and other miscellaneous data like the number of satellites received. With a large Li-ion battery, the entire system can be powered for about 5 hours; an impressively portable GPS system that rivals the best commercial options out there.

Flocking Behavior Using Mindstorm Robots

flock-behavior-with-mindstorm

Do you ever wonder why geese always fly together in a V-shape? We’re not asking about the fact that it makes the work load much less for all but the lead goose. We mean how is it that all geese know to form up like this? It’s is the act of flocking, and it’s long been a subject of fascination when it comes to robotics. [Scott Snowden] researched the topic while working on his degree a few years ago. Above you can see the demonstration of the behavior using LEGO Mindstorm robots. That’s certainly interesting and you’ll want to check out the video after the break. But his offering doesn’t end with the demo. He also posted a huge article about his work that will provide days of fascinating reading.

We can’t begin to scratch the surface of all that he covers, but we can give you a quick primer on his Mindstorm (NXT) setup. He uses these three bots along with a central brick (the computer part of the NXT hardware) which communicates with them. This lets him use a wide range of powerful tools like MatLab and Processing to recognize each robot with a top-down camera, passing it data based on info harvested with computer vision. From there it’s a wild ride of modeling the behavior as a set of algorithms.

Continue reading “Flocking Behavior Using Mindstorm Robots”

Magnetic CNC Marble Maze

magnetic-cnc-marble-maze

[Martin Raynsford] figured out a way to sneak some learning into a fun package. He did such a good job the test subjects didn’t even know they were teaching themselves just a tiny bit of CNC programming.

The apparatus above is a marble maze, but instead of building walls [Martin] simply etched a pattern on the playing field. The marble is a ball bearing which moves through the maze using a magnetic CNC gantry hidden underneath. Where does one get ball bearings of this size? If you’re [Martin] you scavenge them from your laser-cut Donkey Kong game.

He showed off the rig at the Maker Faire.  It takes simple commands as cardinal directions and units of movement. The ‘player’ (remember, they’re secretly learning something, not just playing a game) inputs a series of movements such as “N10,E10” which are then pushed through a serial connection to the Arduino. It follows these commands, moving the hidden magnet which drags the ball bearing along with it. It’s simple, but watch the clip after the break and we think you’ll agree the sound of the stepper motors and the movement of the ball will be like crack for young minds.

Continue reading “Magnetic CNC Marble Maze”

Timelapse Of The 3d Printed Gun Being Printed.

Once the DoD requested the 3d printed gun files be removed from the internet, a couple things happened.

  1.   The Streisand Effect went into full force. The file was shared all over and can still be found easily.
  2.   I suddenly realized that I was going to be printing a 3d printed gun and doing another article on it even though I had just written an opinion piece about how I don’t care.

I’m not above admitting that it is childish of me. I was told I couldn’t have this thing and suddenly I knew I had to make it. I see it with my kids all the time. Toys can sit in a corner collecting dust for ages, but the second it is in threat of being removed, they have renewed interest, at least for a few minutes.

I figured, if I’m going to be childish about it and print a gun that a) won’t work because I don’t have the right printer, and b) I won’t use anyway because I don’t generally play with guns, I might as well make a fun timelapse video of the more recognizable parts being made.

It initially seemed like it was going to be quick and easy. However, I quickly found that just printing this thing was going to be a time consuming and frustrating task.

1. the scale on the individual files was way off. 

I suspect this has something to do with the printer it was designed for. It seemed very close to being 1 inch = 1 mm. Not a completely uncommon problem. Manually resizing got some files to look right, but I found many simply wouldn’t resize.

2. Almost every single item had errors.

If you’ve done 3d printing, you’ve found that a model can have all kinds of issues that will stop it from printing correctly. I found every single item for the gun had errors. I actually learned a lot about how to repair non-manifold items from this exercise, so it was good in the end.

Some items, like the hammer and the hammer springs simply would not print. I ran them through systems to repair them and fix errors. It would say that everything was fixed, but when I tried to “slice” them for printing, the software would crash.  This means that my gun is incomplete. It has no hammer. Not really that big of a deal to me.

photo(53)
the whole gun
photo(52)
Note that it is missing the hammer mechanism. More on that later.
photo(51)
disassembled

Do I care now?

Nope. I climbed to the top of the fridge and got my cookies. I’m a happy child. The reality is that a zip gun is still cheaper, easier, safer, and more reliable.  Here’s an example.

Altering Automotive Window Motors For Use In Your Projects

automotive-window-motor-for-your-projects

We agree with [Mário Saleiro] that the motors from a car’s power windows make for a fantastic high-torque solution to your next project. If you have a you-pick junkyard in your town they’ll be dirt cheap after you put in a bit of time to find and removing the parts from the yard. But you’ll probably want to add a few extra steps to get them ready, and he’s done a great job of documenting how he augmented them with wheels and rotary encoders.

One aspect of the project which really struck home with us was his machine-shop-101 style tricks to mate the axle of the motor with the wheel. He has a process which ensures you will find the exact center of a cylinder as you work. This starts by lining up a bench vice on his drill press. He then inserts a drill bit upside down in the drill chuck, lowers it and clamps the vice on the bit. After loosening the chuck he ends up with the bit pointing up at the exact center of the chuck. Next he chucks up a piece of threaded rod, drilling a perfectly centered hole by lowering it into the drill bit while the drill press is rotating. The image above shows him using this machined part as a guide to continue the hole into the motor’s axle. Click through the link above to learn the rest of the tricks he uses.

Rigol DS1022C Hack Brings It Up To 100MHz Speed

rigol-1022c-100MHz-hack

[Andreas Schuler] has been playing around with his Rigol DS1022C digital storage oscilloscope. It’s an older model which can capture samples at up to 25MHz, but [Andreas] claims to have quadrupled that using a service menu hack. His technique changes the settings to use the DS1022C at 100Mhz.

Usually a hack like this includes some test measurements that confirm the hardware is actually sampling at the higher rate, and is not just claiming that it has the ability to do so. We’d love to hear from you in the comments if you’ve got this piece of bench hardware and decided to try it for yourself. His method enters in a sequence of buttons from the system info menu. If done correctly this will add a service menu option that wasn’t there before. A bit of navigation leads you to the screen seen above, where you can change the model number to DS1102C. This is the more robust 100MHz cousin of the 1022.

If you think you’ve seen this hack before it’s probably because the Rigol 1052E was previously pulled to 100MHz with a firmware hack.

Converting A Bottle Style Water Cooler To Self-fill From The Tap

water-cooler-water-line-conversion

[Roy Bean] thought it was pretty silly for the Milwaukee Makerspace to keep buying bottles of water for their water cooler. He rigged up a system that automatically fills the refrigerated reservoir in their water cooler. It’s a functional hack that also provided an excuse for him to learn about a couple of different sensors.

What you see above is the meat and potatoes of the hack. The well is where water from a bottle drains into the cooler. This has been covered with a sheet of acrylic to keep the drinking water clean. There is a copper pipe which has been plumbed into the tap water supply. The other two bits are redundant level sensors to make sure the water valve shuts off without overflowing. One of them is a capacitive proximity sensor, the other is a conductivity sensor hacked together using stainless steel hardware submerged in the pool.

If you’re worried about the taste or odor of your tap water just add in a single or multiple stage under-counter filter system when plumbing in the water line. The filters are easy to find and we’d bet they cost less than a contract with a bottled water company.

[Thanks Pete]