[Ben Krasnow] Builds A CT Scanner

gif

After building a homebrew x-ray backscatter imager, [Ben Krasnow] realized he had nearly all the components to build his own CT scanner, able to make a 3D model of the inside of a frozen chicken.

Basically, a CT scanner takes dozens of x-rays of an object and reassembles them with the help of fancy algorithms to allow doctors to peer inside a human body. The CT scanners you’ll find at your local hospital are monstrous devices, rotating an x-ray tube and sensor around a patient with the help of some very heavy duty electromechanical engineering. [Ben] wanted to keep his build rather small, so instead of rotating the x-ray tube and screen around an object, he simply made a stepper motor-driven lazy suzan to rotate his frozen bird.

[Ben] set a digital camera off to the side of his build and captured 45 images of a rotating chicken. After correcting for the perspective distortion, the images were thrown into 3D Slicer to create a true 3D representation of a x-rayed chicken.
Continue reading “[Ben Krasnow] Builds A CT Scanner”

Robot Has Rhythm; Carries Drum Sticks

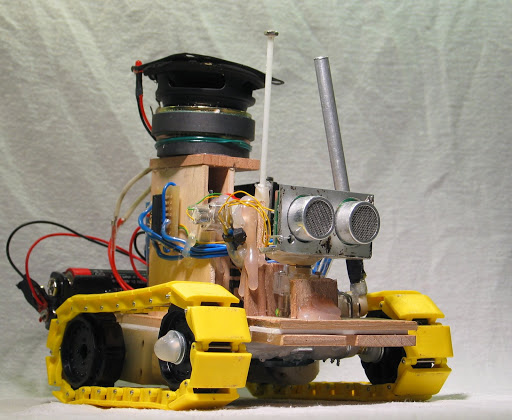
This little robot needs to go on the road with the Blue Man Group. The treaded rover carries its own drum sticks and uses random objects as its drum set.

We admit that this is not a fresh hack. It harkens from 2008 but this is the first time we can remember seeing the little guy. After viewing the video embedded after the jump we think you’ll agree the project deserves to be seen by as many aspiring hardware hackers as possible.

Perched atop the pile is a speaker, with a second hidden between the yellow treads. The lower unit lets the PICAX 28 microcontroller produce beeps and pops, while the upper unit provides a background track for the drumming. The two rods extending above the ultrasonic rangefinder are connected to a couple of motors and drum along with a third stick that looks like a tail. Even the servo that sweeps the rangefinder from side to side keeps the beat. The synchronized magic is all in the code, which you can get your hands on in step 11 of this longer build tutorial.

Continue reading “Robot Has Rhythm; Carries Drum Sticks”

Adding AirPlay To A Shelf System

adding-airplay-to-a-shelf-system

AirPlay is a great system. It allows you to send whatever media is playing from one device to another. Sure, we wish it were a bit more open (Apple is certainly not known for that) but there are several option for creating your own AirPlay receivers. After coming across a project that does just that, [Matt Shirley] decided to turn his shelf system into an AirPlay receiver.

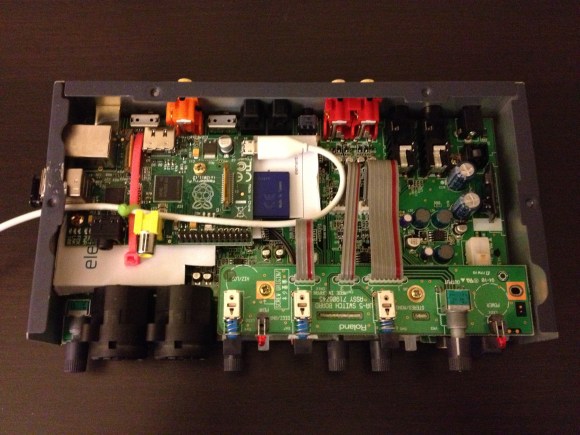
The path to his goal depends on the Raspberry Pi’s ability to receive AirPlay audio using the Shairport package (we just looked in on another player that does this last week). He uses an Edirol UA-5 USB audio interface as an amplifier for his record player. He wasn’t using the USB port for it and knew that it would be simple to connect the RPi USB as a host for the device.

Wanting to keep the look of the system as clean as possible he popped the lid off of the amp. There is just enough room to fit the small RPi board inside. He hacked (literally, look at the pictures) an opening for the USB ports into the side of the metal enclosure. A short patch cable connects from one port to the USB jack on the back of the amplifier. The white cable leaving the side of the case provides power to the Rasperry Pi. The surgery was a success and now he can listen to his tunes with a tap of his finger.

Picture Frame That Scrapes Train Times From The Web

rpi-train-times-fixture

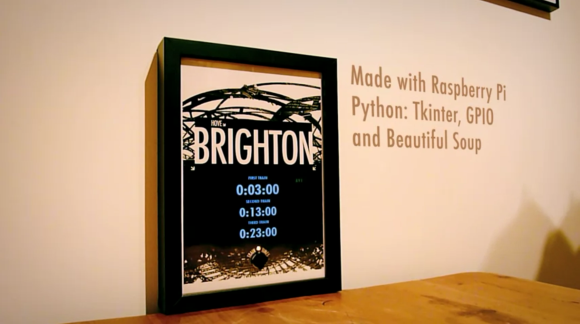
Whenever [Gareth James] needs to catch a train he has only to push a button on this frame and the next three departure times will be displayed. As you can see from the post-processing in the photo, this is accomplished by a Raspberry Pi board using a few familiar tools.

Let’s take a look at the hardware first. He acquired a 7″ LCD display which he removed from its plastic case. The bare screen will easily fit inside of the rather deep wood frame and its composite video input makes it quite simple to interface with the RPi board. There was a little work to be done for power. The LCD needs 12V so he’s using a 12V wall wart to feed the frame, and including a USB car charger to power the RPi. The last thing he added is a button connected to the GPIO header to tell the system to fetch a new set of times.

A Python script monitors the button and uses Beautiful Soup to scrape the train info off of a website. To get the look he wanted [Gareth] wrote a GUI using tkinter. Don’t miss the demo after the jump.

If you need a bit of a primer on scraping web data take a look at this guide.

Continue reading “Picture Frame That Scrapes Train Times From The Web”

Star Wars Themed MAME Cabinet Is Perfect In This Basement Bar

star-wars-themed-mame-cabinet

Fans of the Star Wars series will immediately recognize these illuminated vertical bars as a piece of the style from the original movie. They decorate the MAME cabinet recently installed in this home bar. You’ve got to admit, it looks amazing. But we’re always on the prowl for the build log and this annotated 46 image set has no shortage of goodies.

The project started off as a very ordinary looking plywood frame. But it takes shape quickly as the rounded-over grills were added to the box. Holes were cut behind them to accept the acrylic that serves as a diffuser and to allow the LEDs to shine through from the inside. There are several shelves which will be used to store additional gaming systems in the future. For now all that’s inside is a pretty beefy computer that runs the emulators, allowing games to be played via the arcade buttons or using wireless Xbox controllers.

Make sure you get all the way to the end of the build images. We were delighted by the custom icons in the arcade buttons. Instead of the common player one and player two images there are silhouettes of Star Wars characters and objects. This attention to detail really makes the build something special!

[Thanks Jason]

Satellite Dish Solar Cooker Bakes Potatoes And More

baked-potatoes-in-a-dish-solar-cooker

Hone your survival skills by harnessing the sun’s rays to cook your meals. [Robert] and his daughter turned an old satellite dish into a solar cooker. The image above shows them baking some potatoes, but the temperatures inside the cast iron vessel are high enough to let you cook most foods.

The dish was originally used for satellite television but has been collecting dust in the shed for quite some time. When [Robert] came across a roll of foil tape in his workshop he decided to give the project a whirl. His daughter helped out by peeling away the tape backing (this can be much harder than it sounds) while he applied the reflective material trying to keep it free of wrinkles. After a close call [Robert] donned a pair of welding goggles when positioning the dish. If the light intensity can get the pot up as high as 428 degree Fahrenheit we’re sure it can cause flash blindness.

Unlike other dish cookers we’ve seen, [Robert] didn’t use the original mount for holding the dish in place. He just set it on three bricks and directed it by hand. To keep the intensity focused on the kettle he had to reposition it every 15 minutes.

We wonder if the heat is too much for building a sun tracking solar power harvester?

A Blinky Fedora To Ring In The New Year

[Garrett Mace] decided to dress festive for New Year’s Eve. What he came up with is a fedora ringed in LEDs that react to music. The hardware uses 5050 LEDs on strips. Three of them encircle the head-gear providing a total of 114 RGB pixels. Each is a WS2811 module — a part which we’re seeing more and more of lately.

The video clip after the break starts off with a few minutes of demonstration. [Garrett] managed to code all kinds of animations for the hardware including several different styles of color sweeps and fades. You may start to think that the three bands always display the same patterns but keep watching and you’ll see a sparkle pattern that proves each dot can be addressed individually.

About 2:20 seconds into the video [Garrett] explains how he pulled it off and shows off the driver hardware. The strips are glued to a band of webbing that slides over the hat. The wires that drive the lights were fed through the center of some paracord and connect to an Arduino housed in a 3D printed case. Power is provided by a portable USB battery with a ShiftBrite shield and an MSGEQ7 chip complete the parts list.

Continue reading “A Blinky Fedora To Ring In The New Year”