Retrotechtacular: The Fell Locomotive

If you were to visit a railway almost anywhere in the world, you would find that unless it was in some way running heritage trains, the locomotives would bear a similarity to each other. Electric traction is the norm, whether it comes from a trackside supply or from a diesel generator. In the middle of the last century, as the industry moved away from steam traction though, this was far from a certainty. Without much in the way of power electronics, it was a challenge to reliably and efficiently control a large traction motor, so there were competing traction schemes using mechanical gearboxes or hydraulic drives. One of these is the subject of an archive film released by the oil company Shell, and it’s a fascinating journey into a technology that might have been.

A model of a gearbox, in black and white.
The Fell differential gearbox.

All diesel locomotive designs struggle with the problem of transmitting the huge torque required to start a fully loaded train at low speeds, and because of the huge force required, it’s impossible to design a locomotive-sized conventional gearbox to do the job in the way it might be managed on a truck. Electric and hydraulic drives exploit the beneficial torque characteristics of electric and hydraulic motors, but the mechanical gearbox isn’t quite done for. The subject of the video is British Rail number 10100, otherwise commonly known as the Fell locomotive, and it was a one-off prototype that took to the rails at the start of the 1950s designed to test a very novel gearbox design.

At the heart of the Fell gearbox is a set of differential gears the same as you’d find in the axle of a car, and in the locomotive they are used to combine the output of more than one engine. The loco had four smaller-than-normal diesel traction motors that could be combined, but even then, it wasn’t done. To achieve variable torque, they employed superchargers driven by a set of even-smaller diesel engines, resulting in an ungainly multi-engined beast but with the desired characteristics for both starting heavy trains and for moving them at high speed. Continue reading “Retrotechtacular: The Fell Locomotive”

Pinball With No Computers

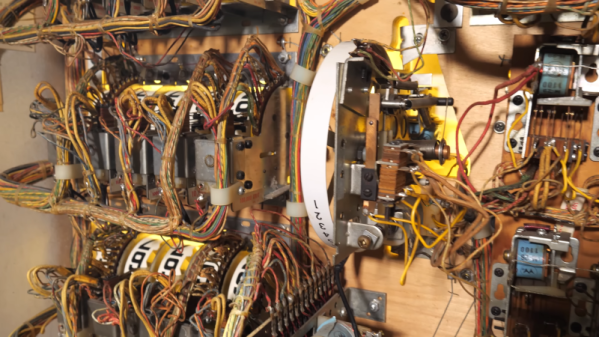
Pinball machines were the video games of their day. Back when they were king, there were no microcontrollers — everything was electromechanical. We know from experience that fixing these was difficult but we imagine that designing complex play behavior with a bunch of motors, relays, clutches, contacts, and more would have been excruciatingly difficult. [Technology Connections] has several videos about an old Aztec machine and he promises more to come. You can watch the first two below.

To give you an idea of what’s involved, imagine a very simple pinball machine that supports a single player and a handful of targets. When the ball hits a target, that could trigger a micro-switch. The switch closure could trigger a relay that closes a contact for a short period of time. That contact energizes a solenoid that advances the score wheels. So now, when a ball hits a target, the score wheel will spin enough to award ten points. To make sure there is enough time for the score to advance, the relay uses something like a mechanical flip flop.

Sound complicated? That’s nothing. Don’t forget, the machine also has to reset the score at the start of the game, count the ball in play, and end the game when the last ball returns. Then consider a real game. There will be multiple players and fancy sequences (e.g., hit the red target three times to award double scores for other targets).

While we knew a fair bit about the design of pinball machines already, we did learn a lot about their history and where the idea came from. The video also explains why it is called pinball since modern machines don’t really have pins — these were like relay-based computers with strange electromagnetic I/O devices.

While pinball machines were the best example of this sort of thing, there were also things like bowling machines and ladder-logic industrial control systems. We’ve even seen an electromechanical phone answering machine.

Continue reading “Pinball With No Computers”

A Few Reasonable Rules For The Responsible Use Of New Technology

If there’s one thing which probably unites all of Hackaday’s community, it’s a love of technology. We live to hear about the very latest developments before anyone else, and the chances are for a lot of them we’ll all have a pretty good idea how they work. But if there’s something which probably annoys a lot of us the most, it’s when we see a piece of new technology misused. A lot of us are open-source enthusiasts not because we’re averse to commercial profit, but because we’ve seen the effects of monopolistic practices distorting the market with their new technologies and making matters worse, not better. After all, if a new technology isn’t capable of making the world a better place in some way, what use is it?

It’s depressing then to watch the same cycle repeat itself over and over, to see new technologies used in the service of restrictive practices for short-term gain rather than to make better products. We probably all have examples of new high-tech products that are simply bad, that are new technology simply for the sake of marketing, and which ultimately deliver something worse than what came before, but with more bling. Perhaps the worst part is the powerlessness,  watching gullible members of the public lapping up something shiny and new that you know to be flawed, and not being able to do anything about it.

Here at Hackaday though, perhaps there is something I can do about it. I don’t sit in any boardroom that matters but I do have here a soapbox on which to stand, and from it I can talk to you, people whose work takes you into many fascinating corners of the tech industry and elsewhere. If I think that new technologies are being used irresponsibly to create bad products, at least I can codify how that might be changed. So here are my four Rules For The Responsible Use Of New Technology, each with some examples. They should each be self-evident, and I hope you’ll agree with me. Continue reading “A Few Reasonable Rules For The Responsible Use Of New Technology”

render of a sample board produced with help of this plugin. it's pretty, has nice lighting and all!

From KiCad To Blender For A Stunning Render

We love Blender. It brings you 3D modeling, but not in a CAD way — instead, people commonly use it to create animations, movies, games, and even things like VR models. In short, Blender is about all things art and visual expression. Now, what if you want a breathtaking render of your KiCad board? Look no further than the pcb2blender tool from [Bobbe 30350n].

This isn’t the first time we’ve seen KiCad meet Blender. However, compared to the KiCad to Blender paths that people used previously, pcb2blender makes the import process as straightforward and as quick as humanly possible. Install a plugin for both tools, and simply transfer a .pcb3d file out of the KiCad plugin into the Blender plugin. Want to make the surfaces of your design look like they’re meant to look in real life? Use the free2ki plugin to apply materials to your 3D models. In fact, you should check out [30350n]’s Blender plugin collection and overall portfolio, it’s impressive.

There’s no shortage of Blender hacks – just this year we’ve covered a hacker straight up simulating an entire camera inside Blender for the purpose of making renders, and someone else showing how to use Stable Diffusion to texture 3D scenes at lightning speed. We even recently published a comprehensive tutorial on how to animate your robot in Blender ourselves! Want to give it a shot? Check out this quick and simple Red Bull can model design tutorial.

Thanks to [Aki] for sharing this with us!

Gyro-Controlled Labyrinth Game Outputs To VGA

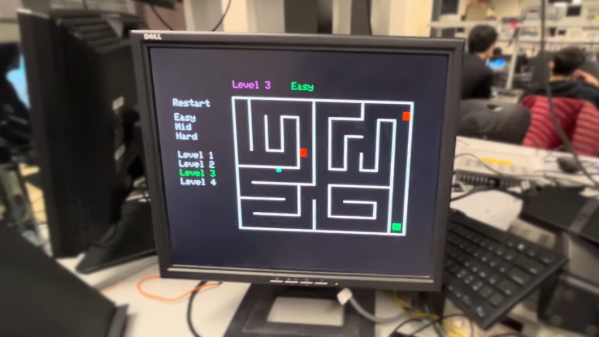
This gesture-controlled labyrinth game using two Raspberry Pi Pico units does a great job of demonstrating how it can sometimes take a lot of work to make something look simple.

To play, one tilts an MPU6050 inertial measurement unit (IMU) attached to one Pico to guide a square through a 2D maze, with the player working through multiple levels of difficulty. A second Pico takes care of displaying the game state on a VGA monitor, and together they work wirelessly to deliver a coherent experience with the right “feel”. This includes low latency, simulating friction appropriately, and more.

Taking a stream of raw sensor readings and turning them into control instructions over UDP in a way that feels intuitive while at the same time generating a VGA display signal has a lot of moving parts, software-wise. The project write-up has a considerable amount of detail on the architecture of the system, and the source code is available on GitHub for those who want a closer look.

We’ve seen gesture controls interfaced to physical marble mazes before, but two Raspberry Pi Picos doing it wirelessly with a VGA monitor for feedback is pretty neat. Watch it in action in the video, embedded just under the page break.

Continue reading “Gyro-Controlled Labyrinth Game Outputs To VGA”

Video Feedback Machine Creates Analog Fractals

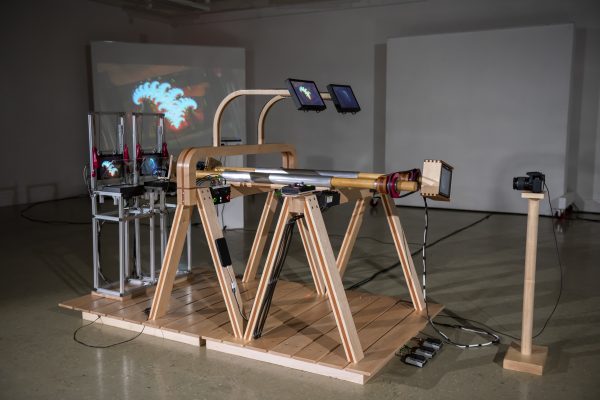
One of the first things everyone does when they get a video camera is to point it at the screen displaying the image, creating video feedback. It’s a fascinating process where the delay from image capture to display establishes a feedback loop that amplifies the image noise into fractal patterns. This sculpture, modestly called The God Machine II takes it to the next level, though.

We covered the first version of this machine in a previous post, but the creator [Dave Blair] has done a huge amount of work on the device since that allows him to tweak and customize the output that the device produces. His new version is quite remarkable, allowing him to create intricate fractals that writhe and change like living things.

The God Machine II is a sophisticated build with three cameras, five HD monitors, three Roland video switchers, two viewing monitors, two sheets of beam splitter glass, and a video input. This setup means it can take an external video input, capture it, and use it as the source for video feedback, then tweak the evolution of the resulting fractal image, repeatedly feeding it back into itself. The system can also control the settings for the monitor, which further changes the feedback as it evolves. [Blair] refers to this as “trapping the images.”

Continue reading “Video Feedback Machine Creates Analog Fractals”

Saving An Expensive Sony HW65ES Projector With Some Fresh Chips

HDMI section of the Sony HW65ES PCB.

When you’re the proud owner of a beast of a projector like the Sony HW65ES (£2800 in 2016), you are understandably upset when it stops working. In the case of [Wettergren] it appears that a lightning strike in the Summer of 2021 managed to take out the HDMI inputs, with no analog or other input options remaining. Although a new board with the HDMI section would cost 500 €, it couldn’t be purchased separately, and a repair shop quoted 1800 € to repair it, which would be a raw deal. So, left with the e-waste or DIY repair options, [Wettergren] chose the latter.

Suffice it to say that taking one of these large projectors apart is rather an adventure, as is extracting the input PCB. On this board some probing showed that while the HDMI 2 port showed some signs of life, with its DDC lines functioning and the EDID readable. The HDMI 1 port had a dead short on these lines, which got traced back to a dead Sil9589CTUC IC, while HDMI was connected to the Sil9679 IC next to it. With this easy part done, the trick was finding replacements for what is decidedly not an off-the-shelf component, but fortunately EBay came through. This just left the slow agony of microsoldering to replace the dead IC, which ultimately succeeded.

After the second repair attempt in May of 2022, the projector is still working in December of 2023, proving that a bit of persistence, a bit of EBay luck and a microsoldering bench with the skills to use it can bring many devices back from the brink to give them a happy second life.