The Pi Pico replacement board in question, assembled, held diagonally in some type of holder

ProPico For Your Pro Pico Needs

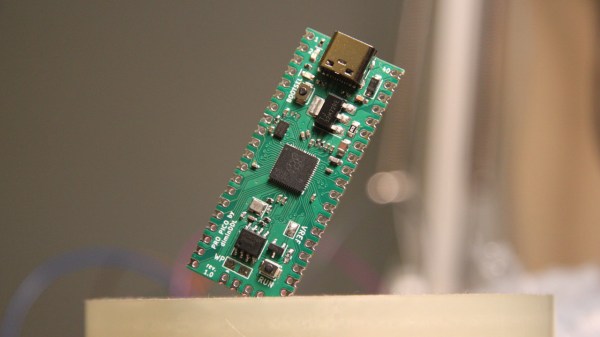
Ever feel like the Pi Pico board could be doing way more given its footprint? Does it bother you that the RP2040’s ADC quality is even further decreased because of the noisy onboard switching regulator? Miffed about decisions like the MicroUSB socket, the 2MB flash, or lack of the reset button? [Dmytro] brings us an open-source Pi Pico design, sporting the same RP2040 and a fully compatible footprint, but adding a number of improvements to its surroundings.

There’s a good few additions, all of them hacker-friendly – [Dmytro] adds comfortably-spaced reset and boot buttons, a USB-C socket, a dedicated low-noise voltage reference for the ADC, one more LED, and an I2C EEPROM footprint socket that is compatible with FRAM chips. Everything worth preserving is preserved – the pinout stays the same, including the SWD connector, which now sports an extra RESET pin. The bottom side USB testpoints remain, with only the four testpoints changed for more useful signals. Last but not least, the switching regulator is replaced by the venerable 1117 – you lose the ability to power your Pico from two AAs, and the capacitor series resistor requirement isn’t great, but you can easily put one of the drop-in 1117 replacement regulators on there.

What’s great is that the design is fully open-source, with KiCad files available. Want to design your own Pi Pico footprint board, improve upon this one even further, or maybe make a more tailored one? Treat yourself to the GitHub repository! There’s also a pinout diagram and a KiCanvas schematic for all your tinkering needs. We’ve covered drop-in replacements for classic drawer-inhabiting parts like the Pi Zero, for the 7805 (twice!), the 6502 CPU, and even for the DE9 serial port connector. No matter the purpose, they’re always a joy to see.

Cessna 208B Grand Caravan Flies Under Remote Control

Reliable Robotics has been working on Unmanned Aircraft Systems (UAS) since its founding in 2017, with a number of demonstrations for the FAA so far as it works towards getting the technology licensed. Most recently, it flew an unmanned Cessna 208B Grand Caravan with a pilot in a ground-based control center. This comes a few years after the company flew a Cessna Skyhawk 172 in a similar manner, demonstrating the functionality of its systems in a fairly small airplane.

Because the pilot is not in the cockpit, the aircraft needs to be equipped with not only the remote controls and camera systems, but also with automation to handle taxiing, take-off, and landings, which is demonstrated in the in-cockpit video provided by Reliable Robotics (also embedded below). Another large part of the automation is dealing with loss of remote control signal (LC2L). Initially this system will be offered only as a retrofit kit for the 9-13 seater, single-prop Cessna 208B, but Reliable Robotics claims that the system is aircraft-agnostic.

Reliable Robotics is focused on remotely piloted cargo flights, as it would save pilots from the stress of constantly traveling and hectic schedules. In addition, the potential loss of a cargo plane would be far less dramatic than an aircraft carrying passengers. That doesn’t mean passenger airplanes won’t eventually use a remote control system like this, but the certification process for something on the order of even a twin turbo-prop Dash 8 passenger plane is likely to be much more involved.

Continue reading “Cessna 208B Grand Caravan Flies Under Remote Control”

FLOSS Weekly Episode 764: You Have To Be Pretty Cynical

This week Jonathan Bennett and Katherine Druckman talk with benny Vasquez, chair of AlmaLinux, all about the weird road we’ve been on with Enterprise Linux distributions, and how that’s landed us here, where we have AlmaLinux, Rocky Linux, and multiple other Red Hat downstream distros. What’s the difference between those projects, and why does it matter?

Projects need more than just developers. How do you keep members doing documentation, bug hunting, outreach, and even graphic design plugged in and feeling like part of the team? How do you walk the narrow line between the different directions a project can drift, setting up your community for long term success? And where’s the most surprising place benny has found AlmaLinux running? And why is benny’s first name never capitalized? Give this week’s show a listen to find out!

Continue reading “FLOSS Weekly Episode 764: You Have To Be Pretty Cynical”

The controller after the rebuild, looking just like the stock controller but with an external antenna attached

An Extensive Walkthrough On Building Your Own KSP Controller

Having a game-tailored controller is a level-up in more ways than one, letting you perform in-game actions quickly and intuitively, instead of trying to map your actions to a clunky combination of keyboard and mouse movements. [abzman] took the Pelco KBD300A, a DVR-intended camera controller panel with a joystick, reverse-engineered it, and then rebuilt it into a Kerbal Space Program controller. What’s more, he documented every detail along the way!

The write-up is so extensive, it’s four separate posts — all of them worth reading without a doubt. In the first post, he describes the original hardware, the process of reverse-engineering it, and a few tips for your own RE journeys. Next, he covers about making his own board, showing all the small decisions he’s had to make, with plenty of KiCad screenshots. If you are on the lookout for designing such a board, there’s plenty to learn!

The original hardware didn’t go down without a fight — the third post talks about taming the seven-segment displays, the onboard joystick, and fighting with the key matrix wired in exactly the way you wouldn’t want. In the end, he shows us how you could tie a controller easily into Kerbal Space Program.

One more piece of hardware liberated, one more win for the hacker world. Whether it’s a Macintosh SE, a classic ThinkPad, or even a generic rotary tool, these upgrades are always a joy to see. If you wanted to learn to do such an upgrade yourself, here’s us showing how you can pull this off with a classic Sony Vaio!

Jana showing the board in action, with a magnetic probe attached to it

Add The Analog Toolkit To Your…Toolkit

Analog acquisition tools are super helpful whenever you want to run an experiment, test out a theory, or improve upon your code, and you won’t realize how much you always needed one up until you’re facing a situation where it’s the only tool for the task. Well, here’s a design you might just want to add to your next PCB order — the STM32G4 Analog Toolkit from [Jana Marie].

The recommended STM32G431 is a wonderful tool for the task in particular. For a start, this board exposes nine 16-bit ADC inputs, with six of them capable of differential mode and three of them having the PGA (Programmable Gain Amplifier) feature. There’s also two 12-bit DAC pins, two timer outputs, three GPIOs, and UART with I2C for the dessert. As a bonus, it can work as a PD trigger, giving you higher-than-5V voltages out of USB-C for any experiments of yours.

The board requires only a few components, most of them easily solderable, with the STM32 in the TQFP32 package. The BOM is optimized, the GPIOs are used up to the max, with two spare GPIOs driving an RGB LED using a witty control scheme. There’s even a place to clip an alligator clip, in case that’s what your probing hardware wants! All in all, this is a carefully crafted design certainly worth having on hand.

Make sure to get a few of these made before you find yourself desperately needing one! That said, there’s always a backup option, the venerable ATtiny85.

Retrotechtacular: The Fell Locomotive

If you were to visit a railway almost anywhere in the world, you would find that unless it was in some way running heritage trains, the locomotives would bear a similarity to each other. Electric traction is the norm, whether it comes from a trackside supply or from a diesel generator. In the middle of the last century, as the industry moved away from steam traction though, this was far from a certainty. Without much in the way of power electronics, it was a challenge to reliably and efficiently control a large traction motor, so there were competing traction schemes using mechanical gearboxes or hydraulic drives. One of these is the subject of an archive film released by the oil company Shell, and it’s a fascinating journey into a technology that might have been.

A model of a gearbox, in black and white.
The Fell differential gearbox.

All diesel locomotive designs struggle with the problem of transmitting the huge torque required to start a fully loaded train at low speeds, and because of the huge force required, it’s impossible to design a locomotive-sized conventional gearbox to do the job in the way it might be managed on a truck. Electric and hydraulic drives exploit the beneficial torque characteristics of electric and hydraulic motors, but the mechanical gearbox isn’t quite done for. The subject of the video is British Rail number 10100, otherwise commonly known as the Fell locomotive, and it was a one-off prototype that took to the rails at the start of the 1950s designed to test a very novel gearbox design.

At the heart of the Fell gearbox is a set of differential gears the same as you’d find in the axle of a car, and in the locomotive they are used to combine the output of more than one engine. The loco had four smaller-than-normal diesel traction motors that could be combined, but even then, it wasn’t done. To achieve variable torque, they employed superchargers driven by a set of even-smaller diesel engines, resulting in an ungainly multi-engined beast but with the desired characteristics for both starting heavy trains and for moving them at high speed. Continue reading “Retrotechtacular: The Fell Locomotive”

Pinball With No Computers

Pinball machines were the video games of their day. Back when they were king, there were no microcontrollers — everything was electromechanical. We know from experience that fixing these was difficult but we imagine that designing complex play behavior with a bunch of motors, relays, clutches, contacts, and more would have been excruciatingly difficult. [Technology Connections] has several videos about an old Aztec machine and he promises more to come. You can watch the first two below.

To give you an idea of what’s involved, imagine a very simple pinball machine that supports a single player and a handful of targets. When the ball hits a target, that could trigger a micro-switch. The switch closure could trigger a relay that closes a contact for a short period of time. That contact energizes a solenoid that advances the score wheels. So now, when a ball hits a target, the score wheel will spin enough to award ten points. To make sure there is enough time for the score to advance, the relay uses something like a mechanical flip flop.

Sound complicated? That’s nothing. Don’t forget, the machine also has to reset the score at the start of the game, count the ball in play, and end the game when the last ball returns. Then consider a real game. There will be multiple players and fancy sequences (e.g., hit the red target three times to award double scores for other targets).

While we knew a fair bit about the design of pinball machines already, we did learn a lot about their history and where the idea came from. The video also explains why it is called pinball since modern machines don’t really have pins — these were like relay-based computers with strange electromagnetic I/O devices.

While pinball machines were the best example of this sort of thing, there were also things like bowling machines and ladder-logic industrial control systems. We’ve even seen an electromechanical phone answering machine.

Continue reading “Pinball With No Computers”