How To Modify Your Car Stereo For Bluetooth Or Aux-In

If you’re an automotive enthusiast of taste, you can’t stand the idea of fitting a janky aftermarket stereo into your nice, clean ride. Flashy, modern head units can spoil the look of a car’s interior, particularly if the car is a retro, classic, or vintage ride.

Thus, we’re going to look at how to modify your existing stock car stereo to accept an auxiliary cable input or even a Bluetooth module. This way, you can pump in the latest tunes from your smartphone without a fuss, while still maintaining an all-original look on the dash.

Fundamentals

A simple Bluetooth module designed for wiring into car audio systems. There are two wires for 12 V power from the vehicle, and the audio signal is sent out over the RCA plugs. The RCA plugs can be cut off and the module hard wired inside your stereo if you have room. Cutting off the plastic case can help too.

Depending on your choice of audio player, you may prefer a 3.5 mm aux jack, or you might want to go with Bluetooth audio if your smartphone no longer has a headphone port. Whichever way you go, the process of modifying the stereo is largely the same. To achieve your goal, you need to find a way of injecting the audio signal into the head unit’s amplifier stage, while making sure no other audio sources are getting sent there as well.

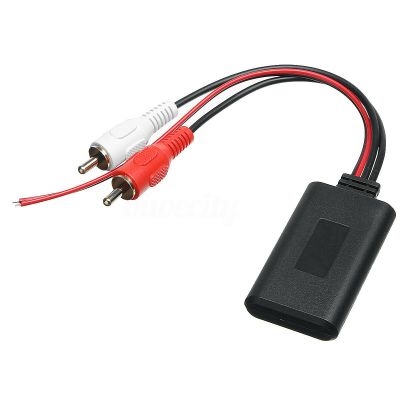
Whether that audio source is a 3.5 mm jack or a Bluetooth module doesn’t matter. The only difference is, in the latter case, you’ll want to buy a Bluetooth module and hardwire it in to the auxiliary input you create, while also splicing the module into the stereo’s power supply. In the case of a simple headphone jack input, you simply need to wire up an aux cord or 3.5 mm jack somewhere you can get to it, and call it done.

This guide won’t cover every stereo under the sun, of course. Edge cases exist and depending on the minute specifics of how your original car radio works, these exact methods may or may not work for you. However, this guide is intended to get you thinking conceptually about how such mods are done, so that you can investigate the hardware in front of you and make your own decisions about how to integrate an external audio input that suits your usage case. Continue reading “How To Modify Your Car Stereo For Bluetooth Or Aux-In”

Ten Projects Won The Refresh Work-From-Home-Life Round Of The Hackaday Prize

Here we are, a year and change into this pandemic, and if you were new to working-from-home every day at the start, surely it has lost its luster by now. We asked you to stand back and assess what can be better about WFH life and you took it from there, building incredibly useful things we couldn’t have dreamed of. From a pool of more than one hundred entries, the judges have selected ten projects whose creators have each been awarded a $500 prize, and will advance to the final round of the 2021 Hackaday Prize in October.

Are your prototypes a mess of wires? Or do you spend way too much time making sure each jumper is cut to the perfect length? Either way, you’re better off using breadWare, which takes a standard breadboard and changes the connection process into a software solution. That’s right — any rail including the power rails can connect to any other thanks to a handful of analog CMOS switch chips.

Maybe you’d love to build the perfect keyboard to grace your battlestation, but are afraid of all that hand wiring. Make it easier on yourself by soldering each key switch to its own little PCB.

If your home office is sometimes overrun by little humans that need immediate attention, you’ll no doubt appreciate the value of a device that can deactivate your web camera and mic automatically when it no longer senses your presence.

You may have left that awful office lighting behind, but you’re still getting plenty of prolonged exposure to blue light. This project aims to head that off a bit by replicating the current outdoor light temperature with indoor lighting. And don’t forget — air quality is just as important, so crack open a window once in a while and build yourself a smart lamp that can give you hard numbers.

This was the second of five challenges in the 2021 Hackaday Prize, which means that the ten finalists linked below will have until the end of October to flesh out and polish their projects before the final round of judging. Meanwhile, we’ve kicked off the next round with the Re-imagine Supportive Tech challenge. Show us how you would make electronics and devices more accessible, as in more modular, hackable, or affordable.

Ten Finalists from the Refresh Work From Home Challenge:

If you like these, take some time to kick back and peruse the entire list of entries in this challenge. You deserve it.

Little Quadruped Uses Many Servos

Walking robots were once the purview of major corporations spending huge dollars on research programs. Now, they’re something you can experiment with at home. [Technovation] has been doing just that with his micro quadruped build.

The build runs twelve servos – three per leg – to enable for a great range of movement for each limb. The servos are all controlled by an Arduino Uno fitted with an Arduino Sensor Shield. Everything is fitted together with a 3D printed chassis and limb segments that bolt directly on to the servo output shafts. This is a common way of building quick, easy, lightweight assemblies with servos, and it works great here. Inverse kinematics is used to calculate the required motions of each joint, and the robot can take steps from 1 to 4cm long in a variety of gaits.

We’d love to see a few sensors and a battery pack added on to allow the ‘bot to explore further in an untethered fashion. [Technovation] has left some provision to mount extra hardware, so we look forward to seeing what comes next.

We’ve seen bigger quadrupeds do great things, too. Video after the break.

Continue reading “Little Quadruped Uses Many Servos”

How To Build With Acrylic Using The Tools You Have

In a perfect world, we’d all have laser cutters and could pop intricate designs out of acrylic sheets with just a few clicks of the mouse. But in reality, most of us have to make do with the pedestrian tools we have at hand. For many, that might even mean everything has to be done by hand. Luckily, [Eric Strebel] has been working on a series of videos that cover how you can make professional looking parts out of acrylic using a wide array of common tools.

Solvent welding hand-cut pieces of acrylic.

The first video demonstrates how a simple cube can be constructed by a band saw, a table saw, and if need be, with hand tools. You might think the two power saws would have similar results, but as [Eric] explains, the table saw ends up being far more accurate and requires less post-processing to get a smooth edge. Ideally you’d run the cut pieces through a router to bevel them, but that’s a tall order for many home gamers.

As for the hand tool approach, scoring and snapping the sheets ends up making a surprisingly clean break that can actually be cleaner than the edge you’d get with a power tool. No matter how you cut them, [Eric] shows the proper way to apply the water-like solvent to your acrylic pieces to create a strong and visually attractive bond.

The next video in the series covers more advanced techniques that can still be pulled off without a top-of-the-line workshop. Sure the water-cooled acrylic bender he has is pretty slick, but if you can’t afford the $100 USD gadget, he shows you how to get similar results with an old toaster oven that you can pick up from the thrift store or even the side of the road. With some hand-made jigs and molds, you can warp and flex the heated plastic into whatever shape your project needs. Combining the tips from both videos, you might be surprised at what can be created with little more than a ruler, some hot air, and the appropriate techniques.

These are just the latest in a long line of fantastic videos that [Eric Strebel] has produced about at-home design and fabrication. Whether its making a two part silicone mold or creating functional prototypes out of foam board, there’s an excellent chance that he’s covered a topic you’ve wanted to learn more about.

Continue reading “How To Build With Acrylic Using The Tools You Have”

Hackaday Links Column Banner

Hackaday Links: July 25, 2021

Everyone makes mistakes in their job, but very few of us get the chance to make a one-character mistake with the potential to brick millions of devices. But that’s what happened to a hapless Google developer, who made an understandable typo in the ChromeOS code that ended up making it all the way to production. The error, which was in the OS encryption keys vault, was supposed to include the “&&” operator for a logical AND. The developer instead used a single ampersand, which broke the who conditional statement. This meant the OS evaluated even correct passwords as invalid, leaving users locked out of their Chromebooks. To be fair to the developer there should be a lot of QA steps between that typo and production, but it still has to sting.

Speaking of whoopsies, sometimes it just doesn’t pay to be right on the internet. It started when a player of the popular tank battle simulator “War Thunder” took issue with the in-game 3D model of the British Challenger 2 main battle tank. The player argued that the model was inaccurate to the point of affecting gameplay, and thought the model should be changed to make things more realistic. There seemed to be some basis for this, as the player claimed to have been a Challenger 2 commander and gunnery instructor. What’s more, like any good Netizen, the player cited sources to back up the claims, including excerpts from the official Challenger 2 instruction manual. Players on the War Thunder forum flagged this as likely classified material, but the player insisted that it wasn’t — right up to the point where the UK Ministry of Defence said, “Not so fast.” It turns out that the manual hasn’t been declassified, and that releasing the material potentially runs afoul of the Official Secrets Act, which carries with it up to 14 years detention at Her Majesty’s pleasure.

For fans of pinball, the announcement that the Museum of Pinball in Banning, California is closing its doors for good is probably a mix of good news and bad. It’s obviously bad news for any museum to close, especially one that curates collections from popular culture. And there’s no denying that pinball has been a big part of that culture, and that the machines themselves are often works of electromechanical art. But it appears that the museum just couldn’t make a go of it, and now its cavernous space will be sold off to a cannabis grower. But the sad news is tempered by the potential for private collectors and other pinball aficionados to score one of the estimated 1,100 pins the museum now needs to find a home for. We’ve never been to the museum, so it’s hard to say what kinds of machines they have and how collectible they are, but regardless, the market is about to be flooded. If you’re nearby, you might want to take a chance to see and play some of these machines one last time, before they get shipped off to private game rooms around the world.

And finally, exciting news from Hackaday superfriend Fran Blanche, who will soon tick an item off her bucket list with a zero-G ride on “G-Force 1”. Not to be confused with its military cousin the “Vomit Comet”, the weightlessness-simulating aircraft will afford Fran a total of about five minutes of free-fall when she takes the ride in a couple of months. There will also be periods of the flight that will simulate the gravity on both the Moon and Mars, so Fran has promised some Matt Damon mythbusting and Buzz Aldrin moonbouncing. And always one to share, Fran will bring along a professional video crew, so she can concentrate on the experience rather than filming it. We’ve actually scheduled Fran for a Hack Chat in August, to talk about the flight and some of her other cool goings-on, so watch out for that.

Are Hackers Being Let Down In Education?

In my work for Hackaday over the years I have been privileged to interact with some of the most creative people I have ever met, I have travelled far more than I ever did when I toiled unseen in an office in Oxford, and I have been lucky enough to hang out in our community’s spaces, camps, and dives across Europe.

Among the huge diversity of skills and ideas though, it’s striking how many of us share similar experiences and histories that have caused us to find our people in rooms full of tools and 3D printers. One of these things I found surprising because I thought I was the only one; I never fit in with the other kids at school, I found much of the teaching incomprehensible and had to figure things out for myself. As an exercise recently I did a straw poll among some of my friends, and found that a significant majority had a similar experience. Clearly something must have gone badly wrong in the way we were being taught that so many of us could have been let down by our schooling, and maybe to understand the needs of our community it’s time to understand why.

Continue reading “Are Hackers Being Let Down In Education?”

Rover Uses Different Kind Of Tracks

Tracked robots usually require at least two wheels inside to work properly. However, [James Bruton] discovered a curious tractor design from the 1940s, the Fordson Rotaped, which only uses a single sprocket wheel inside each track. Being [James], he built a self-balancing robot around the rotaped concept.

Instead of a lot of short track sections, the Rotaped uses six long sections of track, about the same length as the wheel’s diameter. To keep the track on the wheel, a series of chains or an oval frame is used on the inside of the track.

As is usual for [James]’ projects, most of the mechanical parts are 3D printed. To hold the tracks in place, he stretches a bungee cord loop around three points on each side of the track. To make things more interesting, he made the robot balanced on the tracks. This took a bit of PID tuning to get working without oscillations, since the wheels experience a slight cogging effect inside the tracks. The wheels are driven by a pair of brushless motors with O-Drive controllers. The balancing is handled by an Arduino Mega, which reads processed position values from an Arduino Pro Mini connected to an MPU6050 IMU.

This might be a viable alternative to conventional tracks for certain applications, and the reduced part count is certainly an advantage. Let us know in the comments if it spawns any ideas. [James] has previously built another tracked rover, which uses flexible 3D printed track sections. By far, the biggest 3D printed tracked vehicle we’ve seen was [Ivan Miranda]’s ridable tank.

Continue reading “Rover Uses Different Kind Of Tracks”