Vacuum Tube Tesla Coil

[xellers] may have been in 8th grade when he built this vacuum tube tesla coil, but he did a fantastic job. Unlike most of the tesla coils we have shown, this one doesn’t use a high current transformer from a neon sign. Instead, he’s gone the direction of vacuum tubes. He spent a total of about $125 which isn’t too bad. Most of us could reduce that cost by scrounging from our parts bin.

LEGO Router Case Bests Factory Finish

Stare at [Luke’s] LEGO router case; STARE AT IT! The router is nothing special, a WRT54GL that is fun to hack. We’ve seen it used as a robot, turned into a war driving box, and obviously this is where dd-wrt custom firmware started.

[Luke] designed the case in MLCAD and found a seller for the parts which came in just over $50. We think it’s much better looking than the stock case an if you used that for a different project, this is a way to replace it. We’ve embedded [Luke’s] assembly video after the break. If you like this case, take a look at his LEGO PC case as well.

Continue reading “LEGO Router Case Bests Factory Finish” →

Neon Lamp And Other Crazy Clocks

Quick quiz, what came before transistors? Why vacuum tubes of course. If this clock doesn’t make you thankful for the luxury of integrated circuits, nothing will.

We had never heard of using Neon Lamps as logic circuits, and they definitely produce a much cooler effect when counting.
[Thanks Philippe]

And finally, we’re just suckers for a good Nixie Clock. The scope clock is also pretty interesting.

Cubicle-dwellers Rewarded For Reflexes

[youtube=http://www.youtube.com/watch?v=kUqRcLjFOUc]

[StudioJooj] is trying to torture or test his colleagues in his office. A lot of folks leave a candy jar on their desks for all to enjoy but he’s making his friends work for their reward. Like cubicle-dwelling lab subjects, they must successfully navigate his maze to be rewarded with chocolate. The game piece is an amazingly orb-like peanut M&M candy. The maze is constructed from plywood and moves on two axis with the help of a couple of servos. The user interface includes a couple of NES console buttons to release the game piece and a PS2 joystick to control the maze. [StudioJooj] was nice enough to include a music video in his project clip.

We wonder the M&Ms will disappear faster or slower than they would from a candy jar.

[via SparkFun]

Makita Battery Pack Repair

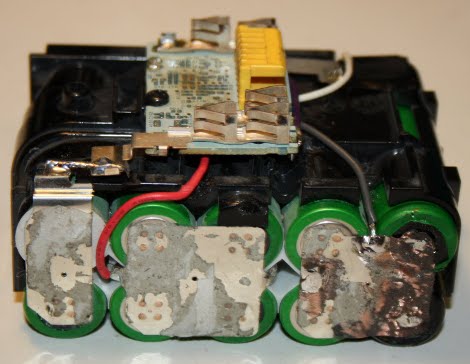
[Rob] grew tired of his Makita power tool battery packs dying so he figured out how to repair them himself. The video after the break walks us through the process which starts by cracking open the case. Inside there is a controller board and a battery of ten cells. [Rob] has pinpointed these battery failures to just the first cell, which is confirmed by measuring the cell voltages with a multimeter. The first cell in the demonstration battery reads zero volts and needs to be replaced. For some reason he’s got heck of a lot of these cells on hand, at the end of the video he shows off a massive block of them that provides one half of a kilowatt-hour of power.

To complete the resurrection he removed the control circuitry from the integrated PCB. It seems that the microcontroller on the battery’s PCB monitors it and bricks them when it thinks the life of the unit has ended. By hacking a charger he can now balance-charge the altered battery packs and get more use out of them before they hit the landfill.

Continue reading “Makita Battery Pack Repair” →

Bike Trainer Computer: Speed, Cadence, Heartrate, Trainer Temp

[Kurt] was using a bike trainer to get in shape for warmer and dryer biking months. Unfortunately it’s pretty hard to train if you don’t have reliable data concerning how hard you’re working. There’s commercial solutions for trainer computers but he’d read some rough reviews about them and decided to build his own trainer computer. He’s done a great job of integrating a lot of different data collection sources. He picked up two replacement bike computer sensors to use on the back wheel for speed (the front wheel is stationary with this type of trainer) and on the crank for cadence. He also wears a heart rate monitor and sourced a SparkFun heart rate module to gather that data. Finally, an LM235 analog temperature sensor was combined with a spring clamp to detect the temperature of the trainer’s resistance module.

Data from the sensors is collected with a PIC16F73 microprocessor and fed to a computer over a serial connection. He’s got a screenshot of the realtime graphs that he’s using for feedback while on the bike. This is a useful and practical setup but when he get’s tired of exercising he’s just a few lines of code from converting this into a gaming controller.

[Thanks Justin]