30 FPS Flip-Dot Display Uses Cool Capacitor Trick

Most people find two problems when it comes to flip-dot displays: where to buy them and how to drive them. If you’re [Pierre Muth] you level up and add the challenge of driving them fast enough to rival non-mechanical displays like LCDs. It was a success, resulting in a novel and fast way of controlling flip-dot displays.

Gorgeous stackup of the completed display. [Pierre] says soldering the 2500 components kept him sane during lockdown.
If you’re lucky, you can get a used flip-dot panel decommissioned from an old bus destination panel, or perhaps the arrivals/departures board at a train station. But it is possible to buy brand new 1×7 pixel strips which is what [Pierre] has done. These come without any kind of driving hardware; just the magnetized dots with coils that can be energized to change the state.

The problem comes in needing to reverse the polarity of the coil to achieve both set and unset states. Here [Pierre] has a very interesting idea: instead of working out a way to change the connections of the coils between source and sink, he’s using a capacitor on one side that can be driven high or low to flip the dot.

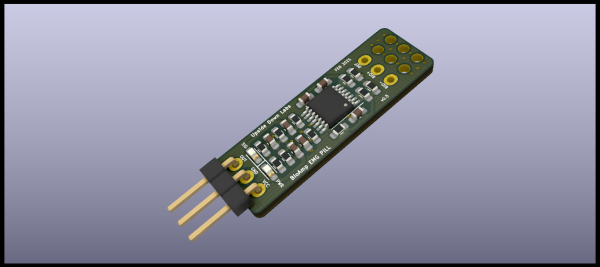
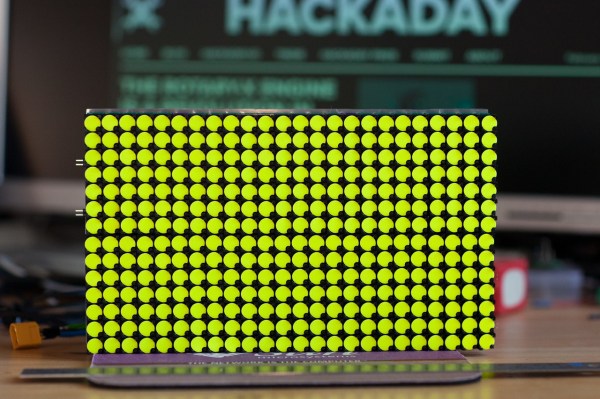
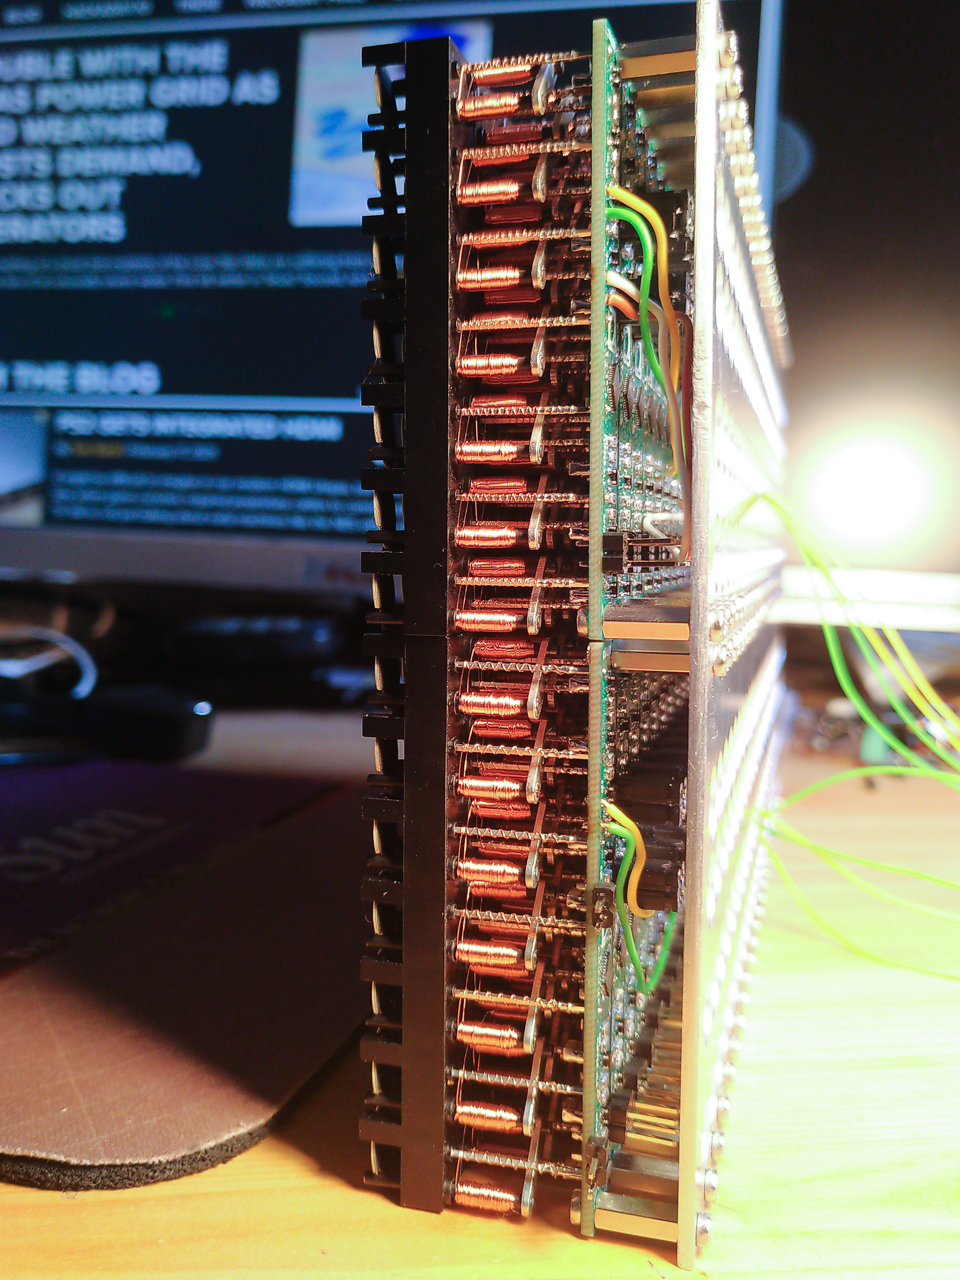
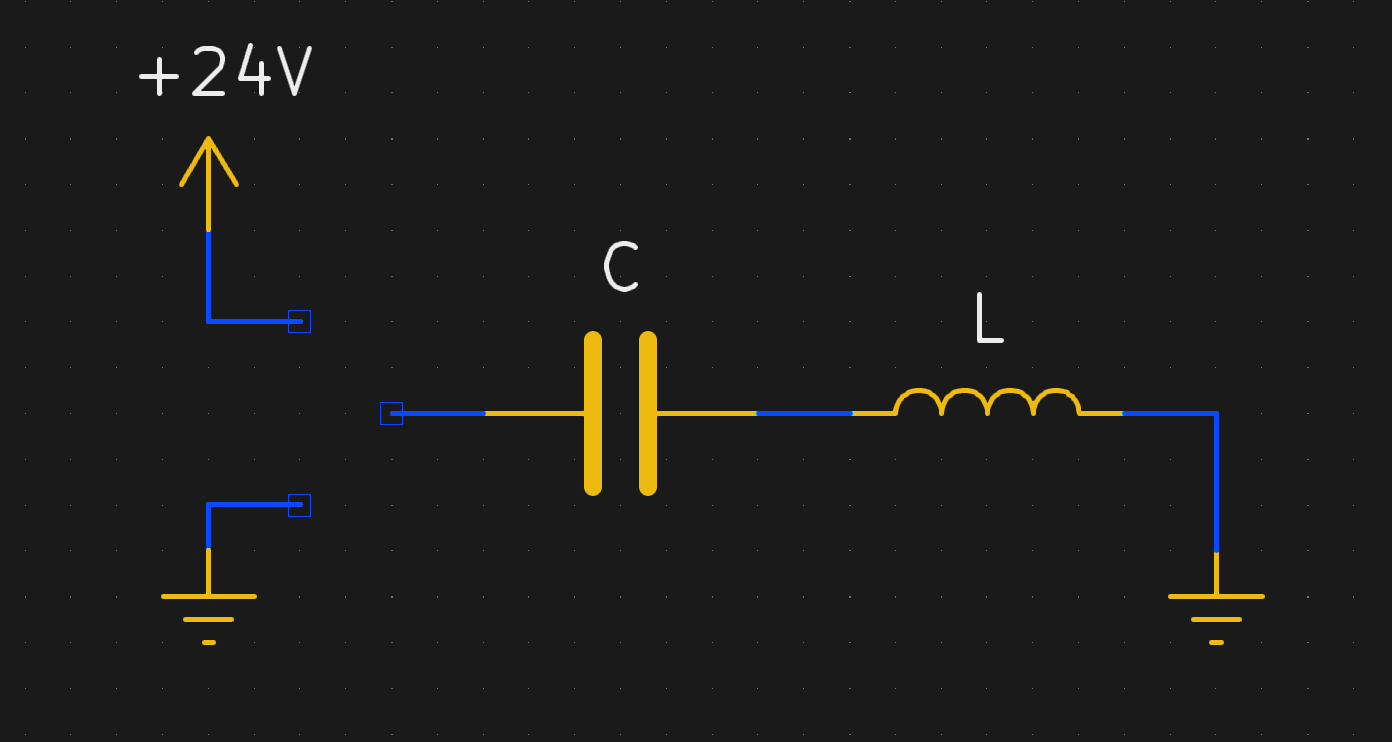
Using this technique, charging the capacitor will give enough kick to flip the dot on the display. The same will happen when discharged (flipping the dot back), with the added benefit of not using additional power since the capacitor is already charged from setting the pixel. A circuit board was designed with CMOS to control each capacitor. A PCB is mounted to the back of a 7-pixel strip, creating modules that are formed into a larger display using SPI to cascade data from one to the next. The result, as you can see after the break, does a fantastic job of playing Bad Apple on the 24×14 matrix. If you have visions of one of these on your own desk, the design files and source code are available. Buying the pixels for a display this size is surprisingly affordable at about 100 €.

We’re a bit jealous of all the fun displays [Pierre] has been working on. He previously built a 384 neon bulb display that he was showing off last Autumn.

Continue reading “30 FPS Flip-Dot Display Uses Cool Capacitor Trick”

Hands On With The Ortur Laser Cutter

I couldn’t write very much without a computer. Early in my career, I wrote with a typewriter. Unless you are pretty close to perfect — I’m not — it is very frustrating to make edits on typewritten stuff. The equivalent in the real world, for me, has been 3D printers and CNC machines. I can visualize a lot of things that I’m not careful enough to build with normal tools. Despite my 7th-grade shop teacher’s best efforts, everything I did turned out to be a toothpick or a number 7. But I can get my ideas into CAD and from there the machines do the rest. That’s why I was excited to get a laser cutter this past Christmas. You might wonder why I’d need a laser cutter if I have the other tools. Then again, if you read Hackaday, you probably don’t need me to explain why you need a new gadget. I’ve had my eye on a laser for a good long time, but recent developments made it more attractive. I thought I’d share with you some of what I’ve found getting started with the Ortur laser cutter. The cutter is easy to put together and costs somewhere in the $200-$400 range depending on what you get with it. I thought I’d take some time to share what I’ve learned about it.

Why a Laser?

If you haven’t had experience with a laser cutter or engraver before, you might think it is a very specific instrument. Sure, the Ortur is good at engraving some things (but not all things). It can cut some things, too, but not as many things as a big serious laser cutter. However, creative people find lots of ways to use cutting and engraving to produce things you might not expect.

Continue reading “Hands On With The Ortur Laser Cutter”

DIY Neuroscience Hack Chat

Join us on Wednesday, February 24 at noon Pacific for the DIY Neuroscience Hack Chat with Timothy Marzullo!

Watch a film about a mad scientist from the golden age of Hollywood and chances are good that among the other set pieces, you’ll see human brains floating in jars of cloudy fluid wired up to electrodes and fancy machines. It’s all made up, of course, but tropes work because they’re based on a kernel of truth, and we in the audience know that our brains and the other parts of our nervous system do indeed work on electricity. Or more precisely, excitable tissues in our nervous systems pass electrochemical signals between themselves as waves of potential across cell membranes.

Studying this electrical world locked away inside our heads is a challenging, but by no means impossible, pursuit. Usable signals can be picked up, amplified, digitized, and recorded to help us understand what’s going on when we think, feel, move, sleep, wake, or just be. Neuroscience has made tremendous strides looking at these signals, but the equipment to do so has largely remained the province of large universities and teaching hospitals with ample budgets, leaving the amateur neuroscientist out of luck.

Tim Marzullo, co-founder of Backyard Brains, is looking to change all that. While working on his Ph.D. in neuroscience at the University of Michigan, he and Greg Gage looked for ways to make the tools of neuroscience research affordable to everyone. The result is the Neuron SpikerBox, a low-cost bioamplifier that can tap into the “spikes” of action potential in live neurons. Open-source tools like these have helped educators bring neuroscience experiments to STEM students, and even helped other scientists set up novel, low-cost experiments.

Tim will join us on the Hack Chat to talk about doing DIY neuroscience and designing the instruments that make it possible. Bring your “mad scientist” questions as we push back the veil of ignorance on how our brains work, one neuron at a time.

join-hack-chatOur Hack Chats are live community events in the Hackaday.io Hack Chat group messaging. This week we’ll be sitting down on Wednesday, February 24 at 12:00 PM Pacific time (UTC-8). If time zones have you tied up, we have a handy time zone converter.

Click that speech bubble to the right, and you’ll be taken directly to the Hack Chat group on Hackaday.io. You don’t have to wait until Wednesday; join whenever you want and you can see what the community is talking about.


Continue reading “DIY Neuroscience Hack Chat”

Homebrew Doorknob Caps For High-Voltage Fun

Mouser and Digi-Key are great for servicing most needs, and the range of parts they offer is frankly bewildering. But given the breadth of the hardware hacking community’s interests, few companies could afford to be the answer to everyone’s needs.

That’s especially true for the esoteric parts needed when one’s hobby involves high voltages and homemade lasers, like [Les Wright]. He recently came up with a DIY doorknob capacitor design that makes the hard-to-source high-voltage caps much easier to obtain. We’ve seen [Les] use these caps in his transversely excited atmospheric (TEA) lasers, a simple design that uses high-voltage discharge across a long, narrow channel filled with either room air or nitrogen. The big ceramic caps are needed for the HV supply, and while [Les] has a bunch, they’re hard to come by online. He tried a follow-up using plain radial-lead ceramic capacitors, and while the laser worked, he did get some flashover between the capacitor leads.

[Les]’s solution was to dunk the chunky caps in acetone for a week or so to remove their epoxy covering. Once denuded, the leads were bent into a more axial configuration and soldered to brass machine screws. The dielectric slug is then put in a small section of plastic tubing and potted in epoxy resin with the bolts protruding from each end. The result is hard to distinguish from a genuine doorknob cap; the video below shows the build process as well as some testing.

Hats off to [Les] for taking pity on those of us who want to replicate his work but find ourselves without these essentials. It’s nice to know there’s a way to make unobtanium parts when you need them.

Continue reading “Homebrew Doorknob Caps For High-Voltage Fun”

Laser Galvos And An ESP32 Recreate Old-School Asteroids

Playing Asteroids now isn’t quite what it used to be when it came out 40 years ago. At the time, the vector-scan display was part of the charm; making do with an emulator running on a traditional raster display just doesn’t quite do it for purists. But if you manage to build your own laser-projector version of the game like [Chris G] did, you’re getting close to capturing some of the original magic of the game.

There’s a lot to unpack about this project, and the video below does a good job explaining it. Where the original game used a beam of electrons flashing inside a CRT to trace out each object in the game, [Chris] substituted an off-the-shelf two-axis galvanometer from eBay and a 5-mW laser LED. This can project a gamefield on a wall up to two meters on a side, far bigger than any version of the machine ever built. The galvos are driven by op-amp drivers and an SPI DAC on a custom PCB. And in comparison to the discrete logic chips and 6502 running the original game, [Chris] opted for an ESP32.

As interesting as the hardware for this is, the real story is in the software. [Chris] does an excellent job running through his design, making the bulk of the video feel like a master class in game programming. His software is from scratch — no emulations here. As such it doesn’t perfectly reproduce the original games — no flying saucers and no spaceship explosion animations (yet) — but when coupled with the laser vector display, it certainly captures the feel of the original.

Being devoted Asteroids fans from back in the day, this one really pushes our buttons. We’ve seen laser-based recreations of the game before, but this one makes us think we can finally afford to recapture the glory of our misspent youth.

Continue reading “Laser Galvos And An ESP32 Recreate Old-School Asteroids”

James West Began 40 Years At Bell Labs With World-Changing Microphone Tech

I’d be surprised if you weren’t sitting within fifty feet of one of James Edward Maceo West’s most well-known inventions — the electret microphone. Although MEMS microphones have seen a dramatic rise as smartphone technology progresses, electret microphones still sit atop the throne of low-cost and high-performance when it comes to capturing audio. What’s surprising about this world-changing invention is that the collaboration with co-inventor Gerhard Sessler began while James West was still at university, with the final version of the electret springing to life at Bell Labs just four years after his graduation.

A Hacker’s Upbringing

James’ approach to learning sounds very familiar: “If I had a screwdriver and a pair of pliers, anything that could be opened was in danger. I had this need to know what was inside.” He mentions a compulsive need to understand how things work, and an inability to move on until he has unlocked that knowledge. Born in 1931, an early brush with mains voltage started him on his journey.

Continue reading “James West Began 40 Years At Bell Labs With World-Changing Microphone Tech”

Listening In On Muscles With The BioAmp EMG Pill

Ever felt like what your MCU of choice misses is a way to read the electrical signals from your muscles? In that case [Deepak Khatri] over at Upside Down Labs has got your back with the BioAmp EMG Pill. Described as an affordable, open source electromyography (EMG) module, based around a TL074 quad low-noise JFET-input opamp. At just over 32×10 millimeters, it’s pretty compact as well.

The onboard opamp ensures that the weak electrical signals captured from the muscles when they move are amplified sufficiently that the ADC of any microcontroller or similar can capture the signal for further processing. Some knowledge of how to set up an EMG is required to use the module, of course, and the TL074 opamp prefers an input voltage between 7-30 V. Even so, it has all the basics onboard, and the KiCad project is freely available via the above linked GitHub project.

In addition, [Deepak] also tweeted about working on an affordable, open source active prosthetics controller (and human augmentation device), which has us very much interested in what other projects may come out of Upside Down Labs before long. After, all we’re no strangers to hacking with biosignals.