The last time we used a scanning electron microscope (a SEM), it looked like something from a bad 1950s science fiction movie. These days SEMs, like the one at the IBM research center, look like computers with a big tank poised nearby. Interestingly, the SEM is so sensitive that it has to be in a quiet room to prevent sound from interfering with images.
As a demo of the machine’s impressive capability, [John Ott] loads two US pennies, one facing up and one face down. [John] notes that Lincoln appears on both sides of the penny and then proves the assertion correct using moderate magnification under the electron beam.
Aerial drone image of a litter windrow in Bay of Biscay, Spain. Windrow width: 1-2 meters. (Credit: ESA)
Recently ESA published the results of a proof-of-concept study into monitoring marine litter using existing satellites, with promising results for the Mediterranean study area. For the study, six years of historical data from the Sentinel-2 satellite multispectral imaging cameras were used, involving 300,000 images with a resolution of 10 meters. The focus was on litter windrows as common collections of litter like plastic, wood and other types of marine debris that float on the surface, forming clearly visible lines that can be meters wide and many times as long.
These were processed as explained in the open access paper in Nature Communications by [Andrés Cózar] and colleagues. As marine litter (ML) tends to be overwhelmingly composed of plastic, this eases the detection, as any ML that’s visible from space can generally be assumed to be primarily plastic litter. This was combined with the spectral profile of common plastics, so that other types of floating materials (algae, driftwood, seafoam, etc.) could be filtered out, leaving just the litter.
This revealed many of these short-lived litter windrows, with spot confirmation from ships in the area. Some of the windrows were many kilometers in length, with an average of around 1 km.
Although just a PoC, it nevertheless shows that monitoring such plastic debris from space is quite doable, even without dedicated satellites. As every day tons more plastics make their way into the oceans, this provides us with the means to at least keep track of the scope of the problem. Even if resolving it and the associated microplastics problem is still a far-off dream.
This week Jonathan Bennett and Simon Phipps chat with Matthew Hodgson and Josh Simmons about Matrix, the open source decentralized communications platform. How is Matrix a Git for Communications? Are the new EU and UK laws going to be a problem? And how is the Matrix project connected with the Element company?
Craig Lindley is a technical author and a prolific maker of things. This simple project was his first attempt to create a laser harp MIDI device. While on vacation, Craig saw a laser harp with only three strings and decided to improve upon it by expanding it to twelve strings. The principle of operation is straightforward: twelve cheap diode laser modules aim a beam towards an LDR, which changes resistance if the light level changes when the beam is interrupted.
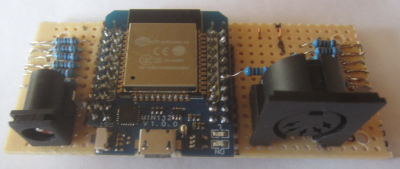
The controller is a simple piece of perf board, with a Wemos D1 mini ESP32 module flanked by some passives, a barrel socket for power, and the usual DIN connector for connecting the MIDI instrument. Using the ESP32 is a smart choice, removing all the need for configuration and user indication from the physical domain and pushing it onto a rarely-needed webpage. After a false start, attempting to use a triangular frame arrangement, [Craig] settled upon a simple linear arrangement of beams held within a laser-cut wooden box frame. Since these laser modules are quite small, some aluminium rod was machined to make some simple housings to push them into, making them easier to mount in the frame and keeping them nicely aligned with their corresponding LDR.
Sadly, the magnetic attachment method [Craig] used to keep the LDRs in place and aligned with the laser didn’t work as expected, so it was necessary to reach for the hot glue. We’ve all done that!
An interesting addition was using an M5 stack Unit-Synth module for those times when a proper MIDI synthesiser was unavailable. Making this luggable was smart, as people are always fascinated with laser harps. That simple internal synth makes travelling to shows and events a little easier.
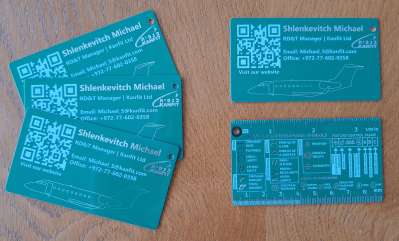
PCB business cards for electronics engineers might be very much old news in our circles, but they are still cool, not seen too much in the wild, and frankly inaccessible to those in other industries. For their entry into the 2024 Business Card Challenge, [Dima Shlenkevitch] is helping a little to alleviate this by providing a set of design examples and worked costs with suppliers.
Original green is still the cheapest option.
[Dima] lists key features every PCB business card should include, such as the expected thickness, restrictions for placing NFC components, and some aesthetics tips. Make sure to choose a supplier that allows you to remove their order number from the manufactured PCB, or it will look out of place.
Ordering PCBs with these specifications to keep costs reasonable requires effort, so [Dima] offers some example designs along with the results. If you want to have pretty gold lettering and graphics, you will need ENiG plating, increasing the price. Non-standard solder mask colors can also raise the price.
Will this help with the practical aspects of driving the PCB design software and actually placing the order? Obviously not, but the information provided gives you a leg up on some of the decisions so you don’t go down an expensive rabbit hole.
By the time you read this the Iowa-class battleship USS New Jersey (BB-62) should be making its way along the Delaware River, heading back to its permanent mooring on the Camden waterfront after undergoing a twelve week maintenance and repair period at the nearby Philadelphia Navy Yard.
The 888 foot (270 meter) long ship won’t be running under its own power, but even under tow, it’s not often that you get to see one of the world’s last remaining battleships on the move. The New Jersey’s return home will be a day of celebration, with onlookers lining the banks of the Delaware, news helicopters in the air, and dignitaries and veterans waiting eagerly to greet her as she slides up to the pier.
But when I got the opportunity to tour the New Jersey a couple weeks ago and get a first-hand look at the incredible preservation work being done on this historic ship, it was a very different scene. There was plenty of activity within the cavernous Dry Dock #3 at the Navy Yard, the very same slip where the ship’s construction was completed back in 1942, but little fanfare. Staff from North Atlantic Ship Repair, the company that now operates the facility, were laboring feverishly over the weekend to get the ship ready.
While by no means an exhaustive account of the work that was done on the ship during its time in Dry Dock #3, this article will highlight some of the more interesting projects that were undertaken while it was out of the water. After seeing the thought and effort put into every aspect of the ship’s preservation by curator Ryan Szimanski and his team, there’s no doubt that not only is the USS New Jersey in exceptionally capable hands, but that it will continue to proudly serve as a museum and memorial for decades to come.
Air ride suspensions have several advantages over typical arrangements, but retrofitting a system to a vehicle that didn’t come with it can get pricey fast, especially if you want to go beyond the basics. The Open Source Air Suspension Management Controller aims to give people a fully customizable system without the expense or limitations of commercial units.
The project started as an upgrade to a basic commercial system, so it assumes that you’re bringing your own “bags, tank, compressor, tubing and fittings.” The current board uses an Arduino Nano, but the next revision based on the ESP32 will allow for a wider feature set.
With a Bluetooth connection and Android app, you can control your ride height from a phone or integrated Android head unit. Currently, the app shows the pressure readings from all four corners and has controls for increasing or decreasing the pressure or airing all the way up or down to a given set point.
Want to know how air suspensions work? How about this LEGO model? If you want a suspension with active tuning for your bike, how about this Arduino-powered mod?


 settled upon a simple linear arrangement of beams held within a laser-cut wooden box frame. Since these laser modules are quite small, some aluminium rod was machined to make some simple housings to push them into, making them easier to mount in the frame and keeping them nicely aligned with their corresponding LDR.