If you’ve had the chance to add a Form 1+ 3D printer to your basement, you might find the post-print cleaning step a bit tedious. (A 20-minute alcohol bath? Outrageous!) Fortunately, for the impatient, [ChristopherBarr] has developed the perfect solution: a post-print agitator that cuts the time in-and-out-of the bath from 20 minutes to about two.
[ChristopherBarr’s] build is the right conglomerate of parts we’d expect when keeping the price down for this hack. He’s combined a palm sander, a couple pints of urethane expanding foam, and two loaf pans into one agitating mechanism that he’s dubbed “the Loafinator.” With the urethane expanding foam, [ChristopherBarr] achieved a near-perfect fit of the sander inside the loaf pan, now that the foam has filled in the remaining contours to hold the sander in place. Best of all, the sander hasn’t been sacrificed for this build; instead, the foam holder was assembled in three stages and isolated from the sander with a layer of plastic wrap to enable later extraction.
[ChristopherBarr’s] simple, yet practical, hack serves as an excellent solution to a number of hobbyists looking to “get things agitated.” While his device is able to polish off the uncured resin from his resin prints much faster than the conventional approach, we’d imagine that a similar build could greatly expedite the PCB etching process in a muriatic-acid or ferric-chloride based PCB etching procedure–far more quickly than our previous automated solution. The time-saving comes at a price; however. Once you’ve installed your very own Loafinator alongside your printer, expect a few nosy neighbors to start asking for visits to check out your new motorboat.
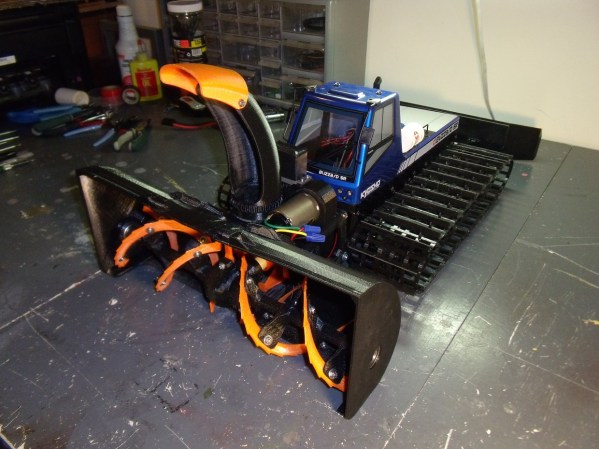
Remote controlled vehicles aren’t just for kids. In fact, you can get some seriously cool mini utility vehicles. In fact, you can even buy a mini tracked snow blowing vehicle! But [The_Great_Moo] was rather disappointed in the performance of his Kyosho Blizzard SR, so he did what any self-respecting hacker would — he redesigned the whole damn thing and 3D printed it.
The beauty with re-designing something from the ground up is you can design it specifically for 3D printing (unless of course you want to mass produce it!), so [The_Great_Moo] took his time and built all his parts with layer strength in mind. The large parts are printed at 0.4mm resolution, and the finer parts; like gears and shafts, are printed at 0.2mm resolution. He printed everything off using his Da Vinci 1.0 printer, and it apparently only took 40 hours!
Besides bolts and nuts everything is 3D printed — even the timing belt gears and gearbox! But the real question is… can it really blow snow. You’ll have to watch the video to find out.
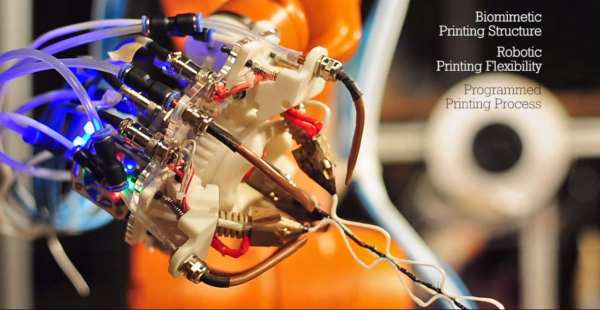
If you can get over how creepy spiders can be there’s a lot to learn from them. One of nature’s master-builders, they have long been studied for how they produce such strong silk. What we hadn’t realized is that it’s not strictly cylindrical in nature. The spider silk exhibits intermittent expansions to the diameter of the — for lack of a better word — extrusion. This project uses biomimickry to replicate the strength of that design.
The print head is actually four extruders in one. In the clip after the break you can see the black center filament’s rigidity is augmented with three white filaments positioned around it radially. The use of this knowledge? That’s for you to decide. As with some of the most satisfying engineering concepts, this is presented as an art installation. As if the rhythmic movements of that print head weren’t enough, they mounted it on a KUKA and plopped the entire thing down in the center of a room for all to see.
The demo isn’t the only awesome bit. You’ll want to click the link at the top to see the exploded-parts diagram porn found half-way down the page. All is beautiful!
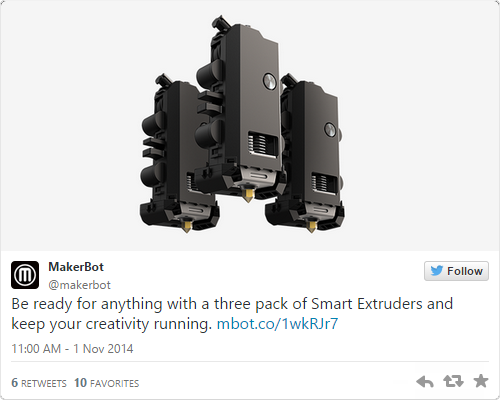
A direct link to Makerbot’s 3-pack of Smart Extruders is very hard to find
It’s been a little over a year since Makerbot introduced their new line of printers, and since then there have been grumblings about the quality of the Smart Extruder that each one of these printers comes with. While there is no 3D printer extruder that will not eventually clog, wear down, or otherwise break, there are reports of the Makerbot Smart Extruder failing in only hundreds or even tens of hours of use. Considering that a single large print can take a dozen or so hours to complete, you can easily see the why the Smart Extruder is so despised and why even the availability of a three-pack of Smart Extruders is a joke in the 3D printing community.
Of course a cheap shot at Makerbot that plays right into your preconceived ideas and prejudices is far too easy. We’re here to solve problems, not just state them, so here’s what we’re working with: to quantify the long-term reliability of 3D printers we need a way to measure the mean time before failure of extruders. This is already a solved problem; it’s just not implemented.
On aircraft and some very expensive engines that power things like buildings and ships, there’s one gauge, tucked away in the control panel, that keeps track of how long the engine has been running. It’s called a hobbs meter, and the idea behind it is extremely simple – when there is power going to the Hobbs meter, it counts out hours on a small clockwork display. The resolution of the display is only tenths of an hour, usually, but that’s good enough for scheduling maintenance and to be mentioned in NTSB accident reports.
Spend enough time with a 3D printer, and you’ll quickly realize the ‘estimated print time’ is merely a ballpark, and with failed prints the ‘total print time for this object’ isn’t exactly a perfect measure of how many hours you’ve been using your extruder. Only by directly measuring how many hours are logged on a hot end or how many kilometers of filament have been sent through an extruder will you ever get an accurate idea of how long an extruder has been running, and how reliable a printer is.
Hobbs meters are available from Mouser, but you’ll be overpaying there. The better option is from a vendor in a different niche; $30 for a meter that can connect directly to the extruder heater. If enough people add this and keep proper logs, there’s a slight chance of improving the state of 3D printers with real data and not the prejudices of people trying to justify their own designs and purchases.
But perhaps that’s too hard; adding a $30 item to a printer’s BOM just for the sake of data is a bit much. Luckily, there’s an even simpler solution that won’t cost a dime. Just measure the time a heater has been on in the firmware, or save the total length of extruded filament in a microcontroller’s EEPROM. Every printer firmware out there, from Marlin to Repetier to Sprinter has in it a way to calculate both the length of time a heater has been on or how much filament has been pushed through a nozzle.
However, this is 3D printing we’re dealing with. An organized community is not a luxury we currently enjoy, and for this to work several things are needed. The first is somewhere to upload failure statistics. This would be a web site, naturally, with the ability to input the printer make, extruder and hot end model, and the time since last clogged nozzle. The website itself is just a database, some JavaScript, a bit of CSS, and some hosting costs; not hard until you consider tens of thousands of operators would have to know about this website and contribute.
Secondly, if we’re not going with mechanical Hobbs meters there would need to be a ‘total time heater on’ or ‘total length of extruded filament’ variable in the various firmwares. There would hopefully be standardized Gcodes or Mcodes to read and reset this variable.
Will this happen? Of course not. Organization isn’t a strong suit of the RepRap project, and any company that implements Hobbs meter functionality will probably lock that up in proprietary obfuscation. However, Makerbot isn’t dumb, and given they’re selling three-packs of extruders, I would bet they have some data on the MTBF of their extruders. A community-based measurement of the most common cause of broken printers is certainly possible, but like all problems it’s one of organization, not technology.
3D Printering is a semi-weekly column that digs deep into all things related to 3D Printing. If you have questions or ideas for future installments please sending us your thoughts.
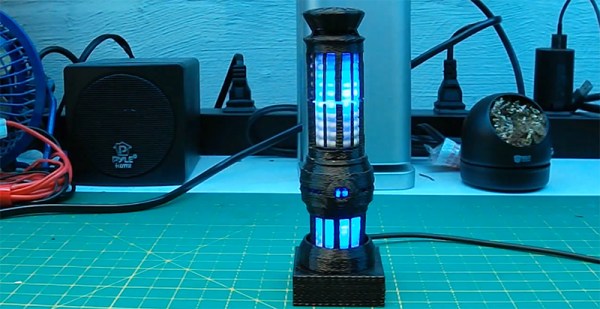
Designed in the 2350s at the Utopia Planita shipyards, the warp core found in Galaxy class starships Yamoto, Odyssey, Challenger, and yes, Enterprise was a incomparable work of engineering, leading to more than one Daystrom Prize for its development. We’re still at least fifteen years away from the great [Zefram Cochrane]’s birth – and another 200 years until [Richard Daystrom] is born – but now, thanks to our advanced technology, a miniature warp core is within reach.
About a year ago, [Alex] found a warp core table lamp based on the one found on the Enterprise. it called out to him, but it’s a an extremely large build and only having a Solidoodle 2 as a 3D printer, [Alex] decided to scale it down to 25%.
Inside the warp core are a few Neopixel strips driven by a 5V Trinket. It’s not the ideal solution – if all the LEDs are turned on at the same time, the Trinket will brown out. It’s enough for an accurate pulsating effect, though, and was a nice enough gift to appease even the most discerning Trek fans he gave these mini models to.
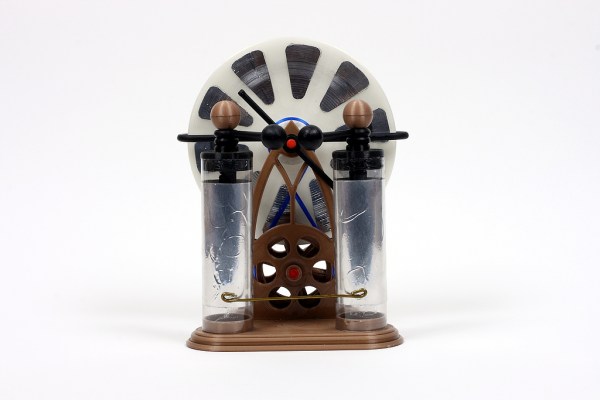
Steampunk extraordinaire [Jake von Slatt] has released his latest creation. This time he’s built a Wimshurst machine from mostly 3D printed parts. The Wimshurst machine is an electrostatic generator and was originally invented in the late 1800’s by James Wimshurst. It uses two counter-rotating disks to generate an electrostatic charge which is then stored in two Leyden jars. These jars are also connected to a spark gap. When the voltage raises high enough, the jars can discharge all at once by flashing a spark across the gap.
[Jake’s] machine has a sort of Gothic theme to it. He designed the parts using Autodesk’s 123D Design. They were initially printed in PLA. Skate bearings were used in the center of the disks to ensure a smooth rotation. The axle was made from the fiberglass shaft of a driveway reflector. The vertical supports were attached the base with machine screws.
The Leyden jars were made from sections of clear plastic tube. The caps for the jars were 3D printed and are designed to accept a short length of threaded 1/8″ pipe. Copper wire was used for the interior contacts and are held in place with electrical tape. The metal sectors on each disk were made from pieces of cut aluminum tape.
You may be wondering how this machine works if it’s almost entirely made out of plastic. [Jake] actually painted most of the parts with a carbon paint. This makes them electrically conductive and he can then use the parts to complete electrical circuits. Unfortunately he found this to be rather ineffective. The machine does work, but it only produces sparks up to 1/2″ in length. For comparison, his other machine is capable of 6″ sparks using similar sized Leyden jars.
[Jake] actually tried rebuilding this project using ABS, thinking that the PLA may have been collecting moisture from his breath, but the result is still only 1/2″ sparks. He suspects that the bumpy surface of the plastic parts may be causing the charge to slowly leak away, preventing a nice build up. He’s released all of his designs on Thingiverse in case any other hackers want to give it a whirl.
[Frank] came up with a clever way to extend the storage of his PS4. He’s managed to store his digital PS4 games inside of storage devices in the shape of classic NES cartridges. It’s a relatively simple hack on the technical side of things, but the result is a fun and interesting way to store your digital games.
He started out by designing his own 3D model of the NES cartridge. He then printed the cartridge on his Ultimaker 3D printer. The final print is a very good quality replica of the old style cartridge. The trick of this build is that each cartridge actually contains a 2.5″ hard drive. [Frank] can store each game on a separate drive, placing each one in a separate cartridge. He then prints his own 80’s style labels for these current generation games. You would have a hard time noticing that these games are not classic NES games at first glance.
Storing the game in cartridge form is one thing, but reading them into the PS4 is another. The trick is to use a SATA connector attached to the PS4’s motherboard. [Frank’s] project page makes it sound like he was able to plug the SATA cable in without opening the PS4, by attaching the connector to a Popsicle stick and then using that to reach in and plug the connector in place. The other end of the SATA cable goes into a custom 3D printed housing that fits the fake NES cartridges. This housing is attached to the side of the PS4 using machine screws.
Now [Frank] can just slide the cartridge of his choice into the slot and the PS4 instantly reads it. In an age where we try to cram more and more bits into smaller and smaller places, this may not be the most practical build. But sometimes hacking isn’t about being practical. Sometimes it’s simply about having fun. This project is a perfect example. Continue reading “Add Extra Storage To Your PS4 With Retro Flair”→