[3DJake] likes putting textures on 3D prints using things like patterned build plates and fuzzy skin. However, both of those techniques have limitations. The build plate only lets you texture the bottom, and the fuzzy skin texture isn’t easy to control. So he shows how to use Blender to create specific textures to produce things like wood-like or leather-like surfaces, for example. You can see how it works in the video below.
As [Jake] points out, you might be able to use other artistic programs to do this, but the kind of things we use like FreeCAD of Fusion360 aren’t going to cut it.
We touched on the open source SLS4All DIY SLS 3D printer a year or two ago when the project was in the early stages. Finally, version one is complete, with a parts kit ready to ship and all design data ready for download if a DIY build or derivative is your style. As some already mentioned, this is not going to be cheap: with the full parts kit running at an eye-watering $7K before tax. But it’s possible to build or source almost all of it a bit at a time for those on a budget.
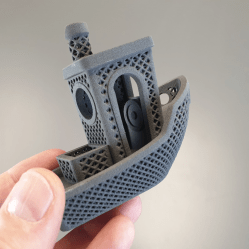
Try printing THIS benchy on an FDM machine!
It’s important to note that to access the detailed information, you’ll need to create an account, which is a bit inconvenient for an open source design. However, all the essential components seem to be available, so it’s forgivable. In terms of electronics, there are two custom PCBs: the GATE1 (GAlvo and Temperature Control) and the ZERO1 (Zero-crossing dimming) controller. Other than that, all the electronics seem to be standard off-the-shelf components. Both of these PCBs are designed using EasyEDA.
Unfortunately we couldn’t find access to the PCB Gerbers, nor does there appear to be a link to their respective EasyEDA projects, just the reference schematics. This is a bit of a drawback, but it’s something that could easily be reproduced with enough motivation. Control is courtesy of a Radxa Rock Pi, as there were ‘problems’ with a Raspberry Pi. This is paired with a 7-inch touchscreen to complete the UI. This is running a highly modified version of the Klipper together with their own control software, which is still undergoing testing before release.
The laser head is built around a 10 W 450 nm laser module from China and a high-end galvanometer set. Two 200 W halogen tube heaters heat the print bed, and 200 W silicone heating pads heat both the powder bed and the print bed.
Now that the bottom end of the 3D printer market has been largely cleared of those garbage “Prusa i3 clone” models which used to infest it a few years ago, a new breed of ultra-cheap printer has taken their place. EasyThreed make a range of very small printers pitched as toys, and while they’re no great shakes by the standards of most Hackaday readers, they do at least work out of the box. For their roughly $75 price tag they deliver what you’d expect, but can such a basic machine be improved with a few upgrades? [Made with Layers] has taken a look.
These printers have an all-plastic snap-together construction with a 10 cm by 10 cm bed and a set of small geared stepper motors driving their axes. He concentrates on stiffening the structure, upgrading those motors, and because he’s sponsored by a 3D printer electronics company, upgrading their controller.
The motors were replaced first with some NEMA 11 steppers, and then by some over-sized ones which maybe push the idea a little far. By moving the motors to a bracket he was able to free up their mountings to secure a 3D printed insert to stiffen the arms. Perhaps he’s pushing it a little for the video with the electronics upgrade, but we think there’s a happy medium with the smaller of the two motor upgrades and the stiffening.
So if you have an EasyThreed in your life it’s possible to upgrade it into something a little better, but it’s worth asking whether that $75 might be better spent in saving for a better machine in the first place. We’ve been curious about these tiny printers for a while though, and it’s interesting to have some more of our questions answered.
While 3D printers have evolved over the past two decades from novelties to powerful prototyping tools, the amount of support systems have advanced tremendously as well. From rudimentary software that required extensive manual input and offered limited design capabilities, there’s now user-friendly interfaces with more features than you could shake a stick at. Hardware support has become refined as well with plenty of options including lighting, ventilation, filament recycling, and tool changers. It’s possible to automate some of these subsystems as well like [Caelestis Workshop] has done with this relay control box.
This build specifically focuses on automating or remotely controlling the power, enclosure lighting, and the ventilation system of [Caelestis Workshop]’s 3D printer but was specifically designed to be scalable and support adding other features quickly. A large power supply is housed inside of a 3D printed enclosure along with a Raspberry Pi. The Pi controls four relays which are used to control these various pieces hardware along with the 3D printer. That’s not the only thing the Pi is responsible for, though. It’s also configured to run Octoprint, a piece of open-source software that adds web interfaces for 3D printers and allows their operation to be monitored and controlled remotely too.
With this setup properly configured, [Caelestis Workshop] can access their printer from essentially any PC, monitor their prints, and ensure that ventilation is running. Streamlining the print process is key to reducing the frustration of any 3D printer setup, and this build will go a long way to achieving a more stress-free environment. In case you missed it, we recently hosed a FLOSS Weekly episode talking about Octoprint itself which is worth a listen especially if you haven’t tried this piece of software out yet.
Anyone who has left their car windows open during a rainstorm will tell you the best way to dry the upholstery is to crank the AC and close the windows. A couple of hours later, presto — dry seats. The same can be said for 3D printer filament, and it’s pretty much what [Ben Krejci] is doing with this solid-state filament dryer.
The running gear for this build is nothing fancy; it’s just a standard thermoelectric cooling module and a fan. The trick was getting the airflow over the module right. [Ben] uses two air inlets on his printed enclosure to pull air from the cold side of the Peltier, which allows the air enough time in contact with the cold to condense out the water. It also allows sufficient airflow to keep the hot side of the module from overheating.
Water collection was a challenge, too. Water always finds a way to leak, and [Ben] came up with a clever case design incorporating a funnel to direct water away. The module is also periodically run in reverse to defrost the cold side heatsink.
The dehumidifier lives in a large tool cabinet with plenty of room for filament rolls and is run by an ESP32-C3 with temperature and humidity sensors, which allowed [Ben] to farm most of the control and monitoring out to ESPHome. The setup seems to work well, keeping the relative humidity inside the cabinet in the low 20s — good enough for PETG and TPU.
It’s an impressively complete build using off-the-shelf parts. For a different approach to solid-state filament drying, check out [Stefan]’s take on the problem.
Multi-filament printing can really open up possibilities for your prints, even more so the more filaments you have. Enter the 8-Track from [Armored_Turtle], which will swap between 8 filaments for you!
The system is modular, with each spool of filament installed in a drybox with its own filament feeder .The dryboxes connect to the 8-Track changer via pogo pins for communication and power. While [Armored_Turtle] is currently using the device on a Voron printer, he’s designed it so that it can be easily modified to suit other printers. As it’s modular, it’s also not locked into running 8 filaments. Redesigning it to use more or less is easy enough thanks to its modular design.
The design hasn’t been publicly released yet, but [Armored_Turtle] states they hope to put it on Github when it’s ready. It’s early days, but we love the chunky design of those actively-heated drybox filament cassettes. They’re a great step up from just keeping filament hanging on a rod, and they ought to improve print performance in addition to enabling multi-filament switching.
Imagine you want to iterate on a shock-absorbing structure design in plastic. You might design something in CAD, print it, then test it on a rig. You’ll then note down your measurements, and repeat the process again. But what if a robot could do all that instead, and do it for years on end? That’s precisely what’s been going on at Boston University.
Inside the College of Engineering, a robotic system has been working to optimize a shape to better absorb energy. The system first 3D prints a shape, and stores a record of its shape and size. The shape is then crushed with a small press while the system measures how much energy it took to compress. The crushed object is then discarded, and the robot iterates a new design and starts again.
The experiment has been going on for three years continuously at this point. The MAMA BEAR robot has tested over 25,000 3D prints, which now fill dozens of boxes. It’s not frivolous, either. According to engineer Keith Brown, the former record for a energy-absorbing structure was 71% efficiency. The robot developed a structure with 75% efficiency in January 2023, according to his research paper.