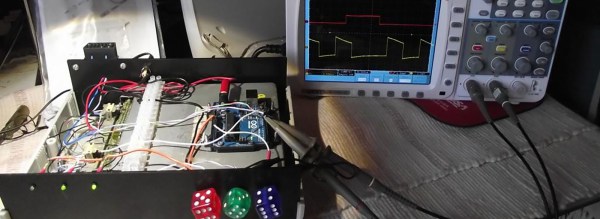
Hackaday Prize Entry: [Nardax] Shoots Fireballs

If you’re looking for a high entertainment value per byte of code, [Nardax] has you covered with his wearable spellcasting controller. With not much effort, he has built a very fun looking device, proving what we’ve always known: a little interaction can go a long way.

[Nardax] originally intended his glorified elbow-mount potentiometer to be a fireworks controller. Ironically, he’s now using it to throw virtual fireballs instead. Depending on the angle at which he holds his elbow before releasing it, he can cast different spells in the game World of Warcraft. We’re not at all sure that it helps his gameplay, but we’re absolutely sure that it’s more fun that simply mashing different keys.

There’s a lot of room for expansion here, but the question is how far you push it. Sometimes the simplest ideas are the best. It looks like [Nardax] is enjoying his product-testing research, though, so we’ll keep our eyes out for the next iterations of this project.

We’ve seen a number of high-tech competitors to the good old power glove, and although some are a lot more sophisticated than a potentiometer strapped to the elbow, this project made us smile. Sometimes, it’s not just how much tech you’ve got, but how you use it. After all, a DDS pad is just a collection of switches under a rug.

Robot Arm From Recyclables

A robot assistant would make the lives of many much easier. Luckily, it’s possible to make one of your own with few fancy materials. The [circuito.io] team demonstrates this by building a robot arm out of recyclables!

With the exception of the electronics — an Arduino, a trio of servo motors, and a joystick — the arm is made almost completely out of salvaged recyclables: scrap wood, a plastic bottle, bits of plastic string and a spring. Oh, and — demonstrating yet another use for those multi-talented tubers — a potato acts as a counterweight.

Instead of using screws or glue, these hackers used string made from a plastic bottle as a form of heat shrink wrap to bind the parts of the arm together. The gripper has only one pivoting claw for greater strength, and the spring snaps it open once released. Behold: your tea-bag dunking assistant.

Continue reading “Robot Arm From Recyclables”

The $2 32-Bit Arduino (with Debugging)

I have a bit of a love/hate relationship with the Arduino. But if I had two serious gripes about the original offering it was the 8-bit CPU and the lack of proper debugging support. Now there’s plenty of 32-bit support in the Arduino IDE, so that takes care of the first big issue. Taking care of having a real debugger, though, is a bit trickier. I recently set out to use one of the cheap “blue pill” STM32 ARM boards. These are available for just a few bucks from the usual Chinese sources. I picked mine up for about $6 because I wanted it in a week instead of a month. That’s still pretty inexpensive. The chip has a lot of great debugging features. Can we unlock them? You can, if you have the right approach.

The Part

For a few bucks, you can’t complain about the hardware. The STM32F103C8T6 onboard is a Cortex-M3 processor that runs at 72 MHz. There’s 64K of flash and 20K of RAM. There’s a minimicro-USB that can act as a programming port (but not at first). There’s also many 5 V-tolerant pins, even though this a 3.3 V part.

You can find a lot more information on this wiki. The board is a clone–more or less–of a Maple Mini. In fact, that’s one way you can use these. You can use the serial or ST-Link port to program the Maple bootloader (all open source) and use it like a Maple. That is, you can program it via the USB cable.

From my point of view, though, I don’t want to try to debugging over the serial port and if I have the ST-Link port already set up, I don’t care about a bootloader. You can get hardware that acts as a USB to ST-Link device inexpensively, but I happen to have an STM32VLDISCOVER board hanging around. Most of the STM32 demo boards have an ST-Link programmer onboard that is made to use without the original target hardware. On some of the older boards, you had to cut traces, but most of the new ones just have two jumpers you remove when you want to use the programmer to drive another device.

The “blue pill” designation is just a common nickname referring to the Matrix, not the pharmaceuticals you see on TV ads. The board has four pins at one edge to accommodate the ST-Link interface. The pin ordering didn’t match up with the four pins on the STM32VLDISCOVER, so you can’t just use a straight four-pin cable. You also need to bring power over to the board since it will have to power the programmer, too. I took the power from the STM32VLDISCOVER board (which is getting its power from USB) and jumpered it to my breadboard since that was handy.

Continue reading “The $2 32-Bit Arduino (with Debugging)”

Acoustic Coupler Pole-Vaults Over China’s Firewall

[agp.cooper]’s son recently went to China, and the biggest complaint was the Great Firewall of China. A VPN is a viable option to get around the Great Firewall of China, but [agp] had a better idea: an acoustic coupler for his son’s iPhone.

Hackaday readers of a recent vintage might remember an old US Robotics modem that plugged into your computer and phone line, allowing you to access MySpace or Geocities. Yes, if someone picked up the phone, your connection would drop. Those of us with just a little more experience under our belts will remember the acoustic coupler modem — a cradle that held a phone handset that connected your computer (indirectly) to the phone line.

With a little bit of CNC work, [agp] quickly routed out a block of plywood that cradled his son’s iPhone. Add in a speaker and a microphone, and that’s an acoustic coupler. There’s not much to it, really. The real challenge is building a modem.

In the late 90s, there were dedicated chipsets for modems, and before that, there was a 74xx-series chip that was a 300-baud modem. [agp] isn’t using anything like that. He’s building a modem with an Arduino. This is a Bell 103A-compatible modem, allowing an iPhone to talk to a remote computer at 300 bits per second. This is a difficult challenge; we’re not able to get 33kbps over a smartphone voice connection simply because of the codecs used. However, with a little bit of work, [agp] managed to build a real modem with an Arduino.

Modern DIY FM Radio

Back in the day, building a DIY radio was fun! We only had to get our hands at a germanium diode, make some coils, and with a resistor and long wire as an antenna maybe we could get some sound out of those old white earplugs. That was back then. Now we have things like the Si4703 FM tuner chip that can tune in FM radio in the 76–108 MHz range, comes with integrated AGC and AFC, controlled by I2C, as well as a bunch of other acronyms which seem to make the whole DIY radio-building process outdated. The challenges of the past resulted in the proven solutions of the present in which we build upon.

This little project by [Patrick Müller] is a modern radio DIY tutorial. With an Arduino Nano as the brains and controller for an Si4703 breakout board, he builds a completely functional and portable FM radio. A small OLED display lets the user see audio volume, frequency, selected station and still has space left to show the current available battery voltage. It has volume control, radio station seek, and four buttons that allows quick access to memorized stations. The source code shows how it is possible to control the Si4703 FM tuner chip to suit your needs.

As for ICs, not everything is new, [Patrick] still used the good old LM386 amp to drive the speaker, which is almost 35 years old by now. As we can listen in the demo video, it can still output some seriously loud music sounds!

Continue reading “Modern DIY FM Radio”

Panel Mount Display Solves The Problem Of Drilling Square Holes

[Absolutelyautomation] has a problem with seven-segment displays. Fitting these displays in an enclosure is a pain because you can’t drill perfectly square holes, and you will invariably mess up a few enclosures with overzealous file work. There is a solution to this problem – panel mount meters.

The bezels on these panel mount meters hide the imperfections in the enclosure, and usually don’t require screws. They are, however, dedicated displays, usually for temperature, RPM, or some other measurement.

[Absolutelyautomation] took one of these dedicated panel mount displays and turned it into an all-purpose device. Basically, it’s a panel mount Arduino with three seven-segment displays.

This project is built on perfboard cut down to fit inside the enclosure of a very cheap panel meter found at the usual suppliers. Tucked away underneath this perfboard is an ATmega, a few resistors, and the support parts to make everything go. This panel mount meter can either be a serial slave or as a standalone controller, programmable with the Arduino IDE. It’s cheap, too. You can check out [Absolutelyautomaion]’s video below.

Continue reading “Panel Mount Display Solves The Problem Of Drilling Square Holes”

The Custom Clicky Shortcut Keypad

You’re not cool unless you have a mechanical keyboard. Case in point: if you were to somehow acquire an identical keyboard to the one I used to type this, it would set you back at least seven hundred dollars. Yes, it’s mechanical (Topre), and yes, I’m cooler than you. Of course, you can’t be as cool as me, but you can build your own mechanical keyboard. [Robin] is, I presume, a pretty cool dude so he built his own keyboard. It’s the amazing shortcut keyboard, and it can be programmed graphically.

The idea for this keyboard came when [Robin] was studying as an engineer. We assume this is code for wearing out the Escape key on AutoCAD, but many other software packages have the same problem. The solution to [Robin]’s problem was a shortcut keypad, a 3 by 4 matrix of Cherry switches that could be programmed for any task.

The design of this keyboard started out as an Adafruit Trellis matrix keypad. This was combined with some software written in Processing that assigned macros to each button. This was a sufficient solution, but the switches in the Adafruit trellis look squishy. These are not the right switches for someone who craves a soft snap under every fingertip. It’s not the keyboard of someone who desires the subtle thickness of laser etched PBT keycaps. The Adafruit keypad doesn’t have the graceful lines of a fully sculpted set of keycaps. Oh my god, it’s doubleshot.

[Robin]’s completed keyboard has gone through a few revisions, but in the end, he settled on PCB-mounted switches and a very clever 3D printed standoff system to hold an Arduino Pro Micro in place. The enclosure, too, is 3D printed, and the end result is a completely custom keyboard that’s perfect for mashing key combos.

You can check out a video of this keyboard in action below.

Continue reading “The Custom Clicky Shortcut Keypad”