I work a lot with high voltages and others frequently replicate my projects, so I often get asked “What voltage is needed?”. That means I need to be able to measure high voltages. Here’s how I do it using a Fluke high voltage probe as well as my own homemade probe. And what if you don’t have a probe? I have a solution for that too.
How Long Is Your Spark?
The simplest way to measure high voltage is by spark length. If your circuit has a spark gap then when a spark occurs, that’s a short-circuit, dumping all your built up charge. When your spark gap is at the maximum distance at which you get a spark then just before the spark happens is when you have your maximum voltage. During the spark the voltage rapidly goes to zero and depending on your circuit it may start building up again. The voltage before the spark occurred is related to the spark length, which is also the spark gap width.
The oscilloscope photo below shows this changing voltage. This method is good for a rough estimate. I’ll talk about doing more precise measurements when I talk about high voltage probes further down.
The first computer I personally owned had 256 bytes of memory. Bytes. The processor in my mouse and keyboard both have more memory than that. Lots more. Granted, 256 bytes was a bit extreme, but even the embedded systems I was building as part of my job back then generally had a small fraction of the 64K bytes of memory they could address.
Some people are probably glad they don’t have to worry about things like that anymore. Me, I kind of miss it. It was often like a puzzle trying to squeeze ten more bytes out of an EPROM to get a bug fix or a new feature put in. I though with the 1K challenge underway, I might share some of the tricks we used in those days to work around the small memory problems.
There is one aspect of desktop computing in which there has been surprisingly little progress over the years. The keyboard you type on today will not be significantly different to the one in front of your predecessor from the 1970s. It may weigh less, its controller may be less power-hungry, and its interface will be different, but the typing experience is substantially identical. Or at least, in theory it will be identical. In fact it might be worse than the older peripheral, because its switches are likely to be more cheaply made.
The famous buckled spring in operation. Shaddim [CC BY-SA 3.0], via Wikimedia Commons.Thus among keyboard aficionados the prized possessions are not necessarily the latest and greatest, but can often be the input devices of yesteryear. And one of the more famous of these old keyboards is the IBM Model M, a 1984 introduction from the computer behemoth that remains in production to this day. Its famous buckled-spring switches have a very positive action and a unique sound that once heard can never be forgotten. Continue reading “Do You Miss The Sound Of Your Model M?”→
The late 1950s and early 1960s were a tumultuous time in world history. The Cold War between the East and the West was in full-swing, driving the new fields of nuclear weapons and space exploration and giving the period its dual monikers of “Atomic Age” and “Space Age.”
Changes in these fields often went hand in glove, with developments in one requiring responses in the other. In 1958, the US conducted nuclear tests in the Pacific that effectively destroyed the ionosphere over the test site and shut down high-frequency communications to places like Hawaii and New Zealand. The strategic implications of this were clear, and the US began looking for ways for the military to reduce its reliance on HF communications and ionospheric skip by using space-based assets to communicate at much higher frequencies.
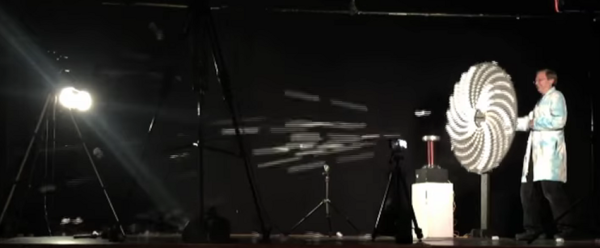
What do you get when you combine a Tesla coil, 315 film canisters and a fortune wheel? The answer is of course a film canister Gatling gun. [ScienceBob] has taken the simple film canister cannon hack to a whole new level. The idea is simple, the film canister has a lid that fits tight and allows pressure to build up, so if you fill it with alcohol vapor and ignite it with a spark gap, you get a small explosion that sends the can flying away.
[ScienceBob] uses 21 rows of fifteen canisters each around the wheel. There is a spark gap for each canister, and all the spark gaps in the same row are in series. You need a lot of volts to turn on fifteen spark gaps, and that is why the Tesla coil is part of the game. When the outer end of the wire in one row passes near the Tesla coil, a spark jumps and fires all the spark gaps, igniting the alcohol vapor and fifteen cans are expelled from the wheel. The wheel rotates until all rows are fired.
Slack is great, but there are a few small problems with the current implementations. There isn’t a client for Palm, there isn’t a client for the Newton, and there isn’t a client for the Commodore 64. The last of these severe oversights was recently fixed by [Jeff Harris]. He built a native Slack client in 6502 assembly for the Commodore 64.
When dealing with network applications and the C64, the first question that comes to mind is how to talk to the outside world. There are C64 NICs, and ESP dongles, but for this build [Jeff] turned to the C64 Userport. This card edge combination of a serial and parallel port allows the C64 to talk to anything with RS-232, and with a simple adapter, [Jeff] got his old computer talking to a Raspberry Pi connected to the Internet.
The C64 Slack client itself is written in 6502 assembly, and features everything you would expect. The Pi is required to talk to the Slack API, though, and uses a NodeJS app to translate the bits from the C64 to something the API can understand.
Does it work? Of course it does. Slack is just text, after all, and there doesn’t seem to be any PETSCII weirdness here. You can check out a video of the build in action below.
There are many kits available to today’s hobbyists who wish to try their hand at producing simple computer-controlled robots. Small concoctions of servos and laser-cut acrylic, to which boards such as the Arduino, Raspberry Pi, or Beaglebone can easily be fitted.
In the 1980s though this was a market that was yet to be adequately served. The sheer size of the many 8-bit machines of the day meant they could not be incorporated in your robot, and interfacing to them was a bit more challenging than the easy-to-use GPIOs of their modern counterparts. Then the mechanical hardware of a small robot was something that had not been easily and cheaply packaged for the constructor, making building a physical robotic platform a significant task in itself.
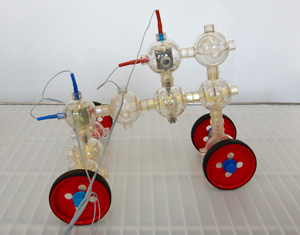
[Charlie] is a robot based on the Capsela construction system, a toy consisting of interlocking plastic spheres containing different functions of shafts, gears, and motors. There was a Robotic Workshop kit for Capsella that featured a Commodore 64 interface, and it is through this means that [Charlie]’s three motors are controlled. It includes a ROM that extends Commodore BASIC with extra commands, which allow the robot to be easily controlled.
Artie the robot, with Dacta box in foreground
Meanwhile [Artie] is a Lego robot, using the Dacta TC Logo, a kit sold for the educational market and available at the time with interfaces for the PC and the Apple II. They had a Dacta control box but not the Apple II card to go with it, so had to make do with a functional replica built on a prototyping card. As the name suggests, this was programmed using Logo, and came with the appropriate interpreter software.
Both robots are reported to have been a success in terms of working in the first place, then demonstrating the 1980s technology and providing entertainment and engagement with the faire’s visitors.
We have covered numerous Lego robots over the years, as a search of our site will confirm. But this is only the second time we’ve featured a Capsela project, the first being this Arduino rover from 2011. [Mike] mused why we don’t see Capsela more often, and the same sentiment is true today. Do you have a Capsela set gathering dust somewhere that could make a robotic project?


![The famous buckled springs in operation. Shaddim [CC BY-SA 3.0], via Wikimedia Commons.](https://hackaday.com/wp-content/uploads/2016/11/bucklingspring-animation-300ms.gif)