Robert Dunn holds a button in his hand for controlling a spot welder

Gorgeous Battery Welder Hits The Spot

Raise you’re hand if you’ve ever soldered directly to a battery even though you know better. We’ve all been there. Sometimes we get away with it when we have a small pack and don’t care about longevity. But when [Robert Dunn] needed to build a battery pack out of about 120 Lithium Ion cells, he knew that he had to do it The Right Way and use a battery spot welder. Of course, buying one is too simple for a hacker like [Robert]. And so it was that he decided to Build a Spot Welder from an old Microwave Oven and way too much mahogany, which you can view below the break.

A Battery Cell with a spot welding tab attached
Spot Welding leaves two familiar divots in the attached tab, which can be soldered or welded as need.

For the unfamiliar, a battery spot welder is the magical device that attaches tabs to rechargeable batteries. You’ll notice that all battery packs with cylindrical cells have a tab with two small dimples. These dimples are where high amperage electricity quickly heats the battery terminal and the tab until they’re red hot, welding them together. The operation is done and over in less than a second, well before any heat damage can be done. The tab can then be soldered to or spot welded to another cell.

One of the most critical parts of spot welding batteries is timing. While [Robert Dunn] admits that a 555 timer or even just a manual switch and relay could have done the job, he opted for an Arduino Uno with a 4 character 7 segment LED display that shows the welding time in milliseconds. A 3d printed trigger and welder handle wrap up the hardware nicely.

The build is topped off by a custom mahogany enclosure that is quite a bit overdone. But if one has the wood, the time, the tools and skills (and a YouTube channel perhaps?) there’s no reason not to put in the extra effort! [Robert]’s resulting build is almost too nice, but it’ll certainly get the job done.

Of course, spot welders are almost standard fare here at Hackaday, and we’ve covered The Good, The Bad, and The Solar. Do you have a battery welder project that deserves a spot in Hackaday’s rotation? By all means, send it over to the Tip Line!

Continue reading “Gorgeous Battery Welder Hits The Spot”

Robert Murray Smith Discusses Rivets and Riveting

Old School Fastener Tutorial Is Riveting

Whether you’re making, repairing, or hacking something together, we all need fastners. Screws, nuts and bolts, and pop rivets are handy sometimes. Various resins and even hot glue are equally useful. In some cases however the right fastener for the job eludes us, and we need another trick up our sleeve.

[Robert Murray Smith] found himself in such a position. His goal was to join two pieces of aluminum that need a nice finish on both sides. Neither glue, pop rivets, screws, nuts or bolts would have been appropriate.  [Robert] is always flush with ideas both new and old, and he resorted to using an old school fastener as explained as explained in his video “How To Make And Use Rivets“.

In the video below the break, [Robert] goes into great detail about making a simple rivet die from a 5mm (3/16”) piece of flat steel, creating the rivet from a brass rod, and then using the flush rivet to join two pieces of aluminum. The simple tooling he uses makes the technique available to anybody with a propane torch, a vise, some basic tools, and a simple claw hammer. We also appreciate [Robert]’s discussion of cold riveting, hot riveting, and annealing the rivets as needed.

Not only is riveting a technique thousands of years old, its advancement and application during the Industrial Revolution enabled technologies that couldn’t have existed otherwise. Hackaday’s own [Jenny List] did a wonderful write up about rivets in 2018 that you won’t want to miss!

Continue reading “Old School Fastener Tutorial Is Riveting”

MC68k SBC with a monitor, keyboard and mouse

Motorola 68000 SBC Runs Again With A Raspberry Pi On Top

Single-board computers have been around a long time: today you might be using a Raspberry Pi, an Arduino, or an ESP32, but three decades ago you might find yourself programming a KIM-1, an Intel SDK-85, or a Motorola 68000 Educational Computer Board. These kind of boards were usually made by processor manufacturers to show off their latest chips and to train engineers who might use these chips in their designs.

[Adam Podstawczyński] found himself trying to operate one of these Motorola ECBs from 1981. This board contains a 68000 CPU (as used in several Macintoshes and Amigas), 32 kB of RAM, and a ROM program called TUTOR. Lacking any keyboard or monitor connections, the only way to communicate with this system is a pair of serial ports. [Adam] decided to make the board more accessible by adding a Raspberry Pi extended with an RS232 Hat. This add-on board comes with two serial ports supporting the +/- 12 V signal levels used in older equipment.

It took several hours of experimenting, debugging, and reading the extensive ECB documentation to set up a reliable connection; as it turns out, the serial ports can operate in different modes depending on the state of the handshake lines. When the Pi’s serial ports were finally set up in the right mode, the old computer started to respond to commands entered in the terminal window. The audio interface, meant for recording programs on tape, proved more difficult to operate reliably, possibly due to deteriorating capacitors. This was not a great issue, because the ECB’s second serial port could also be used to save and load programs directly into its memory.

With the serial connections working, [Adam] then turned to the aesthetics of his setup and decided to make a simple case out of laser-cut acrylic and metal spacers. Custom ribbon cables for the serial ports and an ATX break-out board for power connections completed the project, and the 40-year-old educational computer is now ready to educate its new owner on all the finer points of 68000 programming. In the video (embedded after the break) he shows the whole process of getting the ECB up and running.

[Adam] made a similarly clever setup with a Commodore 64 and an Arduino earlier. [Jeff Tranter] recreated a similar 68000 development board from scratch. And a few years ago we even featured our own custom-built 68k computer.

Continue reading “Motorola 68000 SBC Runs Again With A Raspberry Pi On Top”

Pokemon Time Machine Lets You Really Catch ‘Em All

Since 1996 the Pokemon series of games has moved through eight distinct generations, which roughly parallel the lineage of Nintendo’s handheld gaming systems. While the roster of “pocket monsters” has been updated steadily, players have had the option of bringing captured Pokemon from the older games into the newer releases. But there’s always been a gap in this capability. Due to hardware differences, the Game Boy and Game Boy Color generations of games were physically unable to communicate with the titles released for the Game Boy Advance.

But soon, that may no longer be the case. [Selim] is hard at work on Lanette’s Poke Transporter, a hardware and software solution for bringing Pokemon from the first and second generation games onto the third generation GBA games. Once they’ve been loaded there, players can move the creatures all the way up into the contemporary Pokemon games via official means.

The first Pokemon to make the generational leap.

The project was started in July of 2020, with [Selim] first focusing on the logistical challenges of bringing such early Pokemon into the newer games. Because so much changed between the different generations, there are many sanity checks that need to be made during the transfer. For example, the moves and techniques that the creatures are able to learn isn’t necessarily consistent between these early entries into the series. But after about a year of effort, the software side worked reliably on emulated games, and it was time to start thinking about the hardware.

Ultimately, [Selim] wants to create a physical device into which players can insert their Pokemon cartridges and trigger an automatic transfer. The code is already able to read and write to the cartridges, and has been ported over to Arduino so it doesn’t need a computer to run. A few prototype PCBs have been created, and beyond the inevitable bodges, it seems like they’re functional. There’s still breadboards and jumpers for as far as the eye can see, but this is the first step towards producing a dedicated Pokemon “time machine” that can transport them from the late 1990s to the present day.

With [stacksmashing] recently showing that the Raspberry Pi Pico is fast enough to emulate the Game Boy’s “Link Cable” accessory, and the protocol for trading Pokemon over the wire fairly well understood, we wonder if one day this technique couldn’t be done in real-time between linked handhelds. If you can make two copies of Tetris connect to each other over the Internet, it seems like you’d have enough time to fiddle with a Charizard’s stats.

Eavesdropping By LED

If you ever get the feeling someone is watching you, maybe they are listening, too. At least they might be listening to what’s coming over your computer speakers thanks to a new attack called “glow worm.” In this novel attack, careful observations of a power LED on a speaker allowed an attacker to reproduce the sound playing thanks to virtually imperceptible fluctuations in the LED brightness, most likely due to the speaker’s power line sagging and recovering.

You might think that if you could see the LED, you could just hear the output of the speaker, but a telescope through a window 100 feet away appears to be sufficient. You can imagine that from a distance across a noisy office you might be able to pull the same trick. We don’t know — but we suspect — even if headphones were plugged into the speakers, the LED would still modulate the audio. Any device supplying power to the speakers is a potential source of a leak.

Continue reading “Eavesdropping By LED”

Arduino Caller ID Display Is Better Late Than Never

It’s no secret that the era of the landline telephone is slowly coming to a close. As of 2020, it was estimated that less than half the homes in America still subscribed to plain old telephone service (POTS). But of course, that still amounts to millions upon millions of subscribers that might get a kick out of this Arduino caller ID developed by [Dilshan Jayakody].

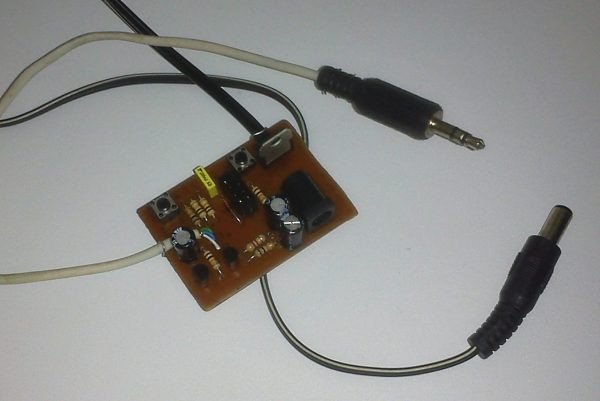
HT9032D caller ID decoder board
The completed HT9032D board.

Truth be told, until this point, we hadn’t really given a lot of thought to how the caller ID system works. But as [Dilshan] explains, you can actually pick up a dedicated IC that can decode incoming caller data that’s sent over the telephone line. In this case he’s using a Holtek HT9032D, which comes in a through-hole DIP-8 package and can be picked up for around $2 USD. The chip needs a handful of passives and a 3.58 MHz crystal to help it along on its quest, but beyond that, it’s really just a matter of reading the decoded data from its output pin.

To display the caller’s information, [Dilshan] is using an Arduino Uno and common 16×2 HD44780 LCD. As a nice touch, the code will even blink the Arduino’s onboard LED when you’ve missed a call. As a proof of concept there’s been no attempt to condense the hardware or ditch the breadboard, but it’s not hard to imagine that all the components could be packed into a nice 3D printed enclosure should you want something a bit more permanent.

We’ve seen caller ID data being collected in previous projects, but they used a USB modem combined with a software approach. We really like the idea of doing it with a cheap dedicated IC, though we’ll admit this demonstration would probably have been a bit more exciting a decade ago.

Continue reading “Arduino Caller ID Display Is Better Late Than Never”

A 3D-Printed Block And Tackle For Those Annoying Lifts

Perhaps the humble block and tackle — multiple parallel pulleys to reduce the effort of lifting — is not such a common sight as it once was in this age of hydraulic loaders, but it remains a useful mechanism for whenever there is a lifting task. To that end [semi] has produced a 3D-printed block and tackle system, which as can be seen in the video below the break, makes lifting moderately heavy loads a breeze.

It’s a simple enough mechanism, with the 3D printer supplying pulleys, chocks, and attachment points, and steel bolts holding everything together. It’s demonstrated with a maximum weight of 20 kilograms (44 pounds), and though perhaps some hesitation might be in order before trusting it with 200 Kg of engine, we’re guessing it would be capable of much more that what we’re shown. Should you wish to give it a try, the files can be found on Thingiverse.

The block and tackle should hold a special place in the hearts of engineers everywhere, as the first product manufactured using mass-production techniques. It shouldn’t be a surprise that this early-19th century factory came from the work of Marc Brunel, father of Isambard Kingdom Brunel who we’ve made the subject of a previous Hackaday piece.

Continue reading “A 3D-Printed Block And Tackle For Those Annoying Lifts”