Stepper Motor Analyzer Reveals All

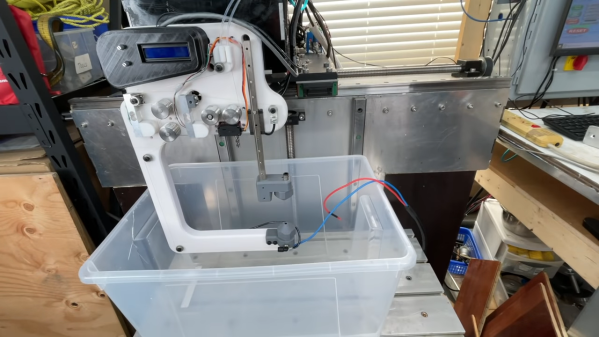
In theory, you really don’t need much to work with electronics. A scope ought to do everything. However, for special purposes, it is handy to have meters, logic analyzers, and other special-purpose instruments. If you work on motion systems like 3D printers and CNC machines, you ought to have a way to look at stepper motors. You don’t? [Zapta] has a great Simple Stepper Motor Analyzer and [Teaching Tech] has a great video (see below) that shows some of the great things it can do.

What can it do? It analyzes the motor in place and can visualize what’s happening during stepping, microstepping, and other operating modes. Connecting the instrument is easy since you just use a four-pin pass-through connector.

Continue reading “Stepper Motor Analyzer Reveals All”

Hacking An Air Assist For The Ortur Laser

Getting great results from a laser cutter takes a bit of effort to make sure all of the settings are just right. But even then, if the air between the material and the laser source is full of smoke and debris it will interfere with the laser beam and throw off the results. The solution is to add air assist which continuously clears that area.

Earlier this year I bought an Ortur laser engraver/cutter and have been hacking on it to improve the stock capabilities. last month I talked about putting a board under the machine and making the laser move up and down easily. But I still didn’t have an air assist. Since then I found a great way to add it that will work for many laser cutter setups.

I didn’t design any of these modifications, but I did alter them to fit my particular circumstances. You can find my very simple modifications to other designs on Thingiverse. You’ll also find links to the original designs and you’ll need them for extra parts and instructions, too. It is great to be able to start with work from talented people and build on each other’s ideas.

Continue reading “Hacking An Air Assist For The Ortur Laser”

CNC Chainsaw

You can spend a lot of time trying to think of a clever title for a post about a CNC chainsaw. But you’ll finally realize, what else can you say but “CNC Chainsaw?” [Stuff Made Here] actually built such a beast, and you can watch it go in the video embedded below. A custom chainsaw on a Tormach robotic arm. So it is more like a robot using a chainsaw than a conventional CNC machine.

Instead of an XY motion, the machine uses what the video calls an “apple peeler” method and uses the Minkowski algorithm to adjust for the size of the chainsaw. The video is an odd juxtaposition of advanced topics like the Minkowski and basic things like G code.

Continue reading “CNC Chainsaw”

When The Right Tool Is Wrong

I’m a firm believer in using the right tool for the job. And one of the most fantastic things about open-source software tools is that nothing stops you from trying them all. For instance, I’ve been going back and forth between a couple, maybe three, CAD/CAM tools over the past few weeks. They each have their strengths and weaknesses, and so if I’m doing a simpler job, I use the simpler software, because it’s quicker and, well, simpler. But I’ve got to cut it out, at least for a while, and I’ll tell you why.

The first of the packages is FreeCAD, and it’s an extremely capable piece of CAD/CAM software. It can do everything, or so it seems. But it’s got a long shallow learning curve, and I’m only about halfway up. I’m at the stage where I should be hammering out simple “hello world” parts for practice. I say, I should be.

Fortunately/unfortunately, some Hackaday readers introduced me to KrabzCAM through the comments. It’s significantly less feature-full than FreeCAD, but it gets the job of turning your wife’s sketches of bunnies into Easter decorations done in a jiffy. For simple stuff like that, it’s a nice simple tool, and is the perfect fit for 2D CAM jobs. It’s got some other nice features, and it handles laser engraving nicely as well. And that’s the problem.

Doing the simple stuff with KrabzCAM means that when I do finally turn back to FreeCAD, I’m working on a more challenging project — using techniques that I’m not necessarily up to speed on. So I’ll put the time in, but find myself still stumbling over the introductory “hello world” stuff like navigation and project setup.

I know — #first-world-hacker-problems. “Poor Elliot has access to too many useful tools, with strengths that make them fit different jobs!” And honestly, I’m stoked to have so many good options — that wasn’t the case five years ago. But in this case, using the right tool for the job is wrong for me learning the other tool.

On reflection, this is related to the never-try-anything-new-because-your-current-tools-work-just-fine problem. And the solution to that one is to simply bite the bullet and stick it out with FreeCAD until I get proficient. But KrabzCAM works so well for those small 2D jobs…

A hacker’s life is hard.

Hacking The Ortur Laser With Spoil Board, Z-Height, And Air Assist

Last month in my hands-on review of the Ortur Laser I hinted that I had done a few things to make it work a little better. I made three significant changes in particular: I anchored the machine to a spoil board with markings, I added a moving Z axis to adjust focus by moving the entire laser head, and I added an air assist.

Turns out, you can find designs for all of these things all over the Internet and I did, in fact, use other people’s designs. The problem is the designs often conflict with one another or don’t exactly work for your setup. So what I’ll tell you about is the combination that worked for me and what I had to do to get it all working together. The air assist is going to take a post all by itself, but some of the attempts at air assist led to some of the other changes I made, so we’ll talk about it some in this post, as well.

One of the modifications — the spoil board mount — I simply downloaded and the link for that is below. However, I modified the moving Z axis and air assist parts and you can find my very simple modifications on Thingiverse. You’ll also find links to the original designs and you’ll need them for extra parts and instructions, too.

Continue reading “Hacking The Ortur Laser With Spoil Board, Z-Height, And Air Assist”

Cricut Decides To Charge Rent For People To Fully Use The Cutting Machines They Already Own

UPDATE: Hackaday was contacted by a PR company claiming to represent Cricut. They clarified that machines are not deactivated upon resale, but the new owner will need to set up their own online account.

UPDATE #2 (3/21/21): In the wake of this controversy, Cricut have announced that they will not move forward with the upload limit for customers who are not paying subscribers.

In our community we like to think of ourselves as pioneers in the field of domestic CNC machinery, with our cheap 3D printers. But there’s another set of people who were way ahead of us, and they’re a rather unexpected one, too. Crafters were using CNC cutting machines well before we were, and while some may deride them when used for sparkly greeting cards sold on Etsy, they can be an extremely useful tool for much more than that. Probably the best known brand of cutter comes from Cricut, and that company has dropped a bombshell in the form of an update to the web-based design software that leaves their now very annoyed users with a monthly upload limit of 20 new designs unless they sign up for a Cricut Access Plan that costs $9.99 on monthly payments. Worse still, a screenshot is circulating online purporting to be from a communication with a Cricut employee attempting to clarify  matters, in which it is suggested that machines sold as second-hand will be bricked by the company.

Also, soon we will be making changes that affect members who use the free Design Space app without a Cricut Access plan. Every calendar month, these members will be allowed to upload up to 20 personal images and/or patterns. Members with a paid Cricut Access plan will have unlimited uploads.

We’d like to think that given the reaction from their online community the subscription plan will backfire, but unlike the world of 3D printing their market is not necessarily an online-savvy one. A crafter who buys a Cricut from a bricks-and-mortar warehouse store and uses it with Cricut cartridges may not balk at being required to pay rent to use hardware that’s already paid for in the same way a member of our community with a 3D printer would. After all, Cricut have always tried to make their software a walled garden. However if the stories about second-hand models being bricked turn out to bear fruit that might be a different matter.

There are of course plenty of alternative CNC cutting machines (The favourite in ones that have made it here seems to be the Silhouette Cameo) that don’t come with this type of baggage, and the online Cricut community are busily raising their profile in the wake of this news. Probably because of their restricted functionality there have been very few hacks here using a Cricut machine, but all of this leaves us wondering whether the machines themselves could be exploited to take less restrictive firmware.

Header image: Factorof2 (CC BY-SA 2.0)

Balanced Design And How To Know When To Quit Optimizing

I got a relatively inexpensive 6040 CNC machine, and have been spending most weekends making the thing work, and then cutting stuff, learning the toolchain, and making subsequent improvements. Probably 90% of my machine time has been on making improvements. It’s not that the machine was bad — I got the version with ballscrews and a decently solid frame — but it’s that it somehow didn’t work together as a whole. It’s just an incredibly unbalanced design.

Let’s start with the spindle motor. It’s a 2.2 kW water-cooled beast that is capable of putting tons of work into a piece and spinning at very high speed. Yet to keep up with the high speed spindle, the motors that move it around would have to be capable of high speeds as well — it’s a feeds and speeds thing if you’re not a CNC geek. And they can’t. Instead, the stepper motors that came with the kit are designed for maximum force at low speeds. Which can make sense for some machines, but for one with a slightly flexible X-axis like this one, that’s wasted as well. The frame just can’t handle the low-end grunt that the motors are capable of, so it can’t take advantage of the spindle’s power either. The design is all over the place.

Over the last two months’ of weekends, I’ve been going through this iterative procedure of asking “what is my limiting factor right now?”, working on fixing that thing up, running it some, and then asking the question again. And it’s a good general procedure, and I believe that it’s getting me to the machine I want at the minimum cost of time, money, and effort.

At first, it was the driver hardware/software with its emulated USB parallel port, so I swapped out the controller for an Arduino running GRBL, soldered directly to the DB-25 that comes out of the back. At least it can put out pulses fast enough to order the motors around, but they would still stall out at high speeds. Swapping the stepper motors out for a high-speed pair only cost me €40, which makes you wonder why they didn’t just put the right motors on in the first place. The machine now travels fast enough to make use of the high-speed spindle, and I’m flying through plywood and plastics without leaving burn marks. It’s a huge win for not much money.

The final frontier is taking big bites out of aluminum. The spindle can do it, but I fear I’m up against the frame’s rigidity on the X-axis. For whatever reason, they went with unsupported rods on the X, which are significantly more flexible than an axis that’s backed up by more metal. And this is where the limiting factor may actually be my time and patience, rather than money. I just can’t bear to disassemble and reassemble the thing again. So for now, it’s going to be small nibbles, taking advantage of the machine’s speed, if not yet the spindle’s full horsepower.

But it’s odd, because this machine is a bundle of good parts. It’s just that they haven’t been chosen to work together optimally; the frame doesn’t work with the stepper motors, which don’t work with the spindle. If they went through my procedure of saying “what’s the limiting factor?” they could have saved themselves €100 by just shipping it with a wimpier spindle, which would have been a balanced, if anemic, machine. Or they could have built it with the right motors for more speed. Or supported rails for more grunt. Or both!

I’ll never know why they quit optimizing their design when they did. Maybe they never got past the slow USB/parallel port speed? But I’m near the end of my path, and I can tell because the limiting ingredient isn’t a simple upgrade, or even mere money anymore, but my own willpower.

How can you tell when you’re at the top of a mountain in a dense fog? A step you take in any direction would lead you downhill. How can you tell when you’re satisfied with a project’s state? When you don’t have the need, or desire, to undertake the next most obvious improvement.