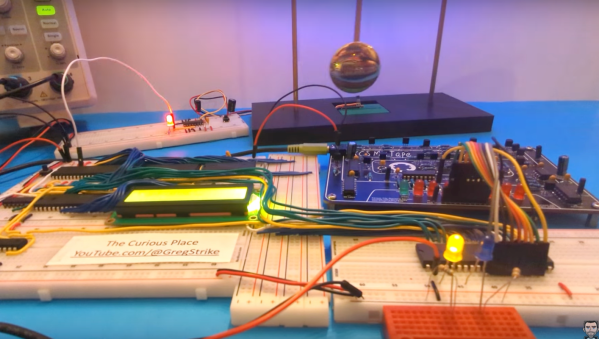
It’s not news that EVGA is getting out of the GPU card game, after a ‘little falling out’ with Nvidia. It’s sad news nonetheless, as this enthusiastic band of hardware hackers has a solid following in certain overclocking and custom PC circles. The Games Nexus gang decided to fly over to meet up with the EVGA team in Zhonghe, Taiwan, and follow them around a bit as they tried for one last overclocking record on the latest (unreleased, GTX4090-based) GPU card. As you will note early on in the video, things didn’t go smoothly, with their hand-lapped GPU burning out the PCB after a small setup error. Continue reading “The Tale Of The Final EVGA GPU Overclocking Record”
computer hacks1396 Articles
computer hacks
Building A NAS That Really Looks Like A NAS
Building your own network attached storage (NAS) for personal use isn’t all that difficult. A single board computer, a hard disk and a power supply in an enclosure is all the hardware you need. Then, choose from one of several open source NAS software solutions and you’re up and running. [tobychui] decided to notch things up by designing a NAS that really looks like a NAS. It’s tailored to his specific requirements and looks like a professional product to boot. The design features dual 3.5 inch HDD bays, a small footprint, is low cost, compatible with a variety of single board computers, and can handle high data transfer speeds by using RAM and SD card for buffering.
Not only has he done a great job with the hardware design, but he’s also developed a companion software for the NAS. “ArozOS” is a web desktop operating system that provides full-fledged desktop experience within a browser. ArozOS has a great user interface and features a lot of networking, file, disk management and security functions. He has also developed a launcher application to enable over-the-air (OTA) software updates.
Assembling the device will need some planning and preparation, even though most of the hardware is off the shelf. You will need a SATA to USB 2.0 adapter, a SBC (Orange Pi Zero, Raspberry Pi 4, Orange Pi Zero 2, etc) , three buck converters — one each to provide 12 V to the two hard disks and a third to provide 5 V to the SBC. You’ll also need a 12 V / 6 A or 24 V / 3 A external power brick, or a USB-C 65 W GaN charger with a triggering module to set the desired voltage and current.
There is also one custom power distribution board which is essentially a carrier board to mount the buck converters and connectors for power and USB data. For the 3D prints, [tobychui] recommends printing at the highest resolution for a nice finish.
The off the shelf SATA to USB adapter will need to be taken apart before it can be fixed to the 3D printed SATA adapter plate and might pose the most challenge during construction, but the rest of the assembly is fairly straightforward. Once assembly is complete, [tobychui] walks you through installation of the ArozOZ software, mounting the drives and making them accessible over the network.
Have you got your data backup act in order ? If not, it’s still not too late to make it a new Year’s resolution. And if you need help figuring things out, check out New Year Habits – What Do You Do For Data Storage?
Continue reading “Building A NAS That Really Looks Like A NAS”
That Old ThinkPad Needs An Open Source 2.5″ IDE SSD
So you fancy yourself a FOSS devotee, do you? Running GNU/Linux on your old ThinkPad, avoiding devices that need binary blobs? Got LibreBoot installed too? Not bad, not bad. But what about the hard drive? Can you be sure you aren’t leaking some freedoms out of that spinning rust?
Well, worry no more. Thanks to the work of [dosdude1], we now have an open source solid state drive that’s designed to work with any device which originally used a 2.5 inch IDE hard drive. The choice of releasing it under the GPL v3 versus an open hardware license might seem an odd choice at first, but turns out that’s actually what the GNU project recommends currently for circuit designs.

Which is precisely what we’re talking about here — just a circuit design done up in KiCad. There’s no firmware required, and the PCB features very little beyond the four BGA152/BGA132 NAND flash chips and the SM2236 controller IC. You’ve just got to get the board fabricated, obtain (or salvage) the chips, and suddenly your retro laptop is sporting the latest in mass storage technology.
So how does it work? The SM2236 is actually a CompactFlash (CF) controller, and since IDE and CF interfaces are so similar, the PCB doesn’t have to do much to adapt from one to the other. Sprinkle in a few NANDs, and you’ve got yourself a native SSD suitable for old school machines. [dosdude1] says the board can slot four 64 GB chips, which should be more than enough given the age of the systems this gadget will likely be installed in. There are a few catches though: the NAND chips need to be supported by the SM2236, and they all have to match.
If you need something even smaller, [dosdude1] produced a 1.8 inch SSD using the same techniques back in October of last year.
Continue reading “That Old ThinkPad Needs An Open Source 2.5″ IDE SSD”
Tetris Joins Minecraft And DOOM In Running A Computer
There is a select group of computer games whose in-game logic is enough for them to simulate computers in themselves. We’ve seen it in Minecraft and DOOM, and now there’s a new player in town from a surprising quarter: Tetris.
One might wonder how the Russian falling-blocks game could do this, as unlike the previous examples it has a very small playing field. And indeed it’s not quite the Tetris you’re used to playing, but a version played over an infinite board. Then viewed as a continuous progression of the game it can be viewed as somewhat similar to the tape in a Turing machine.
The various moves and outcomes are referred to through a Tetris scripting language, so states can be represented by different sets of blocks and holes while logic elements can be be built up using the various shapes and the game logic. From those a computer can be built, represented entirely in Tetris moves and shapes. It’s a little mind-bending and we’d be lying if we said we understood every nuance of it, but seemingly it works well enough to run the game from within itself.. If it had the catchy music from the NES version, we’d declare it perfect.
Hungry for more? Here’s DOOM doing some adding, and of course Minecraft has a rich computing history.
Dirty USB-C Tricks: One Port For The Price Of Two
[RichardG] has noticed a weird discrepancy – his Ryzen mainboard ought to have had fourteen USB3 ports, but somehow, only exposed thirteen of them. Unlike other mainboards in this lineup, it also happens to have a USB-C port among these thirteen ports. These two things wouldn’t be related in any way, would they? Turns out, they are, and [RichardG] shows us a dirty USB-C trick that manufacturers pull on us for an unknown reason.
On a USB-C port using USB3, the USB3 TX and RX signals have to be routed to two different pin groups, depending on the plugged-in cable orientation. In a proper design, you would have a multiplexer chip detecting cable orientation, and routing the pins to one or the other. Turns out, quite a few manufacturers are choosing to wire up two separate ports to the USB-C connector instead.
In the extensive writeup on this problem, [Richard] explains how the USB-C port ought to be wired, how it’s wired instead, shows telltale signs of such a trick, and how to check if a USB-C port on your PC is miswired in the same way. He also ponders on whether this is compliant with the USB-C specification, but can’t quite find an answer. There’s a surprising amount of products and adapters doing this exact thing, too, all of them desktop PC accessories – perhaps, you bought a device with such a USB-C port and don’t know it.
As a conclusion, he debates making an adapter to break the stolen USB3 port out. This wouldn’t be the first time we’re cheated when it comes to USB ports – the USB2 devices with blue connectors come to mind.
Workbench PC With A 50s Twist
[HolGer71] had a Mini-ITX Intel Atom-powered mainboard that he found useful for its vintage interfaces like COM and LPT. On a whim, he decided to give it even more vintage of a look – transforming it into a device more akin to a 50s home appliance, complete with a fitting monitor, mouse and keyboard. The project, dubbed Legacy-PC Computer Case, imitates the sheet metal construction masterfully in its 3D-printed design. That’s not all there is to it, either – everything is open-source, and there is enough documentation that you can build your own!
[HolGer71] starts with general printing and finishing advice, and goes through every part of the setup from there. The mainboard-holding case builds around a small miniITX case frame, enclosing it and adding extensions for connectors and lightbulbs. For the monitor, he built a new frame around an old VGA-equipped 17″ desktop screen – most certainly easy to find. The keyboard‘s an inexpensive one yet equipped with mechanical switches, and the mouse‘s an old Fujitsu-Siemens, but of the kind you’d see manufactured under different labels. All in all, this combines quite generic components into a trusty and stylish device for your workshop needs.
Equipped with Windows 7 as, apparently, the earliest supported version, this machine is now on desk duty – ready to run obscure software for old programming dongles, and look absolutely fabulous while doing so. It’s rare that we see such effort put into creating designs from scratch and sharing them with the community – most of the time, we see PCs built into already existing devices, like this vintage radio, or a benchtop logic analyzer.
Mouse Enjoys Its Freedom
Although it took a little while to standardize on the two-button-with-scroll-wheel setup, most computers have used a mouse or mouse-like device to point at objects on the screen since the 80s. But beyond the standard “point and click” features of the mouse, there have been very few ground-breaking innovations beyond creature comforts. At least, until the “Space Mushroom” mouse from [Shinsaku Hiura] hit our tips line.
This mouse throws away most of the features a typical mouse might have in favor of a joystick-like interface that gives it six degrees of freedom instead of the usual two — while still being about mouse-sized and held in the hand. It doesn’t even have a way of mapping motion directly to movements on the screen. Instead, it maps each degree of freedom to a similar movement of the mouse itself using these three joystick sensors physically linked together, with some underlying programming to translate each movement into the expected movement on the screen.
While this might not replace a standard mouse for every use case anytime soon, it does seem to have tremendous benefit in 3D modeling software, CAD, or anything where orienting a virtual object is the primary goal. Plus, since there’s no limit to the number of mice that can be attached to a computer (beyond USB limitations) this mouse could easily be used in conjunction with a normal mouse much like macro keyboards being used alongside traditional ones.