Linux-Fu: Running Commands

One of the things that makes Linux and Unix-like systems both powerful and frustrating is that there are many ways to accomplish any particular goal. Take something simple like running a bunch of commands in sequence as an example. The obvious way is to write a shell script which offers a tremendous amount of flexibility. But what if you just want some set of commands to run? It sounds simple, but there are a lot of ways to issue a sequence of commands ranging from just typing them in, to scheduling them, to monitoring them the way a mainframe computer might monitor batch jobs.

Let’s jump in and take a look at a few ways you can execute sequences from bash (and many other Linux shells). This is cover the cron and at commands along with a batch processing system called task spooler. Like most things in Linux, this isn’t even close to a complete list, but it should give you some ideas on ways to control sequences of execution.

Continue reading “Linux-Fu: Running Commands”

A Crash Course In Thingiverse Customizer

OpenSCAD is a great way to create objects for 3D printing (or other purposes), especially if you are already used to programming. For things like front panels, it is great because you can easily make modifications and — if you wrote your code correctly–everything will just adjust itself to new positions.

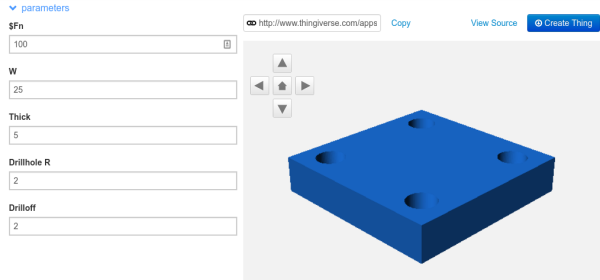
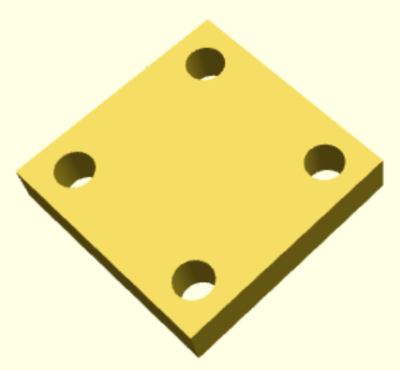
However, what if you have a general-purpose piece of code, and you want people to have the ability to customize it? For example, consider this code:

$fn=100;
difference()
{
  cube([25,25,5]);
  translate([4,4,-1]) cylinder(h=7,r=2);
  translate([25-4,4,-1]) cylinder(h=7,r=2);
  translate([4,25-4,-1]) cylinder(h=7,r=2);
  translate([25-4,25-4,-1]) cylinder(h=7,r=2);
}

That creates the plate with four drill holes you see on the right.

Continue reading “A Crash Course In Thingiverse Customizer”

Panelizing Boards The Easy Way

For reasons that will remain undisclosed until some time in the future, I recently had a need to panelize a few PCBs. Panelization is the art of taking PCB designs you already have, whether they’re KiCad board files, Eagle board files, or just Gerbers, and turning them into a single collection of PCBs that can be sent off to a fab house.

Now this is panel racing

If you’re still wondering what this means, take a look at the last board you got from OSH Park, Seeed, Itead, or Dirty PCBs. Around the perimeter of your board, you’ll find some rough spots. These are ‘mouse bites’ and tabs, places where the boards are strung together to form a gigantic rectangular panel sent off to a manufacturer. You can check out this great interview with [Laen] from OSH Park to get an idea of how this works, but the basic process is to take a bunch of Gerbers, add tabs and mouse bites, solve the knapsack problem, and send the completed panel off to a board house.

Panelizing boards is something most of us won’t have to do often. Really, you only want a panel of boards when you’re manufacturing something. For small-scale production and prototypes, bare boards will do just fine. Simply by virtue of the fact that panelizing boards is far less common than throwing some Gerbers at OSH Park or Seeed, there aren’t many (good) tutorials, and even fewer (good) tools to do so. This is how you panelize boards quickly and easily using Open Source tools.

Continue reading “Panelizing Boards The Easy Way”

Improving Mister Screamer; An 80 Decibel Filament Alarm

I created a prototype 3D printer filament alarm that worked, but the process also brought some new problems and issues to the surface that I hadn’t foreseen when I first started. Today I’m going to dive further into the prototyping process to gain some insight on designing for a well-specified problem. What I came up with is an easy to build pendant that passively hangs from the filament and alerts you if anything about that changes.

I began with a need to know when my 3D printer was out of filament, so that I could drop whatever I was doing and insert a new spool of filament right up against the end of the previous spool. By doing this within four minutes of the filament running out, printing very large jobs could continue uninterrupted. The device I designed was called Mister Screamer.

Continue reading “Improving Mister Screamer; An 80 Decibel Filament Alarm”

How To Build Your Own Google AIY Without The Kit

Google’s voice assistant has been around for a while now and when Amazon released its Alexa API and ported the PaaS Cloud code to the Raspberry Pi 2 it was just a matter of time before everyone else jumped on the fast train to maker kingdom. Google just did it in style.

Few know that the Google Assistant API for the Raspberry Pi 3 has been out there for some time now but when they decided to give away a free kit with the May 2017 issues of MagPi magazine, they made an impression on everyone. Unfortunately the world has more makers and hackers and the number of copies of the magazine are limited.

In this writeup, I layout the DIY version of the AIY kit for everyone else who wants to talk to a cardboard box. I take a closer look at the free kit, take it apart, put it together and replace it with DIY magic. To make things more convenient, I also designed an enclosure that you can 3D print to complete the kit. Lets get started.

Continue reading “How To Build Your Own Google AIY Without The Kit”

Music Reading For Machines

“Dammit Jim, I’m a hacker, not a musician!”, to paraphrase McCoy Scotty from the original Star Trek series. Well, some of us are also musicians, some, like me, are also hack-musicians, and some wouldn’t know a whole note from a treble clef. But every now and then the music you want is in the form of sheet music and you need to convert that to something your hack can play. If you’re lucky, you can find software that will read the sheet music for you and spit out a MIDI or WAV file. Or, as with my hand-cranked music player, you may have to read just enough of the music yourself to convert musical notes to frequencies for something like a 555 timer chip. We’ll dive into both cases here.

Continue reading “Music Reading For Machines”

The Textile Bench

What’s on your bench? Mine’s mostly filled with electronic test equipment, soldering kit, and computers. I’m an electronic engineer by trade when I’m not writing for Hackaday, so that’s hardly surprising. Perhaps yours is like mine, or maybe you’ve added a 3D printer to the mix, a bunch of woodworking tools, or maybe power tools.

So that’s my bench. But is it my only bench? On the other side of the room from the electronics bench is a sturdy folding dining table that houses the tools and supplies of my other bench. I’m probably not alone in having more than one bench for different activities, indeed like many of you I also have a messy bench elsewhere for dismantling parts of 1960s cars, or making clay ovens.

My textile bench, with a selection of the equipment used on it.

The other bench in question though is not for messy work, in fact the diametric opposite. This is my textile bench, and it houses the various sewing machines and other equipment that allow me to tackle all sorts of projects involving fabric. On it I’ve made, modified, and repaired all sorts of clothing, I’ve made not-very-successful kites, passable sandals, and adventurous tent designs among countless other projects.

Some of you might wonder why my textile bench is Hackaday fodder, after all it’s probably safe to assume that few readers have ever considered fabricating their own taffeta ball gown. But to concentrate only on one aspect of textile work misses the point, because the potential is there for so much cross-over between these different threads of the maker world. So I’m going to take you through my textile bench and introduce you to its main tools. With luck this will demystify some of them, and maybe encourage you to have a go.

Continue reading “The Textile Bench”