Sometimes you might need to use assembly sometime to reach your project objectives. Previously I’ve focused more on embedding assembly within gcc or another compiler. But just like some people want to hunt with a bow, or make bread by hand, or do many other things that are no longer absolutely necessary, some people like writing in assembly language.
In the old days of DOS, it was fairly easy to write in assembly language. Good thing, because on the restricted resources available on those machines it might have been the only way to get things to fit. These days, under Windows or Linux or even on a Raspberry Pi, it is hard to get oriented on how to get an assembly language off the ground.
2016 is the year of the consumer 3D printer. Yes, the hype over 3D printing has died down since 2012. There were too many 3D printers at Maker Faire three years ago. Nevertheless, sales of 3D printers have never been stronger, the industry is growing, and the low-end machines are getting very, very good.
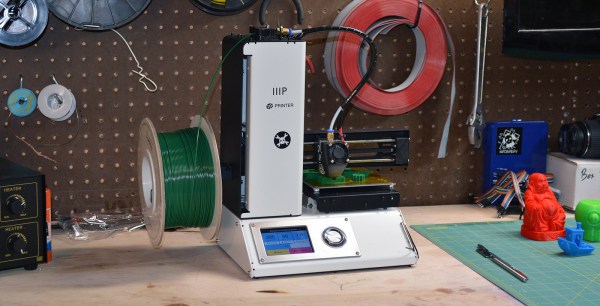
Printers are also getting cheap. At CES last January, Monoprice, the same company you buy Ethernet and HDMI cables from, introduced a line of 3D printers that would be released this year. While the $300 resin-based printer has been canned, Monoprice has released their MP Select Mini 3D printer for $200. This printer appeared on Monoprice late last month.
My curiosity was worth more than $200, so Hackaday readers get a review of the MP Select Mini 3D printer. The bottom line? There are some problems with this printer, but nothing that wouldn’t be found in printers that cost three times as much. This is a game-changing machine, and proof 2016 is the year of the entry-level consumer 3D printer.
Makerbot is in the gutter, 3D Systems and Stratasys stock is only a shadow of their 2014 glory, but this is the best year 3D printing has ever had. Machines are now good and cheap, there’s a variety of various thermoplastic filaments, and printing useful objects – instead of just plastic trinkets – is becoming commonplace.
The standard rectilinear infill from Slic3r
There’s one area of 3D printing that hasn’t seen as much progress, and it’s the software stack. Slicing, the process of turning a 3D object into a Gcode file for a printer has been basically the same for the last few years. Dual extrusion is still a mess, and automated bed leveling is still in its infancy.
One aspect of slicing that has been severely overlooked is infill. Obviously, you don’t want to print plastic trinkets completely solid – only the outside surface matters, and a part with 100% infill is just a waste of plastic. Different slicers have come up with different ways of filling the inside of a print, usually with a grid of squares, triangles, or hexagons.
While the most popular methods of filling in a 3D printed objects do the job of adding a little bit of strength to a print and supporting the top layers of a print, it’s not an ideal solution. The desired strength of the finished part is never taken into account, print artifacts are sometimes visible through the side of a print, and the spacing of the infill grid is completely arbitrary. You can only set a percentage of infill, and telling a slicer to make an internal support grid with 10mm spacing is impossible.
Type A Machines just changed all of this. With the release of their public beta of Cura Type A, the infill for a 3D printed part is also 3D. The dimensions of the infill are predictable, opening the door to stronger and better looking parts.
From the Type A press literature and white paper, this new type of ‘infill’ isn’t; it’s more properly referred to as ‘internal structure’, with proper dimensions between infill features. Instead of a grid of squares or triangles stacked one layer on top of each other, it’s a true structure, with the infill following the perimeter of the 3D printed object.
Generating 3D Infill
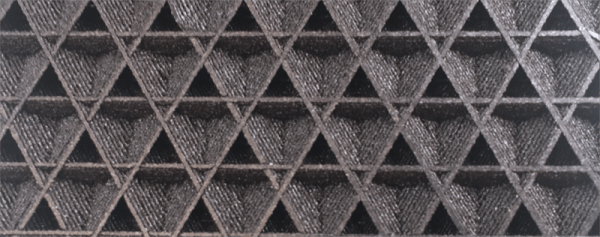
Infill generated from Type A Machine’s Cura beta. Note the 3D structure of the infill.
Right now, infill is generated in a slicer by specifying a percentage. Zero percent infill means a hollow object, and 100% infill is a completely solid part. These two edge cases are easy, but anything else means the slicer must fill the part with filament in a grid of tessellating shapes, either rectangles, triangles, or hexagons. With current slicers, the dimensions of this internal structure are, for all practical purposes, random. Printing an object with 20% infill might mean a grid of squares with 5mm or 2mm spacing. Telling the slicer to infill a part with a grid of squares spaced 10mm apart is impossible.
Type A Machine’s latest Cura release changes all of this, allowing a designer to set a precise distance between rows and columns of infill. By defining infill in absolute dimensions, this allows for stronger parts using less infill.
Absolute dimensioning is only one feature of the Type A Machine’s latest release of Cura. Even more exciting is the development of 3D internal structure. Instead of stacking layers of squares, triangles, or hexagons on top of each other, Type A Machine’s Cura uses an infill of cubes turned on their side. While each individual layer of infill looks like a series of triangles and irregular hexagons, when assembled into a printed 3D object, this infill forms a true 3D structure.
The closest comparison to this sort of structure is the difference between graphite and diamond. Both of these materials are made out of the same element, carbon. The physical structure of graphite is just, 1-atom-thick layers of graphene, producing a relatively weak material. Diamond, on the other hand, has a true 3D structure and is one of the hardest materials known to man. While adding 3D structure to the infill of 3D printed objects won’t make the objects any stronger, it will drastically reduce delamination, and be much more resistant to stresses in all three dimensions.
While Type A Machines has done some great work here, it does mean there’s yet another version of Cura to deal with. Type A Machine’s Cura, in addition to the LulzBot edition and the original are now the defacto standard for turning 3D objects into printed parts. Having an open source solution is great, but forking the development this much surely can’t be ideal.
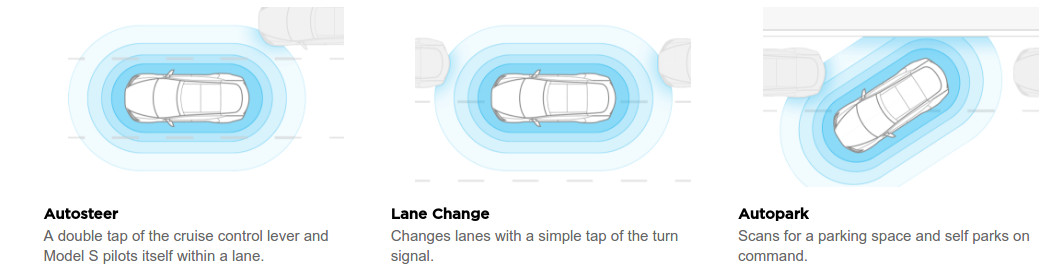
Between Tesla Motors’ automobiles and SpaceX’s rockets, Elon Musk’s engineers just have to be getting something right. In part, SpaceX’s success in landing their first stage rockets is due to analysis of telemetry data. You can see some of the data from their launch vehicles on the live videos and there is surely a lot more not shown.
An article in MIT Technology Review provides similar insights in how Tesla came from behind in autonomous vehicle operation by analyzing telemetry from their cars. Since 2014 their Model S received an increasing number of sensors that all report their data over the vehicle’s always-on cellular channel. Sterling Anderson of Tesla reported they get a million miles of data every 10 hours.
Image Credit Tesla
The same approach can help us to improve our systems but many believe creating a log of key data is costly in time and resources. If your system is perfect (HA HA!) that would be a valid assessment. All too often such data becomes priceless if analysis explains why your drone or robot wanted to go left into a building instead of right into the open field.
My heyday in programming was about five years ago, and I’ve really let my skills fade. I started finding myself making excuses for my lack of ability. I’d tackle harder ways to work around problems just so I wouldn’t have to code. Worst of all, I’d find myself shelving projects because I no longer enjoyed coding enough to do that portion. So I decided to put in the time and get back up to speed.
Normally, I’d get back into programming out of necessity. I’d go on a coding binge, read a lot of documentation, and cut and paste a lot of code. It works, but I’d end up with a really mixed understanding of what I did to get the working code. This time I wanted to structure my learning so I’d end up with a more, well, structured understanding.
However, there’s a problem. Programming books are universally boring. I own a really big pile of them, and that’s after I gave a bunch away. It’s not really the fault of the writer; it’s an awkward subject to teach. It usually starts off by torturing the reader with a chapter or two of painfully basic concepts with just enough arcana sprinkled in to massage a migraine into existence. Typically they also like to mention that the arcana will be demystified in another chapter. The next step is to make you play typist and transcribe a big block of code with new and interesting bits into an editor and run it. Presumably, the act of typing along leaves the reader with such a burning curiosity that the next seventeen pages of dry monologue about the thirteen lines of code are transformed into riveting prose within the reader’s mind. Maybe a structured understanding just isn’t worth it.
I wanted to find a new way to study programming. One where I could interact with the example code as I typed it. I wanted to end up with a full understanding before I pressed that run button for the first time, not after.
When I first read about literate programming, my very first instinct said: “nope, not doing that.” Donald Knuth, who is no small name in computing, proposes a new way of doing things in his Literate Programming. Rather than writing the code in the order the compiler likes to see it, write the code in the order you’d like to think about it along with a constant narrative about your thoughts while you’re developing it. The method by which he’d like people to achieve this feat is with the extensive use of macros. So, for example, a literate program would start with a section like this:
In this installment of Minimal MQTT, I’m going to cover two loose ends: one on the sensor node side, and one on the MQTT server side. Specifically, I’ll tackle the NodeMCU’s sleep mode to reduce power and step you through bridging MQTT servers to get your data securely out of your home server and into “the cloud”, which is really just other people’s servers.
If you’re just stepping into this series now, you should really check out the other three posts, where I set up a server, then build up some sensor nodes, and then flesh-out a few ways to control everything from your phone or the web. That’s the coolest material, anyway. This last installment just refines what we’ve built on. Let’s go!
There are a variety of methods for reflowing a circuit board, but they all rely on a single principle: heat up the solder paste (a mixture of flux and solder) until the flux burns off and the solder becomes liquid, and then cool it down. Accomplishing this once or twice is easy; once you’ve played with a hot plate you’ll swear off through hole. Scaling it up and doing it repeatedly with high yield is extremely challenging, though. Continue reading “Tools Of The Trade – Reflow”→