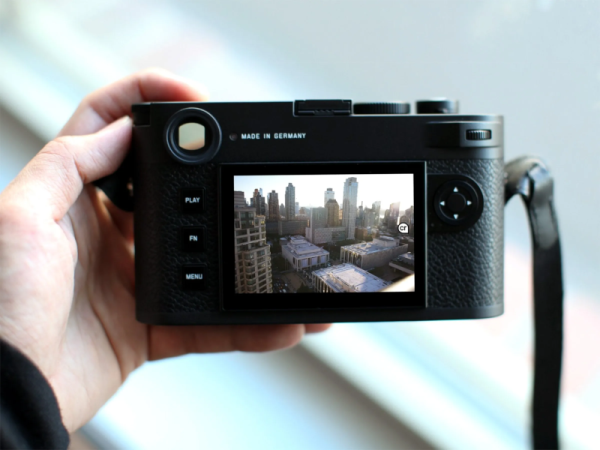
The build relies upon a regular micro servo to handle rotating the turntable. However, it has been modified from stock to rotate 360 degrees instead of its usual 180 degree range of motion. This is a common hack that allows servos to be used for driving wheels or other rotating mechanisms. In this case, though, any positional feedback is ignored. Instead, the servo is just used as a conveniently-geared motor, with its speed controlled via a potentiometer. A CD covered in paper is used as a turntable, with the electronics and motor assembled in a cardboard base.
The megapixel wars of a decade ago saw cameras aggressively marketed on the resolution of their sensors, but as we progressed into the tens of megapixels it became obvious even to consumers that perhaps there might be a little more to the quality of a digital camera than just its resolution. Still, it’s a frontier that still has a way to go, even if [Yunus Zenichowski]’s 489 megapixel prototype is a bit of an outlier. As some of you may have guessed it’s a scanner camera, in which the sensor is a linear CCD that is mechanically traversed over the focal plane to capture the image line by line.
In the 3D printed shell are the guts of a cheap second-hand Canon scanner, and the lens comes from a projector. Both these components make it not only one of the highest resolution cameras we’ve ever brought you, but also by no means the most expensive. It’s definitely a work in progress and the results of a sensor designed for the controlled environment of a document scanner being used with real-world light leave something to be desired, but even with the slight imperfections of the projector lens it’s still a camera capable of some fascinating high-resolution photography. The files are all available, should you be interested, and you can see it in action in the video below the break.
If you’re at all into nostalgic cameras, you’ve certainly seen the old Brownie from Kodak. They were everywhere, and feature an iconic look. [JGJMatt] couldn’t help but notice that you could easily find old ones at a good price, but finding and developing No. 117 film these days can be challenging. But thanks to a little 3D printing, you can install an ESP32 camera inside and wind up with a modern but retro-stylish camera. The new old camera will work with a memory card or send data over WiFi.
The Brownie dates back to 1900 and cost, initially, one dollar. Of course, a dollar back then is worth about $35 now, but still not astronomical. After cleaning up and tuning up an old specimen, it was time to fire up the 3D printer.
There are also mods to the camera to let it accept an M12 lens. There are many lenses of that size you can choose from. There are a few other gotchas, like extending the camera cable, but it looks like you could readily reproduce this project if you wanted one of your very own.
To be fair, there’s a lot to the optical story here, which [volzo] goes over in ample detail. The short version of it is that with the right arrangement of optical elements, it’s possible to manipulate the perspective of a photograph for artistic effect, up to the point of reversing the usual diminishment of the apparent size of objects in the scene that are farther away from the camera. Most lenses do their best to keep the perspective of the scene out of this uncanny valley, although the telecentric lenses used in some machine vision systems manipulate the perspective to make identical objects within the scene appear to be the same size regardless of their distance from the camera. A hypercentric lens, on the other hand, turns perspective on its head, making near objects appear smaller than far objects, and comically distorts things like the human face.
[volzo]’s hypercentric camera uses a 700-mm focal length Fresnel lens mounted on a motorized gantry, which precisely positions a camera relative to the lens to get the right effect. A Raspberry Pi controls the gantry, but it’s not strictly needed for the hypercentric effect to work. Lighting is important, though, with a ring of LEDs around the main lens providing even illumination of the scene. The whole setup as well as the weirdly distorted portraits that result are shown in the video below.
The Paragraphica doesn’t actually take photographs at all. Instead, it uses GPS to determine the user’s current position. It then feeds the address, time of day, weather, and temperature into a paragraph which serves as a prompt for an AI image generator. It also uses data gathered from various APIs to determine points of interest in the immediate area, and feeds those into the prompt as well. It then generates an artificial image that is intended to bear some resemblance to the prompt, and ideally, the real-world scene. In place of a lens, it bears a 3D printed structure inspired by the star-nosed mole, which feels its way around in lieu of using its eyes.
Three dials on the Paragraphica control its action. The first dial controls the radius of the area which the prompt will gather data about; it’s akin to setting the focal length of the lens. The second dial provides a noise seed value for the AI image generator, and the third dial controls how closely the AI sticks to the generated textual prompt.
The results are impressive, if completely false and generated from scratch. The Paragraphica generates semi-believable photos of a crowded alley, a public park, and a laneway full of parked cars. It’s akin to telling a friend where you are and what you’re seeing over the phone, and having them paint a picture based on that description.
Through their unique abilities and stolen data sets, AI image generators are proving controversial to say the least. As all good art does, Paragraphica explores this and raises new questions of its own.
While there have been hiccups here and there, the general trend of electronics is to decrease in cost or increase in performance. This can be seen in fairly obvious ways like more powerful and affordable computers but it also often means that more powerful software can be used in other devices without needing expensive hardware to support it. [Manawyrm] and [Toble_Miner] found this was true of a particular inexpensive thermal camera that ships with Linux installed on it, and found that this platform was nearly perfect for tinkering with and adding plenty of other features to turn it into a much more capable tool.
The duo have been working on a SC240N variant of the InfiRay C200 infrared camera, which ships with a Hisilicon SoC. The display is capable of displaying 25 frames per second, making this platform an excellent candidate for modifying. A few ports were added to the device, including USB and MicroSD, and which also allows the internal serial port to be accessed easily. From there the device can be equipped with the uboot bootloader in order to run essentially anything that could be found on any other Linux machine such as supporting a webcam interface (and including a port of DOOM, of course). The duo doesn’t stop at software modifications though. They also equipped the camera with a lens, attached magnetically, which changes the camera’s focal length to give it improved imaging capabilities at closer ranges.
While the internal machinations of this device are interesting, it actually turns out to be a fairly capable infrared camera on its own as well. The hardware and software requirements for these devices certainly don’t need a full Linux environment to work, and while we have seen thermal cameras that easily fit in a pocket that are based on nothing any more powerful than an ESP32, it does tend to simplify the development process dramatically to include Linux and a little more processing power if you can.
[Sebastian Staacks] built a video booth for his wedding, and the setup was so popular with family, that it was only fitting to do one better and make some improvements to the setup, Matrix-style. The “bullet time” video effect was introduced by the classic movie franchise and makes for a splendid video transition effect for video montages.
Hardware-wise, the effect is pretty expensive, requiring many cameras at various angles to be simultaneously triggered, in order to capture the subject in a fixed pose with a rotating camera. Essentially you need as many cameras as frames in the sequence, so even at 24 frames per second (FPS), that’s a lot of hardware. [Sebastian] cheated a bit, and used a single front-facing camera for the bulk of the video recording, and twelve individual DSLRs covering approximately 90 degrees of rotation for the transition. More than that is likely impractical (not to mention rather expensive) for an automated setup used in as chaotic an environment as a wedding reception! So, the video effect is quite the same as in the movies, as this is a fixed pose, but it still looks pretty good.
A Pico-W hidden in there providing a BT connected interface button
[Sebastian] did consider going down the Raspberry Pi plus Pi-cam route, but once you add in a lens and the hassle of the casing and mounting hardware, not to mention availability and cost, snagging a pile of old DLSRs looks quite attractive. Connectivity to the camera is a simple 3.5 mm jack for the focus and trigger inputs, with frames read out via a USB connection.
For practical deployment, the camera batteries were replaced with battery eliminator adapters which step-up the 5 V from the USB connection to the 7.4 V the cameras need, but the current spike produced by the coordinated trigger of all twelve cameras overwhelmed any power supply available. The solution, to be practical, and not at all elegant, is to just have lots of power supplies hidden in a box. Sometimes you’ve just got a job to do.
Reproducing this at home might be a bit awkward unless you have exactly the same hardware to hand, but the principles are sound, and there are a few interesting details to dig into, if you were so inclined.