CitizenWatt And The Power Of Community

Depending upon where you live in the world, the chances are that your national or local government, or your utility company, has smart meters on their agenda. The idea is that these network-connected energy meters for your gas and electricity supply will allow greater control of energy usage and lead to lower costs through more efficient use of that energy. Bold plans have been advanced for meters that exert control over your higher-power appliances such as water heaters, washing machines, or home heating systems, able to turn them off or on depending on the time of day, spot price of energy, or load on the grid as a whole.

These devices are not without controversy though. Privacy concerns for example, centred on the amount of information about individuals that could be gleaned from the data they collect. Or security, that a vulnerability in an internet-connected electronic device fitted to millions of homes and with control over high-power appliances could be catastrophic if successfully exploited.

In a small area of Paris, they are trying to reap some of the benefits of smart meters for a community without some of those risks. CitizenWatt (French language, Google Translate link) is an open-source smart energy monitor that provides some of the benefits of a smart meter while allowing its owner to retain control of the data it generates by sharing data only with their consent. The entire project was born of an association between Citoyens Capteurs (Citizen Sensors, French language, Google Translate link), the hackEns (French language, Google Translate link) hackspace, the Fabelier FabLab, and the City of Paris.

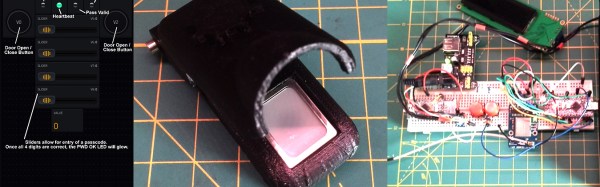
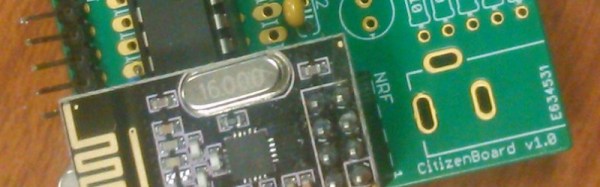
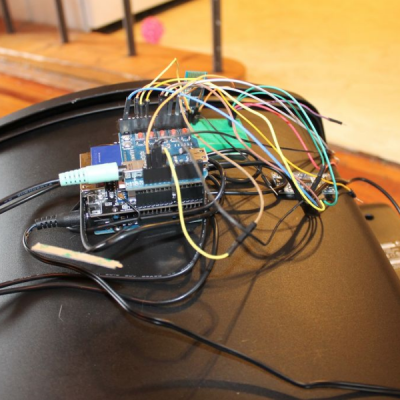
The CitizenWatt system comprises an electricity sensor and a base station. The sensor is a simple battery-powered device that takes the output from a current transformer clamped onto the electricity supply cable and feeds it via an ATMEGA8 microcontroller to a 2.4GHz RF link. The base station is a Raspberry Pi which retrieves the data from the RF, stores it, and allows the user to view it through a web interface. Both the sensor code and hardware files, and the files for the Raspberry Pi base station are freely available on GitHub.

In keeping with the open nature on their project, the CitizenWatt team organised a series of events at which the families who were part of their trial in a Paris suburb were given the chance to build their own sensor boards, for many of them the first time they had handled a soldering iron.

We have seen quite a few smart meters on these pages over the years. There is this one based on a Spark Core, this one based on an ESP8266, and this one provided by a utility company, the data of which can be accessed. CitizenWatt is a worthy project to join them in its own right, but its involvement of a local community of non-makers is what sets it apart. We applad this aspect of the project, and we wish we saw more like it.

One Man’s Quest To Spend Less TIme In The Basement

[Lars] has a second floor apartment, and the washing machines and clothes dryers are in the basement. This means [Lars] has spent too much time walking down to the basement to collect his laundry, only to find out there is 15 minutes left in on the cycle. There are a few solutions to this: leave your load in the washer like an inconsiderate animal, buy a new, fancy washer and dryer with proprietary Internet of Things™ software, or hack together a washer and dryer monitoring solution. We all know what option [Lars] chose.

Connecting a Pi to the Internet and serving up a few bits of data is a solved problem. The hard part is deciding which bits to serve. Washers and dryers all have a few things in common: they both use power, they both move and shake, they make noise, and their interfaces change during the wash cycle. [Lars] wanted a device that could be used with washers and dryers, and could be used with other machines in the future. He first experimented with a microphone, capturing the low rumble of a washer sloshing about and a dryer tumbling a load of laundry. It turns out an accelerometer works just as well, and with a sensor securely fastened to a washer or dryer, [Lars] can get a pretty good idea if it’s running or not.

With a reliable way to tell if a washer or dryer is still running, [Lars] only had to put this information on his smartphone. He ended up using PushBullet, and quickly had an app on his phone that told him if his laundry was done.


Raspberry_Pi_LogoSmall

The Raspberry Pi Zero contest is presented by Hackaday and Adafruit. Prizes include Raspberry Pi Zeros from Adafruit and gift cards to The Hackaday Store!
See All the Entries || Enter Your Project Now!

Robotic Pets Test An Automatic Pet Door

Lots of people get a pet and then hack solutions that help them care for their new friend, like an automatic door to provide access to the great outdoors. Then again, some people build the pet door first and then build the pets to test it.

It’s actually not quite as weird as it sounds. [Amir Avni] and his wife attended a recent GeekCon and entered the GeekCon Pets event. GeekCon is a cooperative rather than competitive hackathon that encourages useless builds as a means to foster community and to just have some fun. [Amir] and his wife wanted to build a full-featured automatic pet door, and succeeded – with NFC and an ESP8266, the stepper-powered door worked exactly as planned. But without any actual animal companions to test the system, they had to hack up a few volunteers. They came up with a 3D-printed dog and cat perched atop wireless cars, and with NFC tags dangling from their collars, the door was able to differentiate between the wandering ersatz animals. The video below the break shows the adorable plastic pals in action.

It’s clear from all the pet doors and automatic waterers and feeders we’ve seen that hackers love their pets, but we’re pretty sure this is the first time the pet itself was replaced by a robot. That’s fine for the test environment, but we’d recommend the real thing for production.

Continue reading “Robotic Pets Test An Automatic Pet Door”

Banish Dangerous Shadows Under Kitchen Cabinets

[nebulous] has a lot of problems with his kitchen cabinets. Aside from a noted lack of micro-controllers, he was especially suspicious of the dark spaces under them. Anything could be hiding there.

The core of the project is a $10 Arduino-compatible esp8266 board from digistump. The board is powered by the five volt regulator of an L298N motor driver module hooked to a power-supply. All this controls a set-of LED strips adhered to the underside of the cabinets with the traditionally bad adhesive strips with which they come standard. We can predict an hour spent bent awkwardly cursing at them, a hot-glue gun in one hand, in [nebulous]’s future. The whole set-up is housed in a SparkFun cardboard box above the microwave. You can barely tell it’s not a commercial product.

We’re not certain if we like a future where even our cabinetry has an IP address. However, this is a good weekend project that could make all our cabinetry brighter, safer, and more connected.

Candy Dispenser Riddles You This

A while ago, someone brought in a candy machine to AdaCore. Sometime after, [Fabien-Chouteau] was challenged to make it more… fun. So he decided to make it harder to receive candy — you know, to encourage knowledge growth — and discourage overeating of tasty treats.

The dispenser itself is pretty simple. It consists of a hopper containing the candies, a motor with a worm-gear for delivering said candies, and a small IR sensor that detects when you wave your hand underneath (in order to receive those sweet sweet candies).

He decided to leave the system operating as is, and only interrupt the connection to the motor feed. That way when you wave your hand underneath, you have to answer a skill testing question before you proceed…

Continue reading “Candy Dispenser Riddles You This”

Geodesic Dome Build At Rev Space Den Haag

[Morphje] has always wanted to build a geodesic dome. The shape and design, and the possibility of building one with basic materials interest him. So with the help of a few friends to erect the finished dome, he set about realising his ambition by building a 9.1 metre diameter structure.

The action took place at Rev Space (Dutch language site), the hackspace in The Hague, Netherlands. [Morphje] first had to create a huge number of wooden struts, each with a piece of tube hammered down to a flat lug set in each end, and with a collar on the outside of the strut to prevent it from splitting. The action of flattening the ends of hundreds of pieces of tube is a fairly simple process if you own a hefty fly press with the correct tooling set up in it, but [Morphje] didn’t have that luxury, and had to hammer each one flat by hand.

The struts are then bolted together by those flattened tube lugs into triangular sections, and those triangles are further bolted together into the final dome. Or that’s the theory. In the video below you can see they make an aborted start assembling the dome from the outside inwards, before changing tack to assemble it from the roof downwards.

This project is still a work-in-progress, [Morphje] has only assembled the frame of the dome and it has no covering or door as yet. But it’s still a build worth following, and we look forward to seeing the finished dome at one or other of the European maker events in the summer.

Continue reading “Geodesic Dome Build At Rev Space Den Haag”

Wood Stove Runs On Arduino Power

Ahh, sweet scope creep! Usually it’s the death of a nice, simple little hack. But once in a hundred times, a small hack doesn’t get buried under the extra features, but instead absorbs them in stride and blossoms into a beautiful system. [rockfishon]’s Arduino-powered wood stove controller is one of these beautiful exceptions. (OK, we’d admit that it could use a fancier faceplate.)

He started off simply enough, wanting to connect a thermocouple to an Arduino, read out the value, and issue an alarm when the temperature got too high. But who could stop there? Just one air-baffle servo away from a closed-loop heating control system? So [rockfishon] added a display and a few more buttons and has a system that will keep his wood-burning stove running at exactly the right temperature, even overnight when nobody’s around to tend it. As a bonus, everything is logged for later analysis.

The code is relatively straightforward, and can be found in this Gist. If you’d like to build your own, you’ll need an Arduino Mega and can then get the control board made for you at OSHPark. Judging from the comments on the Hackaday.io project page, a couple people have already tried this out. We’ve seen other wood-stove monitoring hacks before, but this is the first we’ve seen that closes the control loop. Very cool.