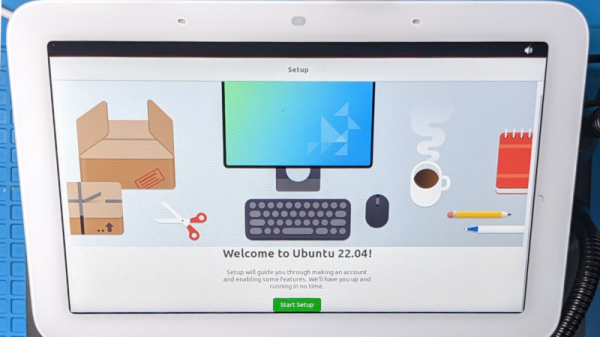
View of a well-organized workspace in front of a window view to outdoors

How To Optimize Your Workspace: Analyze How You Work

[Jay Carlson] has shared some fantastic guidance on how to optimize one’s home workspace, and you just might want to emulate some of his layout, especially if you routinely juggle multiple projects. He makes the important point that different people have different needs, so one size does not fit all. Optimizing one’s workspace must first take into account what kind(s) of work one does, and many of his tips and tricks are pretty broadly applicable.

A rack of trays, each with a project
Looking online for these? A common industry term is “bun rack”. This one is “half-height” in size.

[Jay] works on embedded systems, and often switches between many different jobs and projects. Get your notepads ready, because there are plenty of great takeaways.

For example, to get a good top-down camera view of what’s on the workbench, he uses a camera mounted on an articulated arm (the kind that usually has a lamp attached to the end.) This makes the camera easy to deploy and easy to stow, and he can effortlessly save footage or share video with colleagues online.

Another great tip is using what most of us would call cafeteria trays and a matching rack. With each tray devoted to a different project or version of hardware, it makes switching between jobs as simple as sliding in one tray and pulling out another. It’s also a highly space-efficient way to store a lot of in-progress hardware. [Jay] gives a detailed walkthrough of his workspace and explains every decision, it’s well worth a read.

It’s always better to save space, as long as doing so doesn’t negatively impact the work itself. If you’re looking for space-saving tips, be sure to check out this tiny workshop’s space-saving hacks for more ideas.

Toilet Paper Warmer Is A Unique Chinese Luxury

[Handy Geng] lives in Baoding, China, where average winter temperatures can get as low as −7.7 °C (18.1 °F). Rather than simply freezing in the cold when using the bathroom, he decided he could do better. Thus came about his rather unique toilet paper heating system.

The build uses a gas burner heating up a wok. Toilet paper is fed into the wok body via motorized rollers salvaged from what appears to be an old counterfeit money detector. The wok is then shaken by a second motor in order to more evenly heat the toilet paper within. The burner can then be turned off, and the lid of the wok opened in order to gain access to the toasty toilet paper.

The system heats the toilet paper to a scorching 75 °C (167 °F); a little too warm to comfortably touch, but thankfully toilet paper doesn’t have a lot of thermal mass so cools off relatively quickly. It’s also thankfully well below the auto-ignition temperature of paper of 451 °F.

It’s a noisy, clanging machine that nonetheless provides the same warmth and comfort that you’re probably more familiar with from the office photocopier. It’s not [Handy Geng]’s first bathroom hack, either. Video after the break.

Continue reading “Toilet Paper Warmer Is A Unique Chinese Luxury”

A Lego cup holder with a glass of water and electronics on a breadboard

LEGO Cup Holder Helps You To Stay Hydrated

Eat more fruit, exercise more, drink more fluids; early January is traditionally the time to implement New Year’s resolutions. Most of the common ones simply require willpower, but if it’s staying hydrated that you’re targeting, then some help is available. [Pepijn de Vos] designed a LEGO cup holder and an accompanying desktop app that tell you exactly how much water you’ve had so far, making it easier to get to those eight glasses a day.

The basic idea is simple: the cup holder contains a load cell that senses the weight of your drinking vessel. If the weight decreases, then a message is sent to your PC detailing the amount lost. If the weight increases, then the glass must have been refilled and the previous weight is disregarded. This way, the app simply needs to add up all the amounts reported, without having to compensate for the weight of the empty glass.

The tricky bit was integrating a load cell into the LEGO structure. It required some fiddling with Flex System hoses to ensure the platform’s weight rested only on the load cell, while still being stable enough to safely hold a full glass of water. The load cell is read out through an amplifier and A/D converter, while the USB communication is handled by a Teensy 3.

[Pepijn] modified an existing GNOME desktop widget to display a cup icon and the total volume consumed, which seems to work pretty smoothly judging from the video embedded below. All the code and even a complete set of LEGO build instructions are available on the project’s Github page. If simply monitoring your fluid intake isn’t enough of a nudge for you, then check out this device that floods your desk if you don’t drink enough.

Continue reading “LEGO Cup Holder Helps You To Stay Hydrated”

A Gorgeous Desk With AMD Inside

We’re the first to admit that we don’t see much woodworking here at Hackaday. But this desk with a PC inside from [John Heisz] is just too gorgeous not to share.

The build is mostly cherry veneered half-inch plywood and real cherry. There are dozens of angles and complex pieces that all fit together in a valuable and powerful desk. The centerpiece of the desk is the air intake grill with a 2019 Apple Mac Pro-like finish. [John] mentions that he previously did it by hand with just a parked drill bit and some patience, but he vastly prefers the automated way. Two cubbies flank the center vent, made from plywood with cherry veneers glued on. A USB hub is hidden at the back in one of the cubbies, exposing all the I/O for the AMD-powered desktop PC hidden inside. The top of the desk is hinged to allow easy access to the PC. [John] asserts that he made the coolest desk in the known universe. We don’t know if we can say it’s the coolest, but we certainly appreciate the process and expertise that made it.

After you’ve finished your new desk build inspired by [John]’s project, perhaps you might be interested in a levitating turbine desk toy to seal the deal. Video after the break.

Continue reading “A Gorgeous Desk With AMD Inside”

A world map with a small magetic plane sitting on Japan

“Window To The World” Brings Far-Off Places To Your Home

For those who love travelling around the world, life hasn’t been great for the past two years. World-wide lockdowns and travel restrictions have kept many people stuck inside their own homes when they would rather be jetting off to distant cities. If you’re one of those bothered by Wanderlust, [Alex Shakespeare] might have a solution for you: a window that shows a live image from another location around the world.

A window showing a live webcam feed
The Window, showing a live feed from Tokyo.

To make the experience as lifelike as possible, [Alex] used an actual window in his London home and mounted a large TV behind it. A wall-mounted map enables him to choose any of five locations by moving a little magnetic plane across the map. LEDs show the available spots, while magnetometers detect the motion of the aircraft. An ESP8266 then instructs a media server to connect to the appropriate livestream, which is subsequently displayed on the TV screen.

All of this is clever enough already, but [Alex] decided to go one step further and added a thermal sensor that detects the location of any persons standing near the display and shifts the image a little when they move. This simulates the perspective of looking out a real window, and should give the image a more life-like quality than if it were simply static.

The whole design is available on [Alex]’s GitHub page, ready to be replicated by anyone who wants to look out over some exotic location. If, instead, you want a way to reminisce about the places you’ve visited in the past, check out this cool souvenir globe. We’ve also seen a neat Google Maps based one a few years back.

Continue reading ““Window To The World” Brings Far-Off Places To Your Home”

The insides of a coffee machine replaced with new smart electronics

Add Smarts To Your Old Capsule Coffee Maker

Everyone has their preferred method of making (and consuming) coffee. While modern coffee makers are starting to come standard with IoT and ‘smart’ capabilities, owners of older models should fear not, as [Andreas Skoglund] shows how just about any old machine can be upgraded with the latest automation wizardry.

The most involved part of this conversion is removing the electronic guts of the Dolce Gusto donor machine, leaving just the original heater, pump and the control levers. With safety in mind, the user must make the machine ‘hot’ by configuring the levers and replacing the coffee capsule manually, otherwise no automated coffee magic can take place.

A low-tech relay powers on the coffee maker, with the entire logic supported by an off-the-shelf microcontroller. If you’re using a Particle.io controller, the provided instructions offer some helpful tips on automatically brewing your first beverage. From there it’s trivial to start using Home Assistant to set up various rules and schedules for your coffee drinking pleasure. You can even select whether you want a small or large cup.

There’s a few improvements that our coffee-starved hero suggests implementing, such as upgrading the power supply, as well as investing in refillable capsules to spite a certain global conglomerate corporation (plus it’s cheaper and much better for the environment). We’re not short on coffee-inspired hacks, so why not also check out this AI Powered Coffee Maker.

Continue reading “Add Smarts To Your Old Capsule Coffee Maker”

Weather Station Dumps CR2032 Cells, Gains 18650

Despite the fact that we’re rapidly approaching the year 2022, there are still an incredible number of gadgets out there that you’re expected to power with disposable batteries. Sure you can buy rechargeable stand-ins that come in the various shapes and sizes of the traditional alkaline cells, but that’s a stopgap at best. For some, if a new gadget doesn’t feature an internal Li-ion battery and standardized USB charging, it’s a non-starter.

[Danilo Larizza] is one of those people. Bothered by the fact that his Oregon Scientific weather station required a pair of CR2032 coin cells, he set out to replace them with an integrated rechargeable solution. The conversion ending up being easier to implement than he initially expected, and by his calculations, his solution should keep the unit up and running for nearly 40 days before needing to be topped off with a standard USB charger.

Wiring in the new battery.

The first step was determining how much power it actually took to run the weather station. Although the two CR2032 cells were wired in series, and therefore providing a nominal 6 V, he determined through experimentation with a bench power supply that it would run on as little as 3.2 volts. This coincides nicely with the voltage range for a single 18650 cell, and meant he didn’t need to add a boost converter into the mix. He notes the weather station does flash a “Low Battery” warning most of the time now, but that seems a fair price to pay.

Confident in the knowledge that the weather station could happily run with an 18650 cell connected in place of the original CR2032s, all [Danilo] needed to do was figure out a way to charge the battery up from time to time. To that end, he reached for a common TP4056 module. This handy little board is a great match for 18650 cells, and is so cheap that there’s really no excuse not to  have a few of them kicking around your parts bin. You never know when you might need to teach an old gadget new tricks.