A Simple (and Dirty) Bill Of Materials And Stock Management Utility

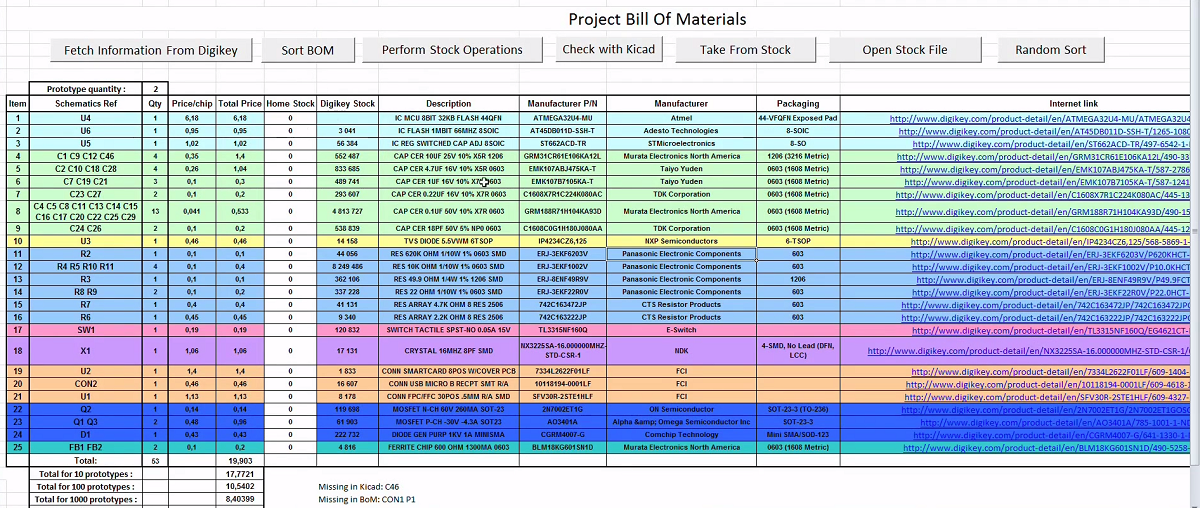
As many readers may already know, when I’m not featuring your projects or working on the mooltipass I try to make simple things that may be useful to electronics enthusiasts. My latest creation is a simple bill of materials generation tool, which can also do simple stock management. Unfortunately for Linux users, this utility is made using Visual Basic functions in an Excel file.

It works fairly simply: just enter your schematics’ components references in the excel sheet, along with the corresponding Digikey webpage address. Click on the “fetch” button and the script will automatically get all your component characteristics from the internet and tell you the component costs depending on the number of prototypes you want to make. Then click the “sort BoM” button and your BoM will automatically be sorted by component type and value. Another functionality allows you to check that all the components present in your BoM are also present on the (very simple) Kicad generated one. Finally, using another Excel sheet containing your current stock, the Bill of Materials will let you know if you have enough components for the assembly stage. A video of the tool in action is embedded after the break, and you can download the BoM template here (.XLSM file) and the corresponding stock file there (.XLSM file).

Continue reading “A Simple (and Dirty) Bill Of Materials And Stock Management Utility”

Build An In Line Network Bandwidth Monitor

[Kurt] likes to know what’s going on with his network. He already uses bandwidth checking software on his DD-WRT capable router, but he wanted a second opinion. So he built his own network monitor. [Kurt] started by building a passive Ethernet tap. He then needed a network interface chip that would serve his purposes. The common Wiznet chips used with Arduinos didn’t allow enough manipulation of raw packet data, so he switched to a Microchip ENC624J600 (PDF). The Microchip controller allowed him to count the bytes in the raw Ethernet packets.

With the Ethernet interface complete, [Kurt] turned his attention to a microcontroller to run the show. He started with an Arduino, but the lack of debugging quickly sent him to an Atmega128 in Atmel Studio. After getting the basic circuit working, [Kurt] switched over to a PIC24F chip. With data finally coming out of the circuit, he was able to tell that his original back-of-the-napkin calculations for bandwidth were wrong. [Kurt] created a PCB to hold the microcontroller, then wrote a Python program to plot the data output from his circuit. The bandwidth plot matched up well with the plot from DD-WRT. Now he just needs a giant LED matrix to show off his current network stats!

How Hacker News Page Rankings Really Work

Page rankings are the secret sauce of websites that automatically aggregate user submissions. The basic formula used by Hacker News was published a few years back. But there are several pieces of the puzzle that are missing from that specification. [Ken Shirriff] recently published an analysis that digs deeper to expose the article penalization system used by Hacker News’ ranking engine.

One might assume that the user up and down votes are what determine a page’s lifespan on the front page. But it turns out that a complex penalization system makes a huge difference. It takes into account keywords, and domain names but also weighs controversy. It’s a bit amusing to note that this article on the topic was itself penalized, knocking it off of the front page.

You can get the full details of the system from his post, but we found his investigation methods to be equally interesting. He scraped two pages of the news feed every minute using Python and the Beautiful Soup package (a pretty common scraping practice). This data set allowed him to compare the known algorithm with actual results. What was left were a set of anomalies that contained enough sense for him to reverse engineer the unpublished formulas being used.

Can An 8 Node Raspberry Pi Cluster Web Server Survive Hackaday?

Plenty of folks have used their Raspberry Pi as a web server. [Steve] however is the first 8 node load balanced pi cluster server we’ve run into.  While we have seen pi clusters before, they’ve never been pressed into service as a public facing web server. [Steve] has created a really nice informative website about the Raspberry Pi, and Linux in general. As his page views have increased, he’s had to add nodes to the server. Currently [Steve] sees about 45,000 page views per month.

At first glance it would seem that the load balance system would be the weak link in the chain. However, [Steve] did realize that he needed more than an Pi to handle this task. He built the load balancer using an old PC with 512MB of RAM and a 2.7GHz x86 CPU. The most important thing about the balancer is dual network interfaces, one side facing the internet, the other facing the Pi cluster. The balancer isn’t a router though. Only HTTP requests are forwarded. The Pi nodes themselves live on their own sub net. Steve has run some basic testing with siege, however nothing beats a real world test. We figured a couple of links in from Hackaday would be enough to acid test the system.

Monitor GitHub Activity With An RGB LED Matrix

tim-display

Ever wonder who is forking your code? [Jack] did, so he built a real time GitHub activity display for his company’s repositories. The display is based a Wyolum The Intelligent Matrix (TiM) board. The TiM is an 8 x 16 matrix of the ubiquitous WS2811/Smart Pixel/NeoPixel RGB LEDs with built-in controller. We’re seeing more and more of these serial LEDs as they drop in price. Solder jumpers allow the TiM to be used as 8 parallel rows of LEDs (for higher refresh rates), or connected into one long serial chain.

[Jack] wasn’t worried about speed, so he configured his board into a single serial string of LEDs. An Arduino drives the entire matrix with a single pin. Rather than reinvent the wheel, [Jack] used Adafruit’s NeoMatrix library to drive his display. Since the TiM uses the same LEDs as the Adafruit NeoPixel Matrix, the library will work. Chalk up another victory for open source hardware and software!

An Electric Imp retrieves Github data via WiFi and passes it on to the Arduino. This is a good use of a microcontroller such as the AVR on the Arduino. [Jack’s] display has a scrolling username. Every step in the scroll animation requires all the pixel data be clocked out to the TiM board. The Arduino can handle this while the IMP takes care of higher level duties.

Continue reading “Monitor GitHub Activity With An RGB LED Matrix”

Browsing The Web One Step At A Time

After modifying his new manual treadmill to fit under his standing desk, [Brian Peiris] found a way to let him stroll all over the internet.

After removing the treadmill’s original time/distance display, [Peiris] reverse engineered the speed sensor to send data to an Arduino and his PC.  We’ve seen a number of projects that interface treadmills with virtual worlds, but what really makes this project stand out is a simple script using the Throxy Python library which allows the treadmill to throttle his machine’s internet connection.

The end result is a browsing experience that reacts to how fast the user runs.  In the demonstration video, you can see Peiris tiptoe through images or jog through YouTube videos.  A minimum bandwidth setting keeps the connection live, so if you can’t make it all the way through that HD Netflix movie, taking a breather won’t time out the connection.

It’s certainly a great way to get in shape, or at the very least, it’ll make your ISP’s bandwidth cap feel a lot bigger.

Video after the jump.

Continue reading “Browsing The Web One Step At A Time”

Free Yourself From Social Media With Classical Conditioning

pavlov

While [Robert] and [Dan] should be working on their dissertation, they found they actually spend a whole lot of time whiling away their days on Facebook and other social media sites. Taking inspiration from a Skinner box, they rigged up their computer to shock them every time they surfed on over to Facebook.

Their build uses the UI inspector in OS X and a Python script to activate an Arduino connected to one of those trick ‘shocking chewing gum’ pranks. The contacts for this shocker are attached to a keyboard wrist rest, providing a wonderful tingling sensation whenever the guys surf on over to Facebook.

Because shocks just aren’t extreme enough, [Robert] and [Dan] took their build one step further by invoking the wrath of Mechanical Turk users. They wrote a Python script to look at their UI inspector and submit a job to Mechanical Turk whenever they logged on to Facebook. The result is a random person being paid $1.40 to yell at [Robert] or [Dan] over the phone for wasting time on Facebook.

Video below, and be sure to like this post on Facebook.

Continue reading “Free Yourself From Social Media With Classical Conditioning”