Laser Projector Ditches Galvanometer For Spinning Drum

Laser projectors like those popular in clubs or laser shows often use mirror galvanometers to reflect the laser and draw in 2D. Without galvos, and on a tight budget, [Vitaliy Mosesov] decided that instead of downgrading the quality, he would seek an entirely different solution: a spinning mirror drum.

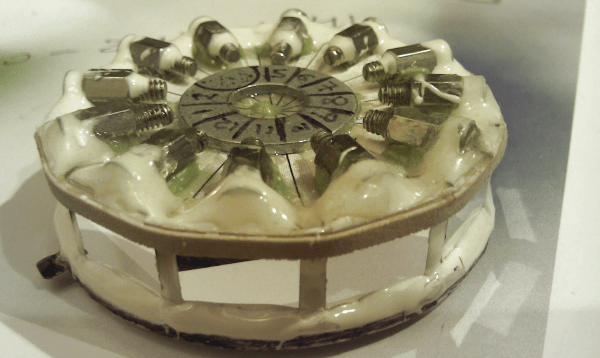
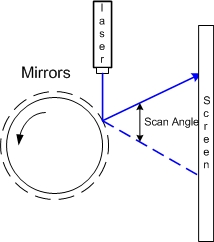
He fires a laser at a rotating drum with twelve mirror faces, each at a different adjustable vertical angle. The laser will hit a higher or lower point on the projection surface depending on which mirror it’s reflecting off – this creates resolution in the Y direction.

Timing the pulsing of the laser so that it reflects off the mirror at a certain horizontal angle provides the X resolution.

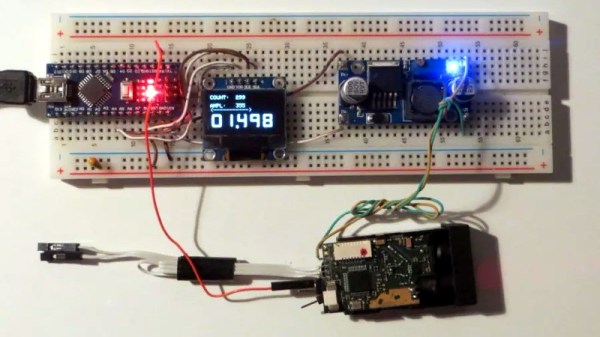
As you can already tell, speed and timing is critical for this to work. So much so that [Vitaliy] decided he wanted to overclock his Arduino – from 16 MHz to 24.576 MHz. Since this changes the baud rate, an AVR ISP II was used for programming after the modification, and the ‘duino’s hardware serial initialization had to be hacked too.

For the laser itself, [Vitaliy] designed some nifty driver circuitry, which can respond quickly to the required >50 kHz modulation, supply high current, and filter out voltage transients on the power supply (semiconductor lasers have no protection from current spikes).

On the motor side of things, closed loop control is essential. A photo-interrupter was added to the drum for exact speed detection, as well as a differentiator to clean up the signal. Oh, and did we mention the motor is from a floppy disk drive?

We’ve actually seen builds like this before, including a dot-matrix version with multiple lasers and one made apparently out of Meccano and hot-glue that can project a Jolly Wrencher. But this build, with its multiple, adjustable mirrors, is a beauty.  Check it out in action below.

Continue reading “Laser Projector Ditches Galvanometer For Spinning Drum”

Arduino Revives Junkyard Laser Cutter

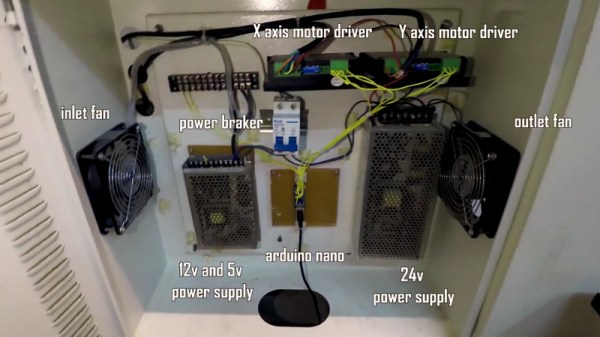
Some people have all the luck. [MakerMan] writes in to gloat tell us about a recent trip to the junkyard where he scored a rather serious looking laser cutter. This is no desktop-sized K40 we’re talking about here; it weighs in at just under 800 pounds (350 Kg), and took a crane to deliver the beast to his house. But his luck only took him so far, as closer inspection of the machine revealed it was missing nearly all of its internal components. Still, he had the frame, working motors, and laser optics, which is a lot more than we’ve ever found in the garbage.

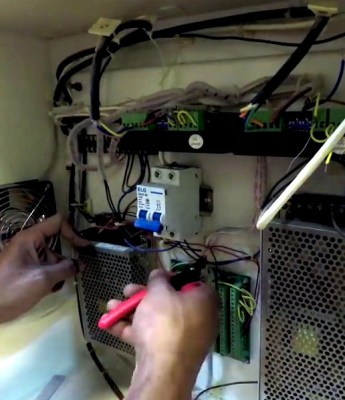
After a whirlwind session with his wire cutters, [MakerMan] stripped away most of the existing wiring and the original control board inside the electronics bay. Replacing the original controller is an Arduino Nano running Grbl, likely giving this revived laser cutter better compatibility with popular open source tools than it had originally. Even though the laser cutter was missing a significant amount of hardware, he did luck out that both the motor drivers were still there (and working) as well as the dual power supplies to run everything.

After a successful motion test, [MakerMan] then goes on to install a new 90W laser tube. Supporting the tube is a rigged up water cooling system using a plastic jug and a cheap bilge pump. He also added an air assist system, complete with side mounted compressor. This pushes air over the laser aperture, helping to keep smoke and debris away from the beam. Finally, a blower was installed in the bottom of the machine with flexible ducting leading outside to vent out the smoke and fumes that are produced when the laser is in operation.

This machine is a considerable upgrade from the previous laser [MakerMan] built, and as impressive as this rebuild is so far, we’re interested in seeing where it goes from here. If you ask us, this thing is begging for an embedded LaserWeb server.

Continue reading “Arduino Revives Junkyard Laser Cutter”

Laser-Cut Mecanum Wheel For The Budget Roboticist

For the budding roboticist, omniwheels might be the next step in design patterns from your everyday “getting-started” robot kits. These wheels consist of tiny rollers that sit on the perimeter of the wheel and enable the wheel to freely slide laterally. With independent motor control of each wheel, a platform can freely locomote sideways by sliding on the rollers. You might think: “a wheel made of wheels? That sounds pricey…”–and you’d be right! Fear not, though; the folks at [Incubhacker] in Belgium have you covered with a laser-cut design that’s one-click away from landing on your workbench.

For anyone who’s tried to reliably mate flat laser-cut parts at an angle, we can tell you it’s no easy feat. The design here triumphs as both simple and reliable. Not only do they solve this problem elegantly, they also manage to create a design that will bear the load of a robot chassis that will travel with it. Laser-cut designs also usually suffer from a poor range of material options. Here the actual rollers need a bit more grip than what the plywood can provide. They also solve this problem effectively as well too, relying on heat-shrink tubing to provide the traction expected from a conventional wheel.

In the video below, [Incubhacker] takes you through the step-by process of making your own come to life. We’ve certainly seen some impressive laser-cut omniwheels in the past, but we like the simplicity of design combined with the composition of parts that probably already live on our workbenches.

Continue reading “Laser-Cut Mecanum Wheel For The Budget Roboticist”

Emboss Your Own Seals With A Laser Cutter

Parchment might be a thing of the past, but for those of us who still use paper an embossed seal can give everything from your official documents to your love letters a bold new feeling of authenticity. As far as getting your own seals made, plenty of folks will settle for having a 3rd party make them a seal, but not us. [Jason] shows us just how simple it is to raster our own seals with a laser cutter.

As far as the process goes, there are no tricks outside the typical workflow for raster engraving. Here, [Jason] simply creates a positive and (mirrored) negative seal pattern for each side of the seal embosser. The pattern is set for raster engraving, and the notched outline will be vector cut. From here, he simply exports the design, and the laser handles the rest.

This hack turned out so cleanly it almost seems like it could got into professional use–and it already is! Some extra Google-fu told us that it’s actually a fairly standard technique across the embossing industry for making embossing seals. Nevertheless, we couldn’t share our excitement for just how accessible this technique can be to anyone within reach of some time on a laser cutter.

[Jason] is using Delrin as his material to capture the design, which cuts cleanly and nicely handles the stress of being squished against your legal documents a couple hundred times. We’ve had our fair share of love on these pages for this engineering plastic. If you’re looking to get a closer look at this material, have a go at our materials-to-know debrief and then get yourself equipped with some design principles so that you’re ready to throw dozens of designs at it.

It’s not the first time the crafting and hacking communities intermingle and start sharing tools. In fact, if you’ve got yourself a vinyl cutter kicking around, why not have a go at churning out a few pcb stencils?

Thanks for the tip, [Doug]!

Continue reading “Emboss Your Own Seals With A Laser Cutter”

The End Of The Candy Rainbow

About a decade ago [Windell Oskay] and [Lenore Edman] spun out of Evil Mad Scientist Laboratories to work on CandyFab, an inexpensive 3D printer that used sugar as its medium. Wondering what happened to CandyFab? It’s been nearly that long since we last wrote about their work and Maker technology has moved on; nowadays 3D printers run the gamut from very inexpensive to production ready. The CandyFab project and nascent company are now shuttered, but there is a epilogue with some interesting lessons.

The CandyFab 6000

First of all, the saga of the CandyFab series of printers (above on the same page) is worth a read. Some of what these machines were capable of is still quite impressive by modern standards. Sure your Monoprice Mini Delta may be easy to use, fully assembled, functional when you take it out of the box, and quiet. But what if you need to print something up to 8.5″ x 11″ x 17″? The CandyFab 5000 can do that. Or even a humongous 24″ x 13.5″ x 9″? The CandyFab 4000 can do it, and for a measly $37 (if you printed a solid cube exactly the size of the build volume)! Sugar may have downsides but it’s still a pretty clever medium for some uses.

CandyFab credits the rise of MakerBot coupled with the complexity of iterating from a pile of “surplus junk” (their words) to something kitable. Reading their post-mortem brings to mind familiar problems from today’s hardware world. A spike of fantastic early publicity lead to the need to handle press while rapidly iterating from the aforementioned surplus parts to a reliable and manufacturable design. Then the complexity of balancing a day job and other side projects with the prospect of CandyFab as a business. Ultimately the need for the project in the first place (accessible inexpensive 3D printers) was alleviated by the market and the project came to a graceful close.

Give the post a read, we’re sure you’ll learn something!

US Military Developing Laser Plasma Speakers

It probably won’t surprise you to know that the US military is very interested in using lasers as weapons. Directed energy weapons such as lasers have many advantages over more traditional kinetic weaponry, not least of which the fact that you don’t need to cart around ammunition for them. But somewhat surprisingly, some of the most promising laser developments have been in the field of non-lethal weaponry. While the mental image of a laser is usually a destructive one, recent demonstrations by the Joint Non-Lethal Weapons Program show lasers can do more than blow holes your target.

As reported by [Patrick Tucker] of Defense One, a radical new laser-powered sonic weapon was shown off at the “Directed Energy to DC Exhibition”. The system uses two lasers: one to generate a ball of plasma when it hits the target, and another to modulate the plasma ball in open air. The result is a variation of the classic plasma speaker demonstration, where plasma is used as a a driver for a massless speaker.

Currently the system is capable of generating a deafening crack at the target area, with a measured intensity as high as 140 dB. That’s about as loud as fireworks or a shotgun going off at close distance, and in theory is enough to drive off whoever is unlucky enough to be targeted with the beam.

In time, the researchers hope to refine their secondary modulation laser to the point that they can play audio over the plasma. This would allow the beam to be used as a directed loud speaker of sorts, which could prove useful for defensive applications. Only the target would be able to hear the audio, which could be a recording telling them they were entering a secured area. A disembodied voice telling you to turn around sounds like a extremely effective non-violent deterrent to us. The voices in our head don’t have to tell us twice.

We recently looked at the possibility of targeted sonic weapons being used in Cuba, and of course, we’ve covered many plasma speakers on Hackaday over the years. Plasma speakers have always been more or less nothing more than a fun high voltage demonstration, so to see them potentially weaponized is a crossover episode we weren’t expecting.

Continue reading “US Military Developing Laser Plasma Speakers”

Lasers, Mirrors, And Sensors Combine In An Optical Bench Game

Who would have thought you could make a game out of an optical bench? [Chris Mitchell] did, and while we were skeptical at first, his laser Light Bender game has some potential. Just watch your eyes.

The premise is simple: direct the beam of a colored laser to the correct target before time runs out. [Chris] used laser-cut acrylic for his playfield, which has nine square cutouts arranged in a grid. Red, green, and blue laser pointers line the bottom of the grid, with photosensors and RGB LEDs lining the grid on the other three sides. Play starts with a random LED lighting up in one of the three colors, acting as a target. The corresponding color laser comes on, and the player has to insert mirrors or pass-through blocks in the grid to create a path to the target. The faster you hit the CdS cell, the higher your score. It’s simple, but it looks really engaging. We can imagine all sorts of upgrades, like lighting up two different targets at once, or adding a beamsplitter block to hit two targets with the same color. Filters and polarizers could add to the optical fun too.

We like builds that are just for fun, especially when they’re well-crafted and have a slight air of danger. The balloon-busting killbots project we featured recently comes to mind.

Continue reading “Lasers, Mirrors, And Sensors Combine In An Optical Bench Game”