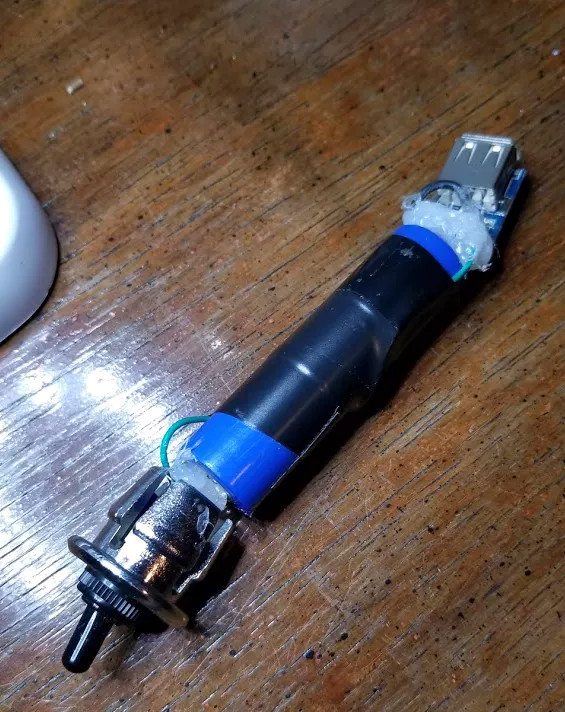
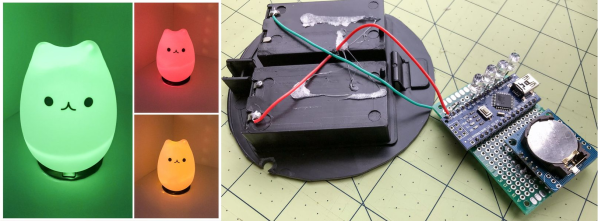
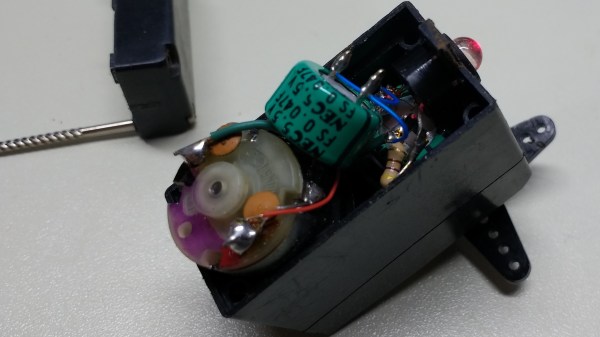
Okay, perhaps the title here is a bit of an exaggeration, but this black hole lamp made by [Will Donaldson] is an interesting approach to creating a black hole simulation without destroying the earth. This lamp uses a ring of LEDs surrounding a piece of black Lycra. A motor in the lamp base pulls the Lycra, representing the distorting effect that a singularity has on space-time. It also demonstrates how black holes can (in theory) evaporate by emitting radiation, a phenomenon called Hawking radiation. It’s a simple, but effective approach that physicists have used to demonstrate gravity for some time, using stretch fabric to simulate space-time and show how gravity warps it. It’s a two-dimensional version of a three (or more) dimensional phenomenon, but it works. And, hopefully, it won’t swallow the planet and destroy us all like the real thing might.
LED Hacks1908 Articles
Tron Inspired LED Desk Lighting
Reddit user [barbarisch] thought his computer desk was a bit boring, so he came up with a cool project to spice it up: A Tron-inspired computer desk with embedded LED strips!
[Barbarisch] took a basic desk and replaced the tops with ¾” oak plywood. The LED routes were planned out on the computer first and then marked out on the plywood. Using straightedges, [barbarisch] carefully used a router to create the straight grooves and then he created a jig for doing the circles. A bit of trimming and sanding and the three pieces of the desk match up.
After painting the desk, it was time to take a crack at the LEDs. Originally, [barbarisch] thought about 3D printing some diffusers to cover the individual WS2812B lights, but it wasn’t coming out to his liking, so diffusers have been put on the back-burner for now. Holes were drilled in the desk so that connections could be made between the different parts of the grooves and soldering was done between bits of the strips when turning corners. The whole thing’s being controlled by a Raspberry Pi and a Fadecandy USB controller for RGB strips. [Barbarisch] modified a Pi case so that the Fadecandy board would fit as well as printing out a bracket to mount the hardware under the desk.
A fun project to update that boring computer desk and to help you out, the python code which communicates with the Fadecandy server has been put up on GitHub. From the Reddit discussion, it looks like [barbarisch] might have found a solution for diffusing the LEDs! If it’s an LED desk you’re interested in, though, we’ve seen interactive LED tables and Mega LED desks before!
PCB Take On Stars, Moons, And Ringed Planets Is Gold
Remember when PCBs were green and square? That’s the easy default, but most will agree that when you’re going to show off your boards instead of hiding them in a case, it’s worth extra effort to make them beautiful. We’re in a renaissance of circuit board design and the amount of effort being poured into great looking boards is incredible. The good news is that this project proves you don’t have to go nuts to achieve great results. This stars, moons, and planets badge looks superb using just two technical tricks: exposed (plated) copper and non-rectangular board outline.
Don’t take that the wrong way, there’s still a lot of creativity that [Steve] over at Big Mess o’ Wires used to make it look this great. The key element here is that copper and solder mask placements have extremely fine pitch. After placing the LEDs and resistors there’s a lot of blank space which was filled with what you might see in the night sky through your telescope. What caught our eye about this badge is the fidelity of the ringed planet.
The white ink of silk screen is often spotty and jagged at the edges. But this copper with ENIG (gold) plating is crisp through the curves and with razor-sharp tolerance. It’s shown here taken under 10x magnification and still holds up. This is a trick to keep under your belt — if you have ground pours it’s easy to spice up the look of your boards just by adding negative-space art in the solder mask!
[Steve] mentions the board outline is technically not a circle but “a many-sided polygon” due to quirks of Eagle. You could have fooled us! We do like how he carried the circle’s edges through the bulk of the board using silk screen. If you’re looking for tips on board outline and using multiple layers of art in Eagle, [Brian Benchoff] published a fabulous How to do PCB art in Eagle article. Of course, he’s gone deeper than what the board houses offer by grabbing his own pad printing equipment and adding color to white solder mask.
The art was the jumping off point for featuring this badge, but [Steve] is known for his technical dives and this one is no different. He’s done a great job of recounting everything that popped up while designing the circuit, from LED color choice to coin cell internal resistance and PWM to low-power AVR tricks.
Is It On Yet? Sensing The World Around Us, Starting With Light
Arduino 101 is getting an LED to flash. From there you have a world of options for control, from MOSFETs to relays, solenoids and motors, all kinds of outputs. Here, we’re going to take a quick look at some inputs. While working on a recent project, I realized the variety of options in sensing something as simple as whether a light is on or off. This is a fundamental task for any system that reacts to the world; maybe a sensor that detects when the washer has finished and sends a text message, or an automated chicken coop that opens and closes with the sun, or a beam break that notifies when a sister has entered your sacred space. These are some of the tools you might use to sense light around you.
Continue reading “Is It On Yet? Sensing The World Around Us, Starting With Light”
Teardown: LED Bulb Yields Tiny UPS
Occasionally you run across a product that you just know is simply too good to be true. You might not know why, but you’ve got a hunch that what the bombastic phrasing on the package is telling you just doesn’t quite align with reality. That’s the feeling I got recently when I spotted the “LED intellibulb Battery Backup” bulb by Feit Electric. For around $12 USD at Home Depot, the box promises the purchaser will “Never be in the dark again”, and that the bulb will continue to work normally for up to 3.5 hours when the power is out. If I could repurpose that to make a tiny UPS for a microcontroller project of my own, it could be even more useful.
Now an LED light bulb with a battery in the base isn’t exactly rocket science, we can understand the product conceptually at a glance. But as they say, the devil is in the details. The box claims the bulb consumes 8.5 watts, but a battery with enough capacity to run such a load for 3.5 hours would be far too large to fit inside of a light bulb. Obviously there’s more to the story.
On the side of the box, in the smallest font used on the whole package, we get our clue. The bulb drops down to 200 lumens when in battery backup mode, or roughly as bright as a cheap LED flashlight. Now things are starting to come together. Without even opening the device, we can be fairly sure it will contain two separate arrays of LEDs: one low set for battery, and a brighter set to run when the bulb has AC power.
Still, I tend to be of the opinion that anything less than $20 or so is worth cracking open to see what makes it tick. Even if the product itself is underwhelming, there’s a chance the internal components could be useful or interesting. With that in mind, let’s see what’s inside a battery backup light bulb, and what we might be able to do with it.
Building A POV Display On A PC Fan
We’ve covered plenty of persistence of vision (POV) displays before, but this one from [Vadim] is rather fun: it’s built on top of a PC fan. He’s participating in a robot building competition soon and wanted to have a POV display. So, why not kill two birds with one stone and build the display onto a fan that could also be used for ventilation?
The display is a stand-alone module that includes a battery, Neopixels, Arduino and an NRF240L01 radio that receives the images to be displayed. That might seem like overkill, but putting the whole thing on a platform that rotates does get around the common issue of powering and sending signals to a rotating display: there is no need for slip connections.
[Vadim] goes into a good level of detail on how he built the display, including the problems he had diagnosing a faulty LED chip, and why it is important to test at each stage as it is easier to debug when the display isn’t whizzing around at high speed.
It’s a bit of a rough build that uses more protoboard than might be necessary, but we’re keeping our fingers crossed that it doesn’t fly off during the competition.
Low-Resolution Display Provides High-Nostalgia Animations
High-definition displays are the de facto standard today, and we’ve come to expect displays that show every pore, blemish, and bead of sweat on everything from phones to stadium-sized Jumbotrons. Despite this, low-resolution displays continue to have a nostalgic charm all their own.
Take this 32 x 16 display, dubbed PixelTimes, for instance. [Dominic Buchstaller] has gone a step beyond his previous PixelTime, a minimalist weather clock and home hub built around the same P10 RGB matrix. The previous build was a little involved, though, with a nice wood frame that took some time and skill to create.
Building your own version of PixelTimes is really approachable. The case is mostly 3D-printed, and the acrylic parts [Dominic] laser cut could just as easily be cut with a saw. And that P10 board can be source for peanuts direct from Chine. The software for the project has been upgraded since the original version, supporting flicker-free animations. Everything runs on a NodeMCU, and there are even scripts to convert your favorite GIF to an animation. Oh, and it still displays the weather too.
This looks great and seems like a lot of fun, and [Dominic] kindly provides all the files you’ll need to build your own. It shouldn’t take more than an hour to build once you’ve got all the parts.


